You know that sweet, enticing smell that draws you into a local panaderia? That's what always got me as a kid whenever I passed by our neighborhood bakery. Among the rows of pan de coco and ensaymada, there was always this humble treat that caught my eye - pilipit.
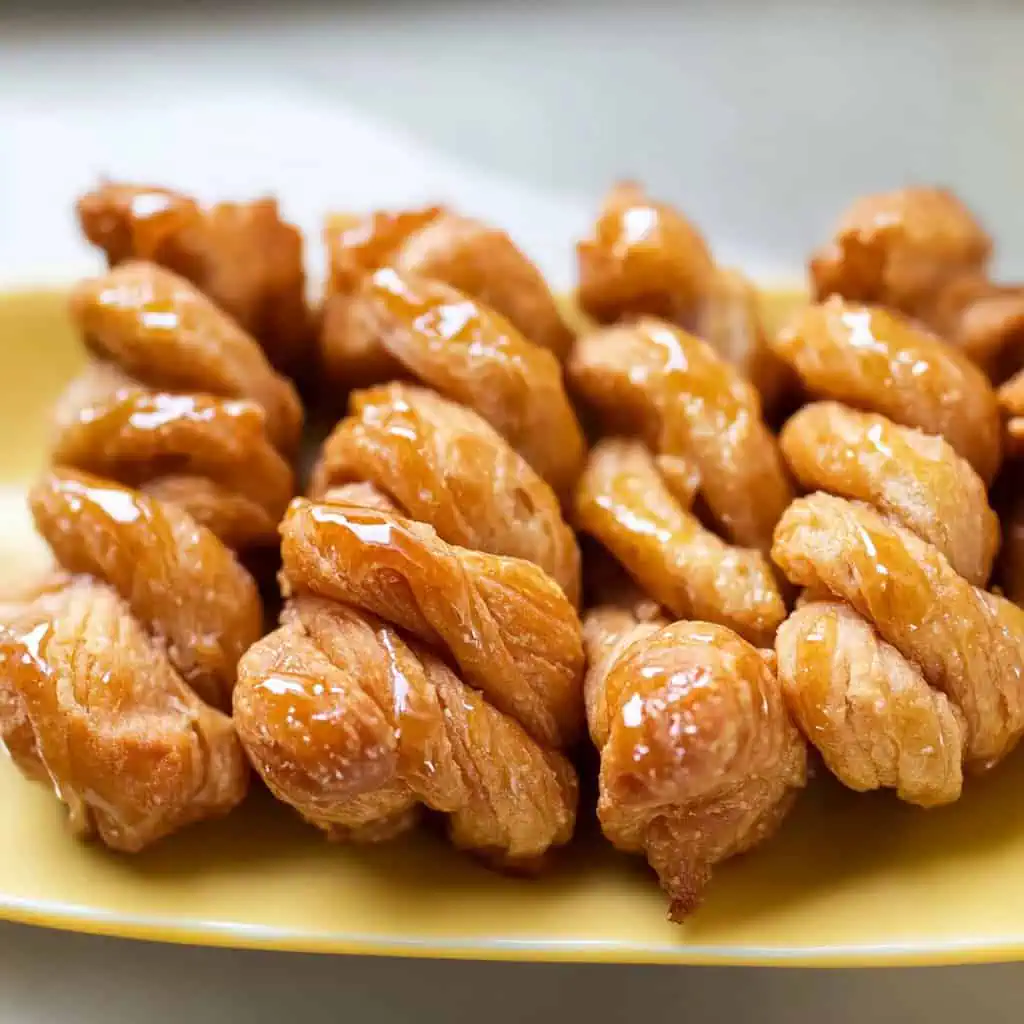
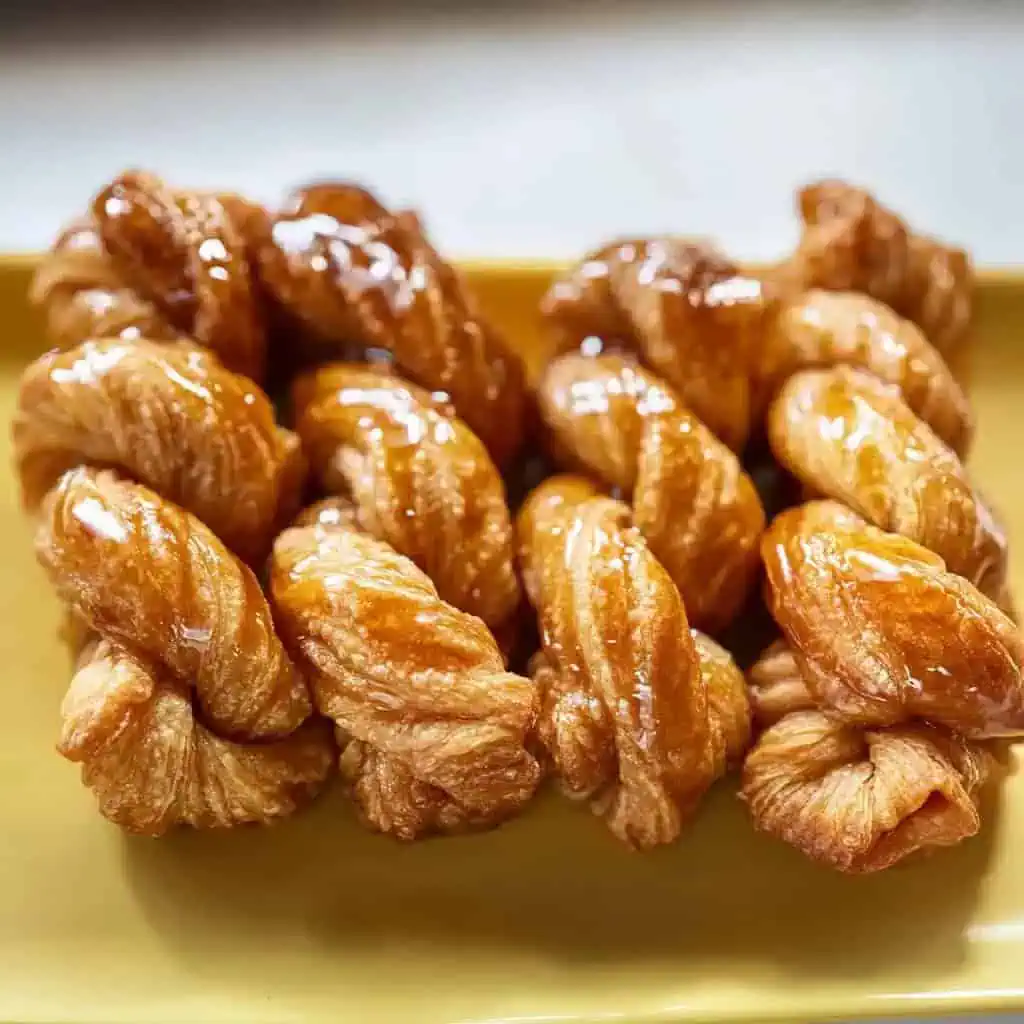
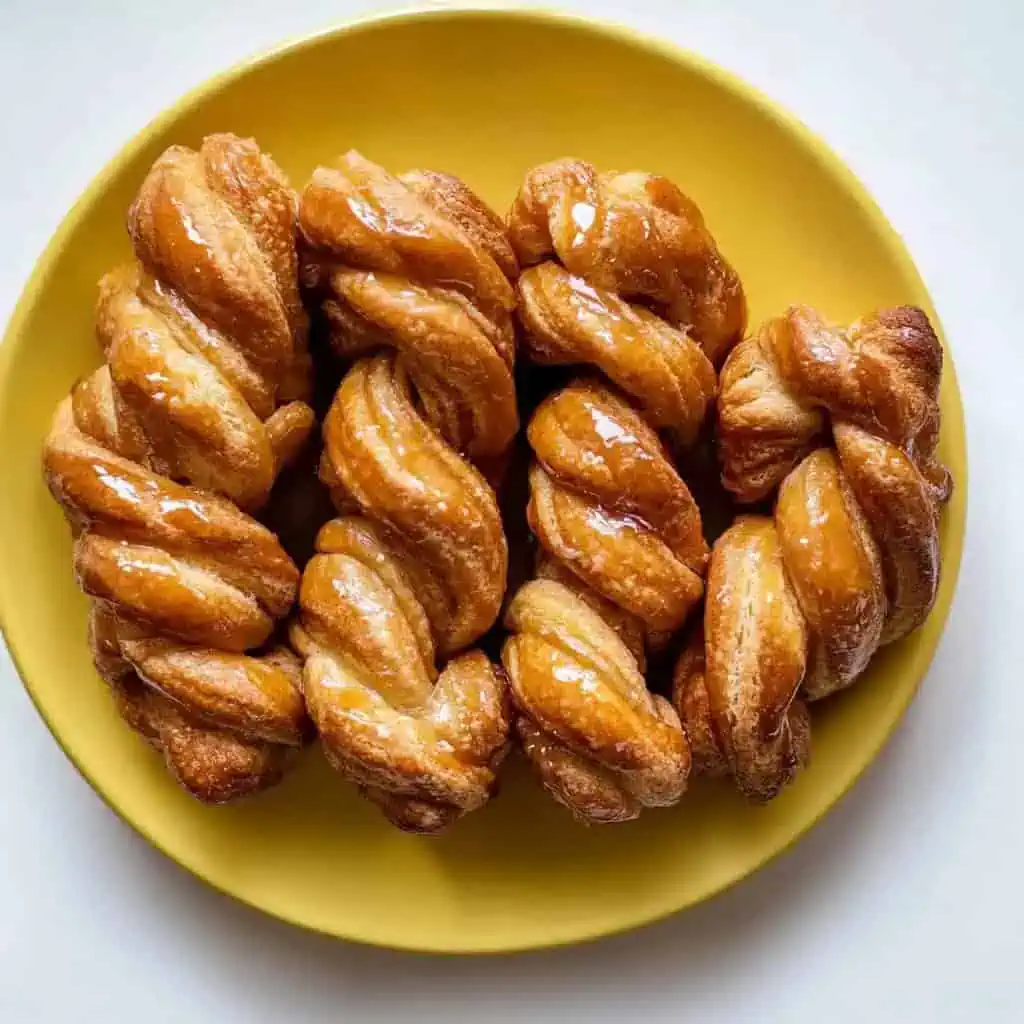
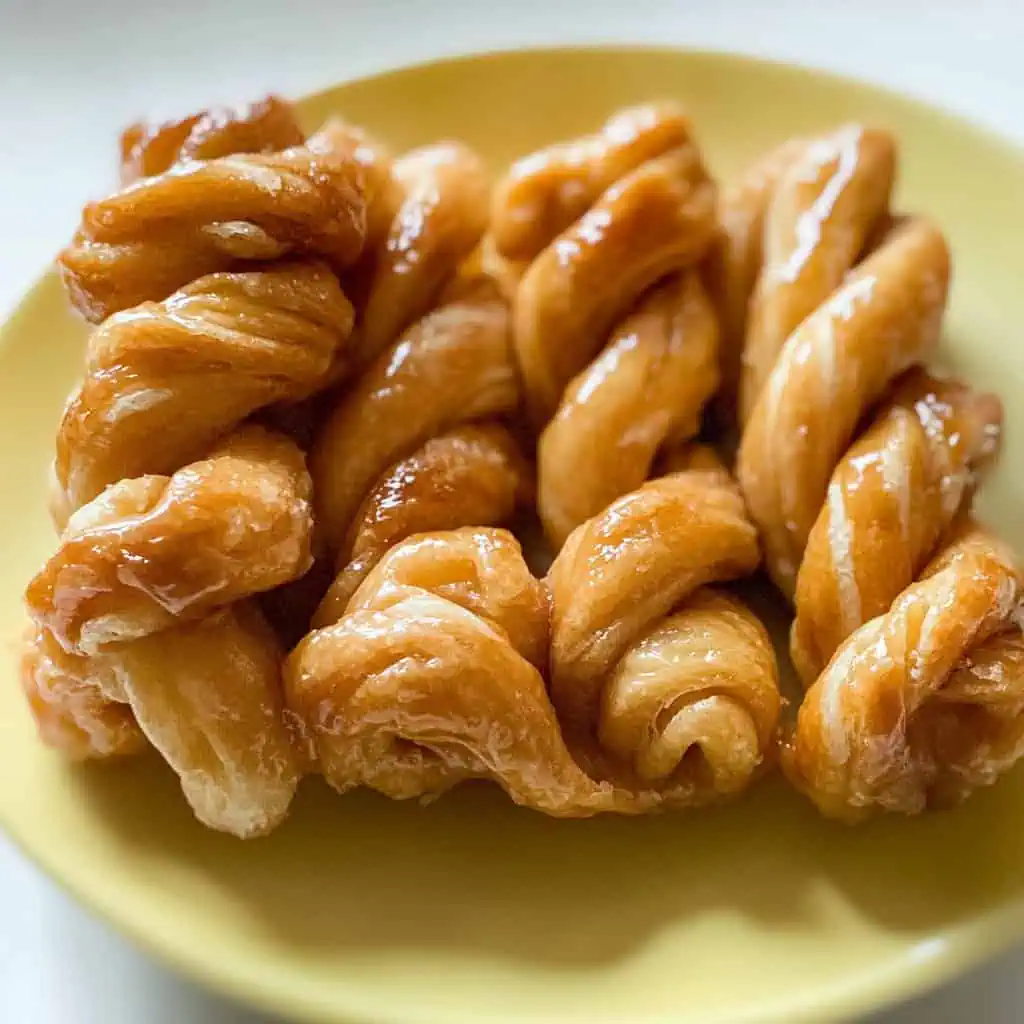
These twisted, sugar-glazed pastries would sit there in neat rows, their golden-brown coils glistening under the bakery lights. For just a few pesos, you'd get this perfectly crispy, sweet snack.
Back then, the manong baker would wrap them in brown paper, and you could feel the warmth of the freshly fried pieces through the package. While those bakery trips are now precious memories, making pilipit at home brings back all that nostalgia, plus your kitchen ends up smelling just like those cherished childhood panaderia visits.
This homemade version stays perfectly crispy, and you can make them as sweet (or not) as you like.
Cultural Background
Pilipit comes from the Tagalog word "pilipit" (twisted). This beloved Filipino snack is also known as Pinisi or Linubid in some regions, derived from "lubid" or "pisi" (rope) due to its twisted rope-like appearance. Similar versions exist across Southeast Asia and even in South Africa, where it's known as "Twisted Sisters."
Jump to:
Why You'll Love This Recipe
- Authentic Filipino taste passed down through generations
- Perfectly crispy exterior with a light, airy interior
- Simple ingredients you likely already have
- Versatile - can be enjoyed for merienda (afternoon snack) or dessert
- Make-ahead friendly - stays crispy for days
- Kid-friendly snack perfect for baon (packed lunch)
- Great project for family bonding
Ingredients
The ingredients for Filipino Pilipit are simple yet purposeful. All-purpose flour forms the base for its signature texture - crisp outside, light inside. Salt enhances flavor while baking powder provides just enough lift without making it too cakey.
Evaporated milk adds richness and helps achieve that golden color when fried, while egg acts as a binder that gives the dough strength to hold its twisted shape. The simple sugar glaze creates that characteristic sweet finish that makes Pilipit instantly recognizable in Filipino bakeries.
These few ingredients come together to create a pastry that's both economical to make and memorably delicious.
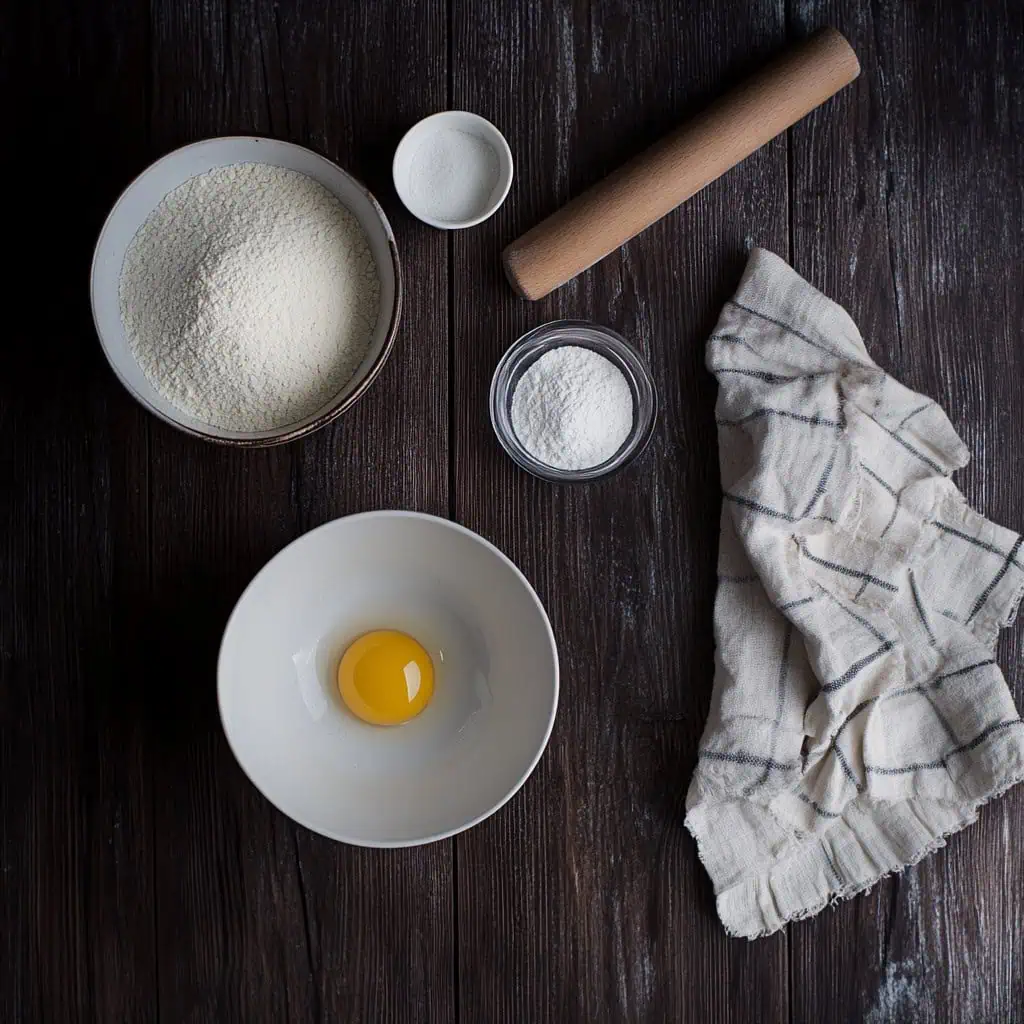
- 2 cups all-purpose flour
- ½ teaspoon salt
- ¼ teaspoon baking powder
- ½ cup evaporated milk
- 1 large egg, lightly beaten
- Oil for deep frying
- 1 cup powdered sugar
- ½ cup water
Equipment
- Large mixing bowl - For combining and kneading the dough ingredients thoroughly
- Sifter - Ensures smooth, lump-free flour for better texture
- Rolling Pin - For flattening the dough to consistent thickness
- Sharp knife or pizza cutter - Creates even strips for uniform cooking
- Deep heavy-bottomed pot or wok - Provides stable heat for deep frying
- Candy/oil thermometer - Ensures precise oil temperature for perfect cooking
- Spider strainer - Safely removes pastries from hot oil
- Wire rack - Allows excess oil to drain and pastries to cool properly
- Small saucepan - For making the sugar glaze
- Kitchen scale (optional) - Helps with precise measurements
How To Make
- Sift 2 cups of all-purpose flour, ½ teaspoon salt, and ¼ teaspoon baking powder together in a large bowl. In a separate bowl, mix ½ cup evaporated milk with one lightly beaten egg until well combined.
- Pour the milk and egg mixture slowly into the flour mixture. Mix everything together, then knead with your hands until you get a smooth dough, about 5-7 minutes. Shape the dough into a ball, place it back in the bowl, and cover with a damp kitchen towel. Let it rest for 15 minutes at room temperature.
- After resting, take the dough out and cut it in half. Take one half and roll it out into an 8-inch wide rectangle. Cut this into half-inch wide strips. Roll each strip between your palms to make it a bit thinner. Join the ends of each strip and twist it to make a rope-like shape. Place the twisted pieces on a lightly floured surface. Do the same with the other half of the dough. Let all your twisted pieces rest for another 20-30 minutes.
- While waiting, heat oil in a deep pot or wok to 180°C (350°F). Once the oil is hot, carefully drop the twisted dough pieces in batches. Fry them until they turn golden brown, about 2-3 minutes. Take them out with a strainer and place on a wire rack to drain excess oil.
- For the sugar glaze, combine 1 cup powdered sugar and ½ cup water in a small pot. Cook over medium heat, stirring until the sugar completely dissolves. Dip each fried pilipit in the warm glaze, making sure it's well coated. Place them back on the wire rack to let the glaze set.
- Let the pilipit cool completely before serving. They taste best with hot coffee or tea.

Tips from Lola's Kitchen
- Rest the dough twice - The initial 15-minute rest and the 20-30 minute rest after shaping are crucial for developing gluten, resulting in the perfect chewy texture.
- Use a damp cloth when resting the dough - This prevents the surface from drying out and forming a skin.
- Maintain consistent oil temperature - Keep the oil at 180°C (350°F). Too hot, and the outside will brown before the inside cooks; too cool, and the pilipit will absorb excess oil.
- Twist properly - Twist the dough firmly but not too tight as it needs some room to expand while frying.
- Fry in small batches - Overcrowding the pot will lower the oil temperature and result in soggy pilipit.
- Glaze while warm - The warm pilipit will absorb the glaze better, creating a more even coating.
- Cool completely - Always let the pilipit cool completely before storing to maintain crispiness.
Substitutions
- Evaporated milk: Use fresh milk mixed with 1 tablespoon of melted butter.
- All-purpose flour: Substitute with cake flour for a lighter texture.
- Plain sugar glaze: Add vanilla or pandan extract for flavor variation.
- Powdered sugar glaze: Use a cinnamon sugar coating instead for a different flavor profile.
- Traditional dough: For a chewier version, replace all-purpose flour with glutinous rice flour.
Troubleshooting
- Pilipit is too hard: Your dough might be overworked or fried at too high a temperature. Knead just until smooth and maintain proper oil temperature.
- Pilipit unravels while frying: The twist wasn't secure enough. Press the ends firmly together and make tighter twists.
- Glaze crystallizes: Your sugar mixture might be too thick or cooled too much. Keep the glaze warm and maintain the proper sugar-to-water ratio.
- Dough is too sticky: The liquid-to-flour ratio might be off. Add flour gradually while kneading until manageable.
- Pilipit absorbs too much oil: The oil temperature is likely too low. Use a thermometer to maintain 180°C (350°F).
Storage & Reheating
- Room temperature: Store in an airtight container at room temperature for up to 5 days.
- Freezing: Can be frozen unglazed for up to 3 months. Thaw at room temperature.
- Reheating: To restore crispiness, reheat in oven at 150°C/300°F for 3-5 minutes.
- Avoid refrigeration: This causes moisture buildup and makes the pastry soggy.
- Storage timing: Always cool completely before storing to prevent condensation.
FAQ
Why did my pilipit become soggy quickly?
This usually happens when stored while still warm or if the container isn't airtight. Always cool completely before storing and use a container with a tight seal.
Can I make the dough ahead of time?
Yes, you can refrigerate the dough for up to 24 hours. Bring it to room temperature before shaping.
How do I know when the oil is ready without a thermometer?
Drop a small piece of dough into the oil - it should rise to the surface with bubbles and turn golden in about 60 seconds.
Can I use an air fryer?
Yes, cook at 180°C/350°F for 5-7 minutes, turning halfway. Results will be less traditional but healthier with less oil.
Why are my pilipit not as crispy as bakery ones?
Bakeries often use bread flour which has higher protein content. You can substitute some of your all-purpose flour with bread flour for a crispier result.
How can I make my glaze less runny?
Use less water or add more powdered sugar. The perfect consistency should coat the back of a spoon.
Can I add flavor to the dough?
Absolutely! Vanilla, pandan, or ube extract work wonderfully. Start with ½ teaspoon and adjust to taste.
What's the cultural significance of pilipit?
Pilipit is a traditional Filipino snack with variations found across the country. It's a beloved merienda (afternoon snack) that showcases Filipino ingenuity in transforming simple ingredients into something extraordinary.
Can I make mini versions for parties?
Yes! Simply cut the dough into thinner strips and make smaller twists. Reduce the frying time slightly to prevent burning.
What's the best drink to serve with pilipit?
Traditionally, pilipit is served with hot coffee (kapeng barako), hot chocolate (tsokolate), or sago't gulaman for a truly Filipino experience.
Related
Looking for other recipes like this? Try these:


Filipino Pilipit (Traditional Twisted Sugar Pastry)
Equipment
- Large mixing bowl (mangkok) for mixing the dough
- Sifter (Salaan) ensures smooth, lump-free flour
- Rolling Pin for flattening the dough
- Sharp knife or pizza cutter for cutting even strips
- Deep heavy-bottomed pot or wok (Kawali) for deep frying
- Candy/oil thermometer for precise oil temperature
- Spider strainer (sandok) for removing pastries from oil
- Wire rack (Parilya) for draining and cooling
- Small saucepan for making the sugar glaze
- Kitchen scale (optional) for precise measurements
Ingredients
For the Dough
- 2 cups all-purpose flour Harina
- ½ teaspoon salt Asin
- ¼ teaspoon baking powder Pampaalsa
- ½ cup evaporated milk Gatas na Evaporada
- 1 large egg lightly beaten (Itlog)
- Oil for deep frying Mantika
For the Sugar Glaze
- 1 cup powdered sugar Asukal
- ½ cup water Tubig
Instructions
- Start by sifting 2 cups of all-purpose flour, ½ teaspoon salt, and ¼ teaspoon baking powder together in a large bowl. In a separate bowl, mix ½ cup evaporated milk with one lightly beaten egg until well combined.
- Pour the milk and egg mixture slowly into the flour mixture. Mix everything together, then knead with your hands until you get a smooth dough, about 5-7 minutes. Shape the dough into a ball, place it back in the bowl, and cover with a damp kitchen towel. Let it rest for 15 minutes at room temperature.
- After resting, take the dough out and cut it in half. Take one half and roll it out into an 8-inch wide rectangle. Cut this into half-inch wide strips. Roll each strip between your palms to make it a bit thinner. Join the ends of each strip and twist it to make a rope-like shape. Place the twisted pieces on a lightly floured surface. Do the same with the other half of the dough. Let all your twisted pieces rest for another 20-30 minutes.
- While waiting, heat oil in a deep pot or wok to 180°C (350°F). Once the oil is hot, carefully drop the twisted dough pieces in batches. Fry them until they turn golden brown, about 2-3 minutes. Take them out with a strainer and place on a wire rack to drain excess oil.
- For the sugar glaze, combine 1 cup powdered sugar and ½ cup water in a small pot. Cook over medium heat, stirring until the sugar completely dissolves. Dip each fried pilipit in the warm glaze, making sure it's well coated. Place them back on the wire rack to let the glaze set.
- Let the pilipit cool completely before serving. They taste best with hot coffee or tea and will stay crispy for several days when stored in an airtight container at room temperature.
Tips from Lola's Kitchen
- Rest the dough twice - this develops gluten for the perfect chewy texture
- Don't skip the damp cloth when resting - prevents dough from drying
- Maintain oil temperature at 180°C - too hot browns outside before inside cooks
- Twist dough firmly but not too tight - allows for expansion during frying
- Use powdered sugar for smoother glaze
- Let cool completely before storing to maintain crispiness
Nutrition
The Story Behind Filipino Pilipit
Like many beloved Filipino merienda treats, Pilipit's story is woven into the fabric of our local panaderias and home kitchens. This twisted delight, whose name literally means "twisted" in Tagalog, showcases the Filipino talent for transforming simple ingredients into something extraordinary. While its exact origins remain pleasantly mysterious, food historians believe it emerged during the Spanish colonial period when European baking techniques merged with local Filipino ingenuity.
In different regions of the Philippines, you'll hear it called by various names - Pinisi or Linubid in some areas, coming from the words "pisi" and "lubid" meaning rope, a playful reference to its twisted appearance. What's fascinating is how this humble snack has cultural cousins across Southeast Asia, and surprisingly, as far as South Africa where a similar treat is known as "Twisted Sisters." This speaks to the universal appeal of fried, sweet dough and the shared culinary connections that span continents.
What makes Pilipit truly special is its versatility. The traditional version made with all-purpose flour offers that satisfying crunch that's become a hallmark of Filipino afternoon snacking. But venture into different provinces, and you might encounter its softer cousin made with rice flour, showing how Filipino cooks adapt recipes to local ingredients and preferences. In some regions, it's enjoyed plain; in others, it's lavishly coated with syrup or dusted with powdered sugar.
Today, while many Filipino treats have been modernized or forgotten, Pilipit remains a steadfast favorite in local bakeries and home kitchens. It's more than just a snack - it's a testament to Filipino culinary creativity, where simple flour, eggs, and sugar transform into a treat that's kept generations coming back for more. Whether enjoyed with traditional kapeng barako, hot chocolate, or as a standalone snack, Pilipit continues to twist its way into the hearts of food lovers, one golden, crispy coil at a time.
Each bite of Pilipit tells a story of Filipino craftsmanship - from the careful kneading of the dough to the precise twisting that gives it its signature shape. It's a reminder that sometimes the simplest recipes carry the richest histories, connecting us to generations of Filipino bakers who perfected this beloved merienda staple.

Comments
No Comments