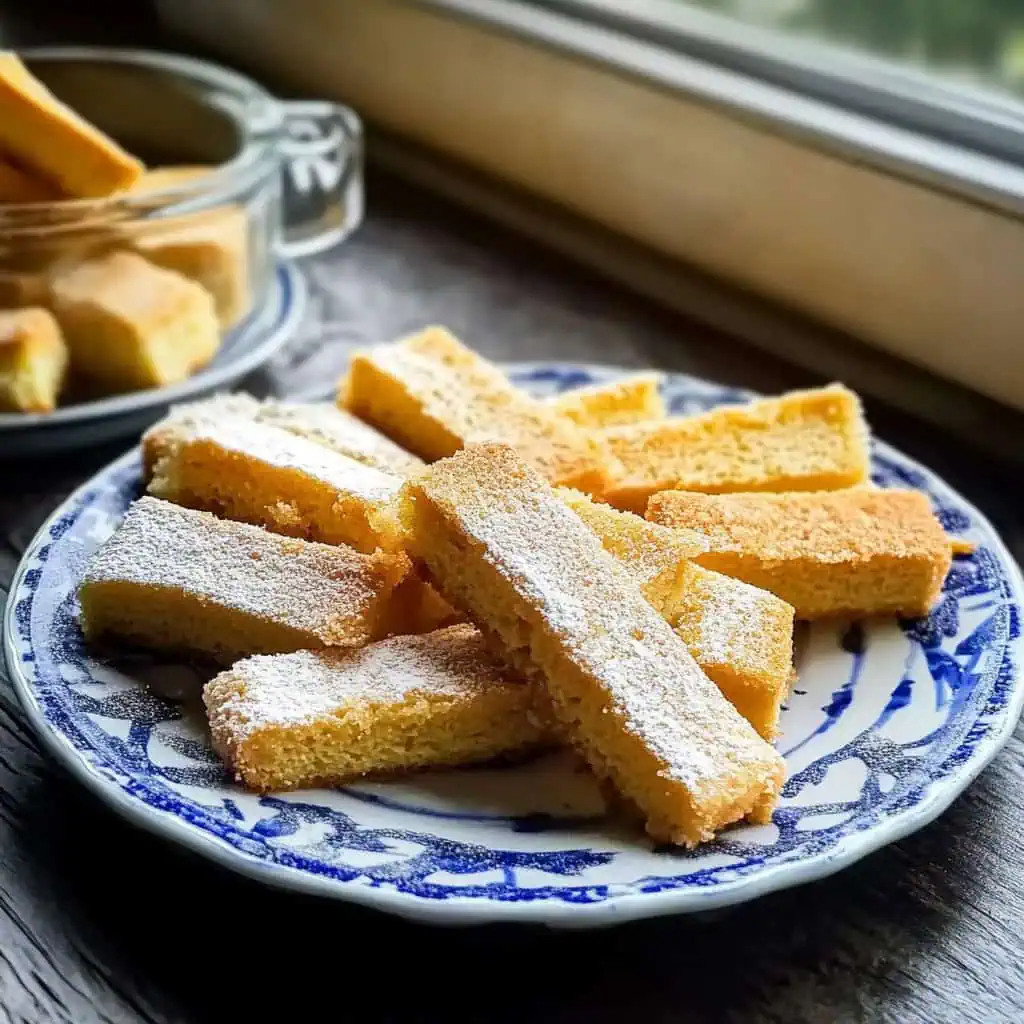
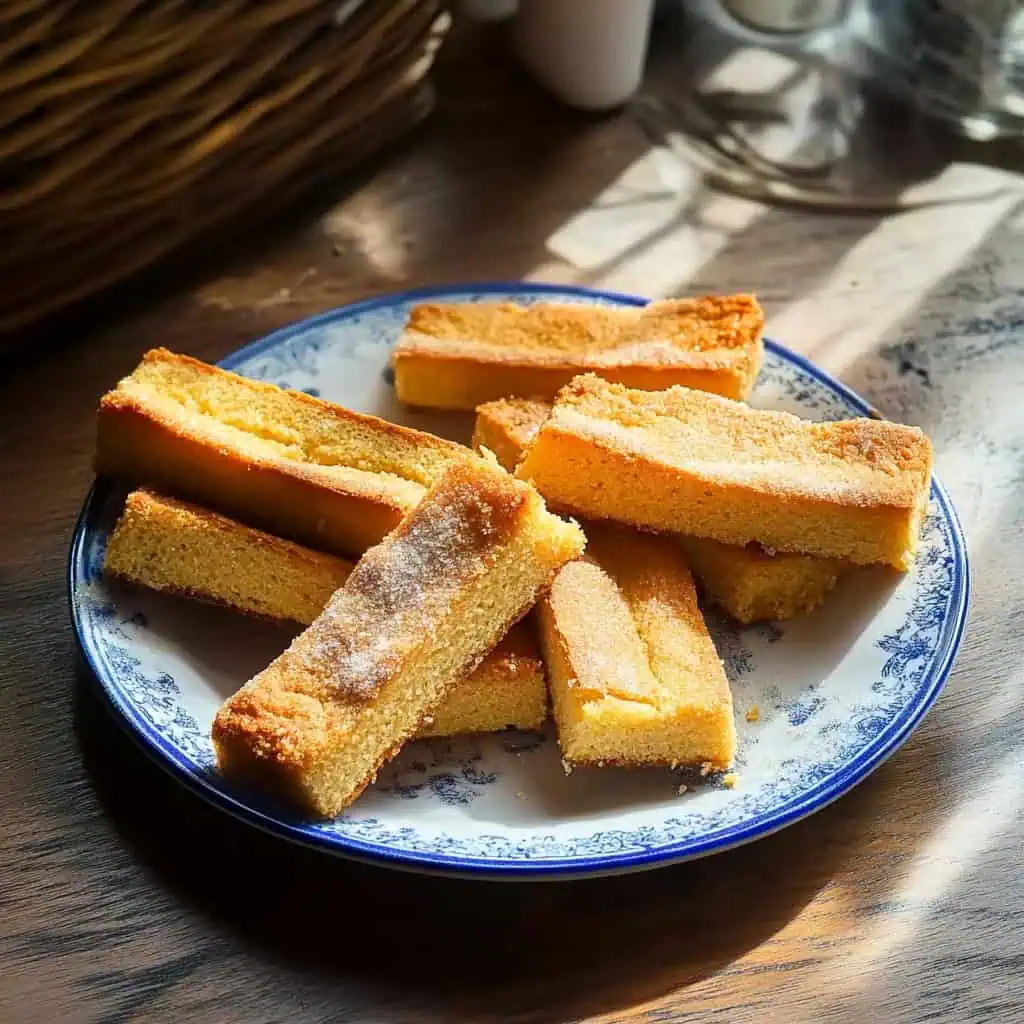
Remember when you dunk a crispy biscocho in your steaming cup of coffee, and it soaks up just enough without falling apart? That's what we're making today.
This twice-baked Filipino treat is basically a genius way of transforming regular sponge cake into these addictively crunchy, buttery slices that were made for coffee dunking. I learned this trick from a fellow Filipino food lover: you don't even need to make the cake from scratch. Just grab a store-bought sponge cake.
The trick is in the slow baking, which gives you that satisfying crunch that holds up perfectly when you dip it in your morning brew. Some like a quick dip to keep the crunch, others (like my Lola) let it soak until it's almost falling apart. There's no wrong way to enjoy it.
Jump to:
Why You'll Love This Recipe
- Quick and simple 4-step process using store-bought cake
- Perfectly crispy texture that's ideal for dunking in coffee
- Nostalgic Filipino snack that brings back memories of local bakeries
- Customizable sweetness levels
- Makes great gifts for family and friends
- Budget-friendly with minimal ingredients
Ingredients
These three simple ingredients create magic when combined. The sponge cake provides the perfect light, airy structure that can absorb butter without becoming soggy.
Butter adds rich flavor and helps create that signature golden-brown crust when baked slowly. White sugar not only adds sweetness but also creates that distinctive crackly exterior texture when caramelized in the oven.
Together, they transform ordinary cake into a crispy, flavorful treat that's sturdy enough for coffee dunking yet delicate enough to melt in your mouth.
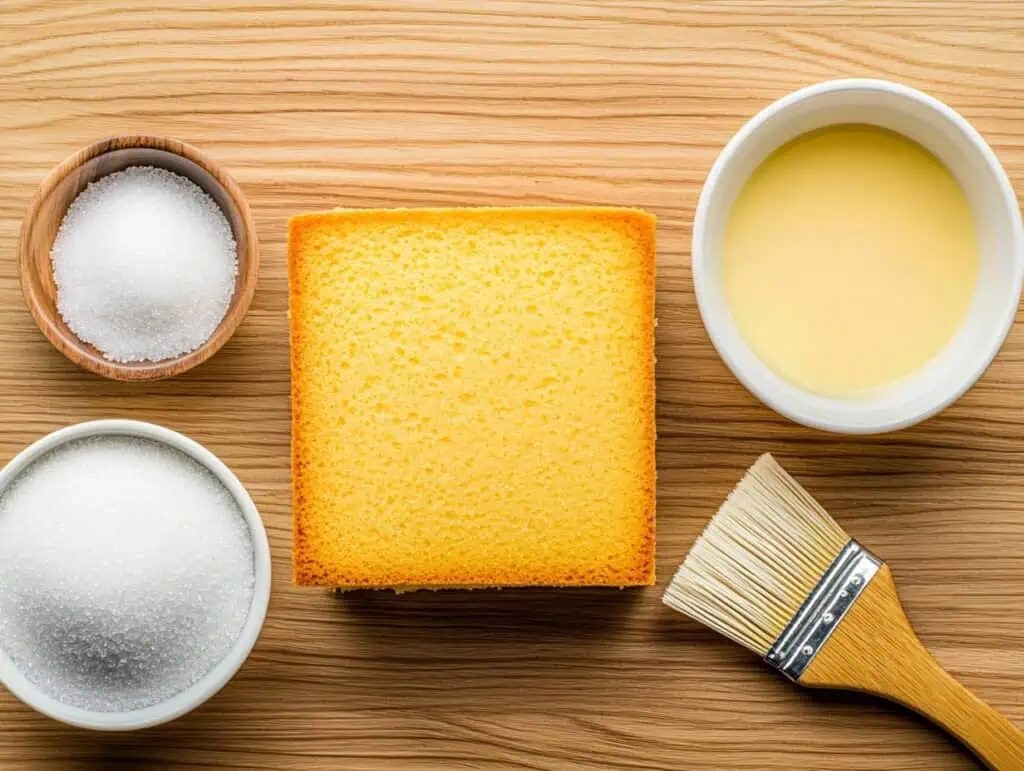
- 1 store-bought sponge cake (8 in × 8 in or 22 cm × 22 cm)
- ½ cup melted butter
- ¼ cup white sugar
Equipment
- Large baking sheet - For arranging cake slices with proper spacing for even baking
- Parchment paper - Creates a non-stick surface and helps with even browning
- Pastry brush - Essential for evenly coating butter on each slice without soaking
- Sharp serrated knife - Allows for clean, precise cuts without crushing the cake
- Wire cooling rack - Ensures proper air circulation for achieving optimal crispiness
- Measuring cups and spoons - For accurate measurements of ingredients
- Small microwave-safe bowl - For melting and reheating butter as needed
How To Make
- Preheat your oven to 120°C (250°F). Take your store-bought sponge cake and slice it into ½-inch thick pieces using a serrated knife. Line a baking sheet with parchment paper and arrange the cake slices, leaving small gaps between each piece for air circulation.
- Melt your butter in a small bowl. Using a pastry brush, generously coat each slice of cake with the melted butter. Sprinkle white sugar evenly over the buttered surfaces, making sure each piece is well covered.
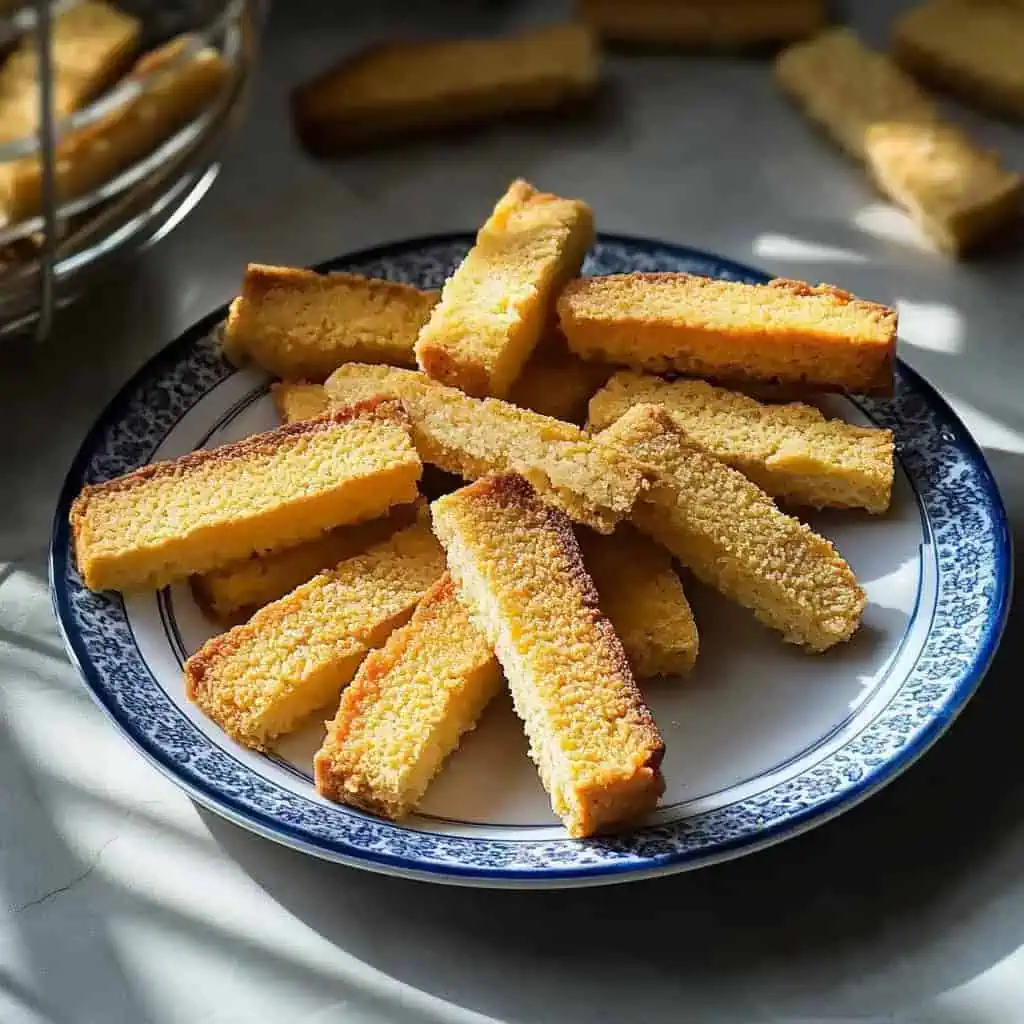
- Place the baking sheet in the preheated oven and bake for 1 hour. Halfway through baking, rotate the pan to ensure even browning. The biscocho is done when the pieces are golden brown and crispy.
- Remove from the oven and let the pieces cool on the baking sheet for 5 minutes. Then transfer them to a wire rack to cool completely - they will continue to crisp up as they cool. Once fully cooled, serve with hot coffee or store in an airtight container.

Tips from Lola's Kitchen
- Use day-old cake for cleaner slicing and better butter absorption
- Never skip the cooling step - it's crucial for developing the perfect texture
- Watch the oven temperature carefully - low and slow is key for even crisping without burning
- If butter starts to solidify while brushing, warm it slightly in the microwave for 5-10 seconds
- The thicker you slice the cake, the longer it will take to crisp completely
- Rotate your baking sheet midway through baking for even browning
- Listen for the crunch - properly baked biscocho should make a satisfying sound when broken
- Add toppings like sugar while still warm for better adherence
Substitutions
- Cake base: While traditional sponge cake works best, you can also use chiffon cake, butter cake, or even Filipino tasty bread
- Butter: Margarine can be substituted, though real butter provides the best flavor and crispness
- White sugar: Try brown sugar or muscovado for a deeper caramel flavor profile
- Sugar-free option: Use appropriate sugar substitutes but adjust quantities as they have different sweetness levels
- Flavored butters: Infuse your butter with vanilla, cinnamon, or other extracts for unique variations
Troubleshooting
- Biscocho not crispy enough? Return to the oven for an additional 10-15 minutes at 110°C
- Too brown or burning? Lower temperature to 100°C and extend baking time
- Slices crumbling when cut? Make sure to slice when completely cool and use a sharp serrated knife
- Not sweet enough? Sprinkle additional sugar while still warm from the oven
- Butter not absorbing properly? Make sure butter is warm (not hot) and apply in thin, even layers
- Uneven browning? Ensure proper spacing between slices and rotate the pan during baking
Storage & Reheating
- Room temperature: Store in an airtight container up to 2 weeks
- Freezer storage: Can be frozen for up to 3 months in a sealed container
- Recrisping: To restore crunchiness, heat in oven at 120°C for 5-10 minutes
- Avoid refrigeration as it can introduce moisture and make biscocho soggy
- Use silica gel packets in storage containers in humid climates to maintain crispness
- Layer with parchment paper when storing to prevent sticking

FAQ
Why is my biscocho not getting crispy enough?
Ensure your oven temperature is accurate (use an oven thermometer if possible) and bake until golden brown. Proper cooling is essential for crispiness to develop fully.
Can I make this with homemade cake?
Absolutely! Just ensure it's completely cooled and slightly dried out. Freshly baked cake that's too moist won't crisp up properly.
How long does biscocho last?
When stored properly in an airtight container at room temperature, biscocho can last up to 2 weeks. In humid environments, consume within a week for best quality.
Can I reduce the sugar?
Yes, you can adjust to taste, but some sugar is needed for the characteristic crunch. Reduce by no more than half for best results.
Is biscocho supposed to be hard?
Yes, properly made biscocho should be crunchy and firm enough to dunk in coffee without immediately falling apart. The texture should be like a firm biscotti.
Why is my biscocho not browning evenly?
This could be due to hot spots in your oven or uneven butter application. Rotate the pan during baking and ensure even coating of butter on all slices.
Can I use other sweeteners like honey?
Liquid sweeteners like honey can make it difficult to achieve the right crispness. Stick with granulated sweeteners for best results.
What's the difference between biscocho and biscotti?
While both are twice-baked, biscocho starts with prepared cake while biscotti begins as a dough. Biscocho typically has a lighter, airier crunch compared to denser biscotti.
Related
Looking for other recipes like this? Try these:


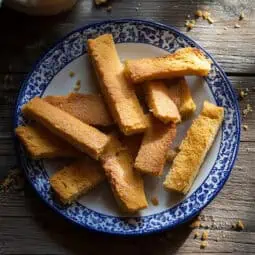
Filipino Biscocho (Biskotso)
Equipment
- Large baking sheet For arranging the cake slices
- Pastry brush For evenly coating butter
- Sharp serrated knife (kutsilyo na may ngipin) or clean, precise cuts
- Wire cooling rack (parilya ng pagpapalamig) For proper cooling and crispiness
- Measuring cups and spoons (Panukat) For accurate measurements
Ingredients
- 1 pc 8 in x 8 in sponge cake 22 cm x 22 cm store-bought sponge cake base
- ½ cup melted butter tinunaw na mantikilya
- ¼ cup white sugar puting asukal
Instructions
- Preheat your oven to 120°C (250°F). Take your store-bought sponge cake and slice it into ½-inch thick pieces using a serrated knife. Line a baking sheet with parchment paper and arrange the cake slices on it, leaving small gaps between each piece.
- Melt your butter in a small bowl. Using a pastry brush, generously coat each slice of cake with the melted butter. Sprinkle white sugar evenly over the buttered surfaces, making sure each piece is well covered.
- Place the baking sheet in the preheated oven and bake for 1 hour. Halfway through baking, rotate the pan to ensure even browning. The biscocho is done when the pieces are golden brown and crispy.
- Remove from the oven and let the pieces cool on the baking sheet for 5 minutes. Then transfer them to a wire rack to cool completely - they will continue to crisp up as they cool. Once fully cooled, serve with hot coffee or store in an airtight container for up to 2 weeks.
- For best results, use day-old cake as it slices more cleanly and absorbs the butter better. If your biscocho isn't crispy enough after cooling, you can return it to the oven for an additional 10-15 minutes at 110°C. And remember, the butter should be warm but not hot when brushing onto the cake slices.
Tips from Lola's Kitchen
- Use day-old cake for better slicing and absorption
- Don't skip the cooling step - it's crucial for the perfect texture
- If butter starts to solidify while brushing, warm it slightly
- Watch carefully during the last 15 minutes to prevent burning
- Store leftover melted butter for your next batch
Nutrition
The Story Behind Filipino Biscocho
The humble biscocho holds a special place in Filipino culinary heritage, weaving together colonial influence with local innovation. While its name derives from the Spanish bizcocho, the Filipino version tells a unique story of adaptation and creativity in local bakeries across the archipelago.
In the Spanish colonial era, Filipino bakers transformed the original Spanish bizcocho, a type of sponge cake, into something distinctly their own. Rather than stopping at the cake stage, they took an extra step by slicing, buttering, sugaring, and baking it again until crisp. This twice-baking method, born perhaps from both necessity and ingenuity, created a treat that perfectly suited the Filipino merienda (snack time) culture and the tropical climate, as the crispy texture helped the treats last longer in humidity.
Historically, biscocho became a staple in Filipino bakeries, particularly in regions like Iloilo, where it earned special renown. Local panaderias (bakeries) would repurpose day-old bread and cakes into these crunchy delights, showcasing the Filipino value of resourcefulness. The practice spread throughout the Philippines, with each region developing its own slight variations – some adding a touch of cinnamon, others incorporating local flavors like ube or cheese.
Today, biscocho remains a beloved pasalubong (homecoming gift) and a quintessential partner to morning coffee or afternoon tsokolate (hot chocolate). What makes it particularly special is its role in Filipino coffee culture, where the act of dunking biscocho in coffee has become a cherished ritual in homes and local cafes alike. This simple yet satisfying treat bridges generations, with recipes passed down from lolas (grandmothers) to their families, each adding their own special touch while maintaining the core tradition of that perfect, coffee-worthy crunch.
The beauty of biscocho lies not just in its taste, but in its accessibility. Whether crafted in small-town bakeries or made at home from store-bought cake, it represents the Filipino talent for transforming simple ingredients into something extraordinary. It's a testament to the ingenuity of Filipino bakers who created a unique snack that has stood the test of time, continuing to bring joy to coffee breaks and family gatherings across generations.

Comments
No Comments