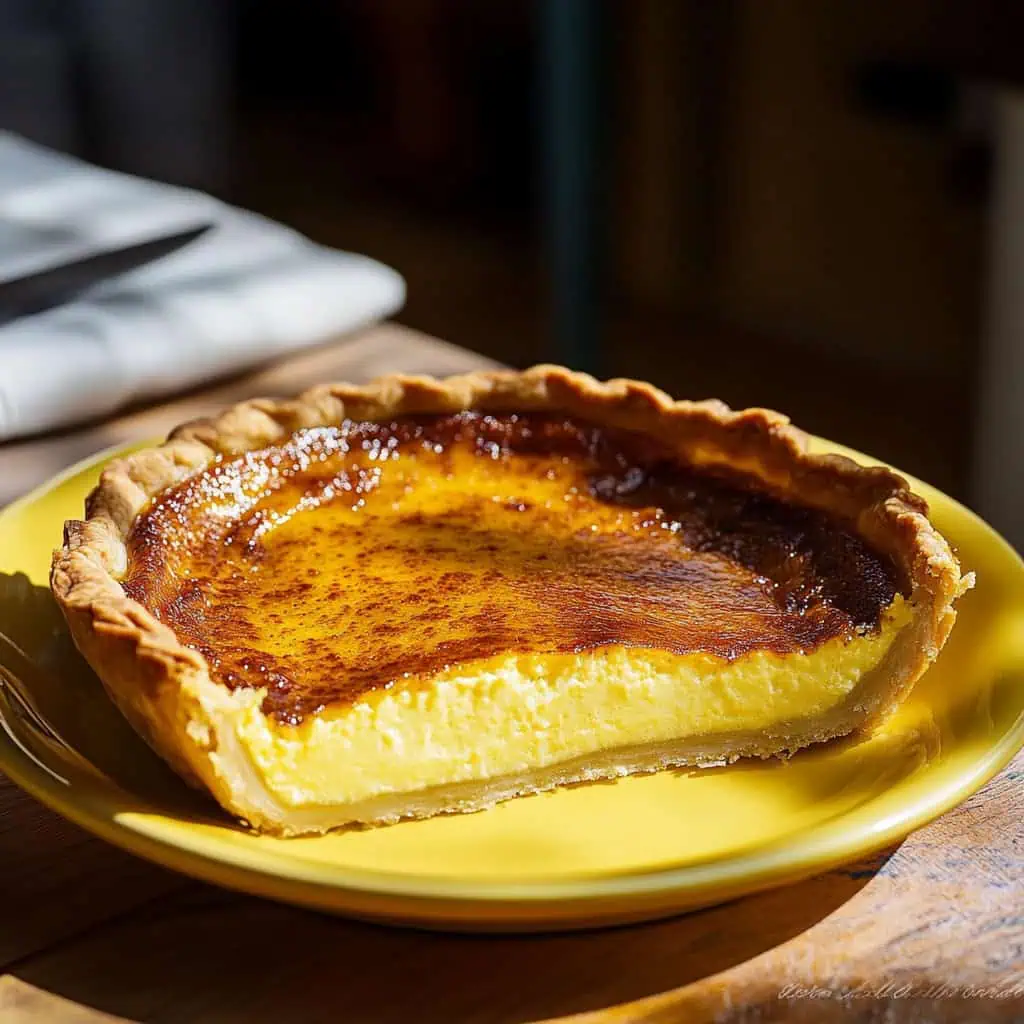
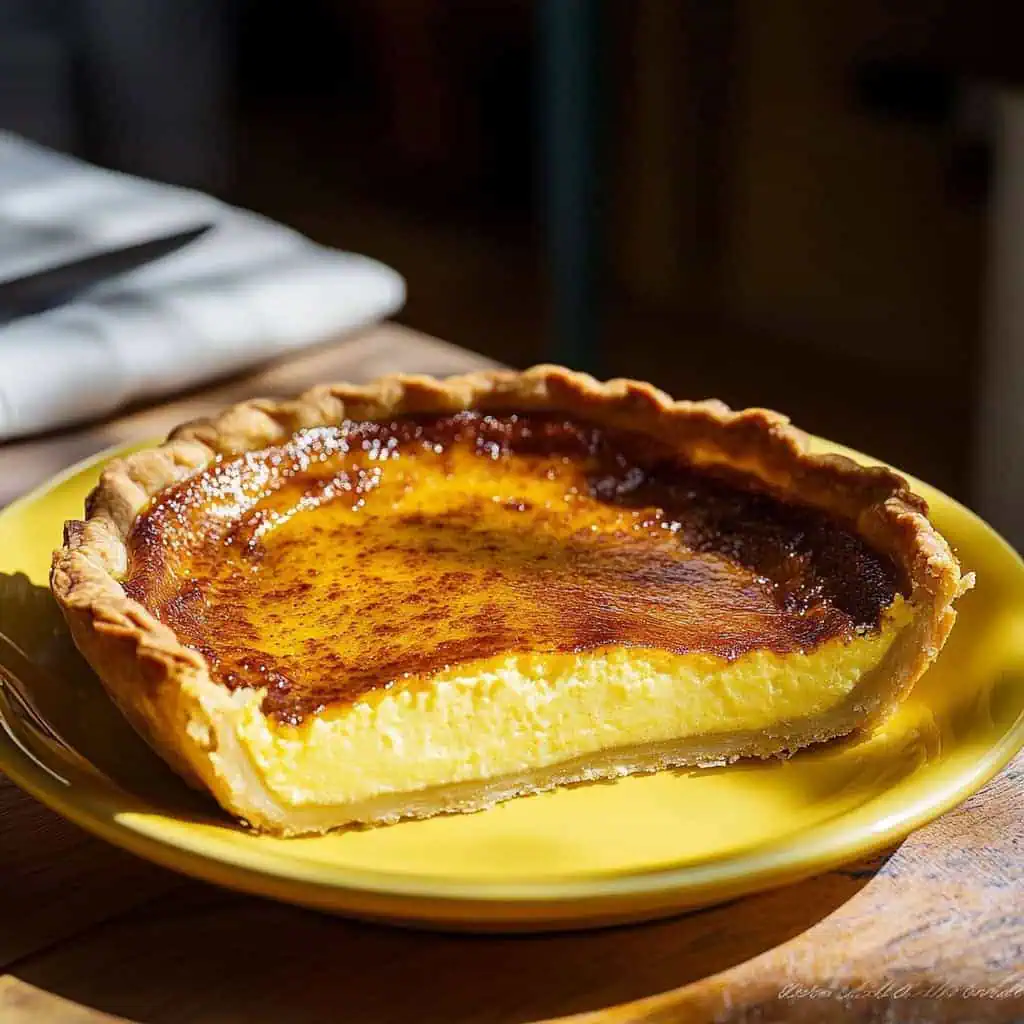
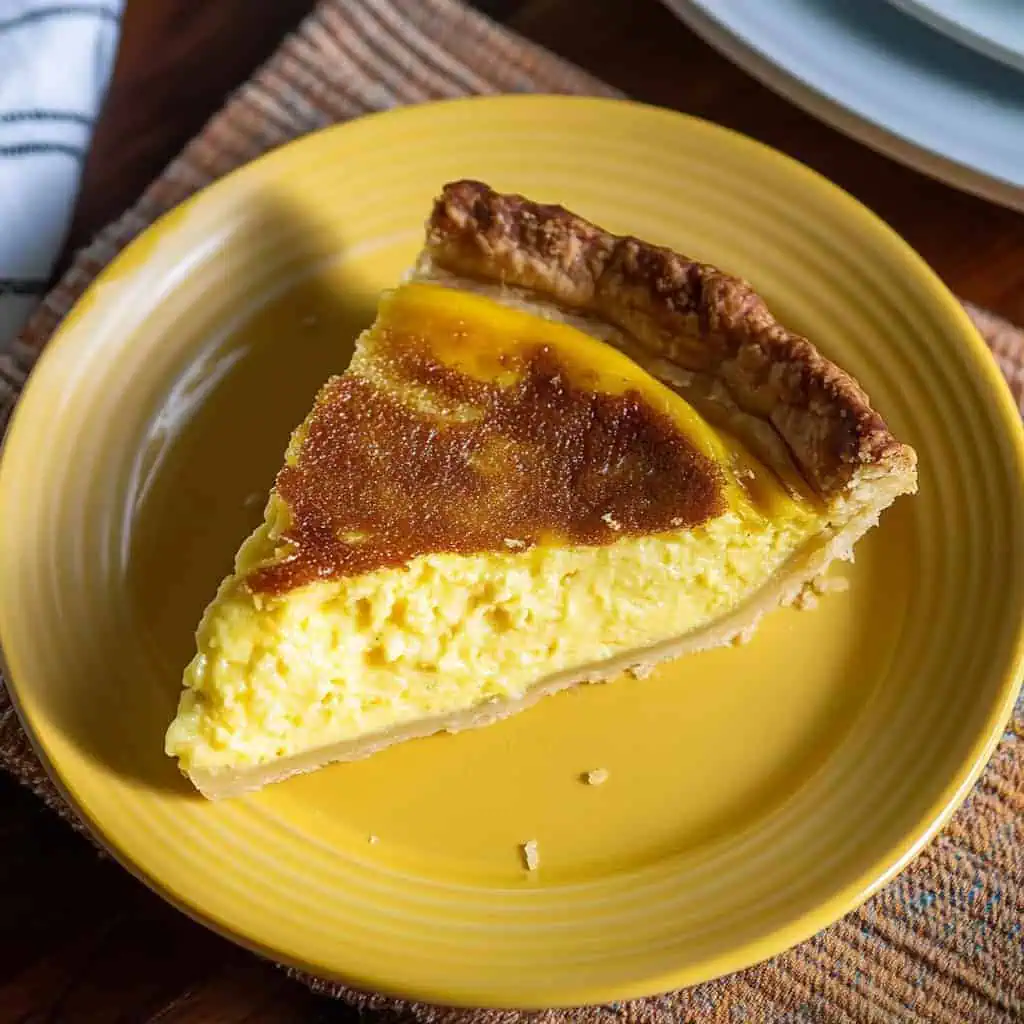
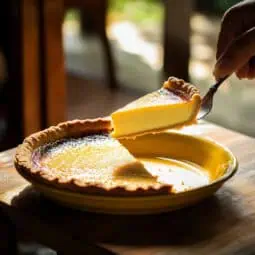
Let me tell you about my Lola's egg pie recipe. Growing up in Pilar, Bataan, I remember walking past neighborhood panaderias, instantly recognizing that sweet, vanilla-rich aroma of freshly baked egg pies. But nothing could beat watching my grandmother make this treasured Filipino dessert in our tiny kitchen - the way she'd carefully fold the egg whites into the filling (her secret to that signature golden-brown top), and how she'd hum old kundiman songs while waiting for the pie to bake.
Today, every time I make this egg pie, using her exact recipe with its perfectly flaky crust and silky-smooth custard filling, my own kids gather around the kitchen counter just like I used to, waiting for that first warm slice. It's amazing how this simple combination of everyday ingredients - eggs, milk, and butter - can create something so magical that it brings Filipino families together, whether for merienda time or special celebrations.
This foolproof Filipino egg pie recipe captures the authentic taste of old Manila bakeries, but is surprisingly easy to make at home. With just a few pantry staples and some patient mixing (no fancy techniques needed), you'll create a perfectly creamy custard nestled in a buttery crust. I've made this countless times, and I promise - this recipe never disappoints.
Historical Note
Egg pie became popular in the Philippines during the American colonial period, combining European pastry techniques with local flavors. It's now a beloved staple in Filipino bakeries nationwide.
Jump to:
Why You'll Love This Recipe
- Perfect balance of sweet and creamy flavors
- Simple ingredients you likely already have
- Versatile for merienda (afternoon snack) or dessert
- Can be made ahead for gatherings
- Authentic Filipino bakery taste at home
- Budget-friendly family favorite
- Customizable to your sweetness preference
Ingredients
This recipe uses a carefully selected blend of simple but powerful ingredients. The combination of evaporated and condensed milk creates that signature silky texture while providing balanced sweetness without being overpowering.
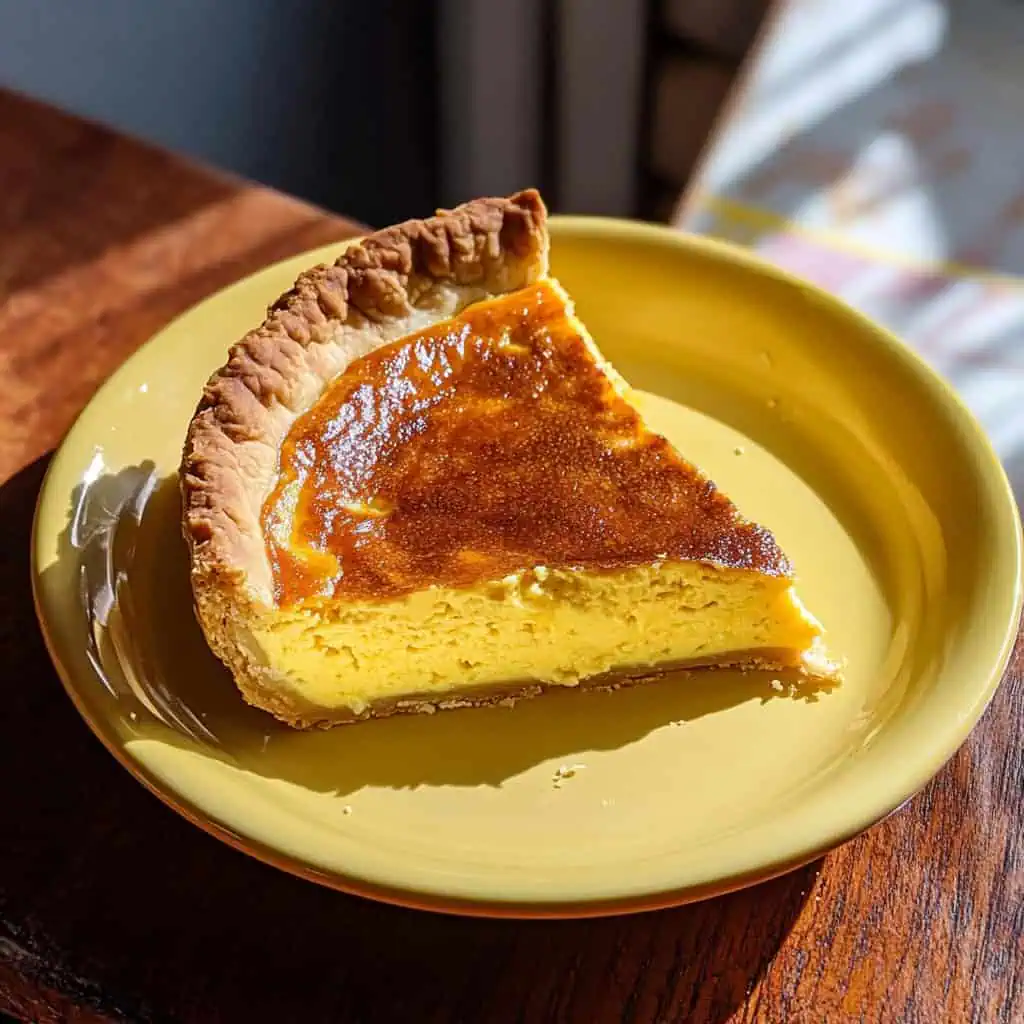
Fresh eggs give structure and richness to the custard, while the separated egg white creates that distinctive golden-brown top that Filipino egg pies are famous for. A hint of kalamansi juice adds subtle brightness that cuts through the richness, and the homemade butter crust provides the perfect crisp contrast to the creamy filling.
These everyday ingredients work together to create something truly special - a dessert that's both humble and extraordinary.
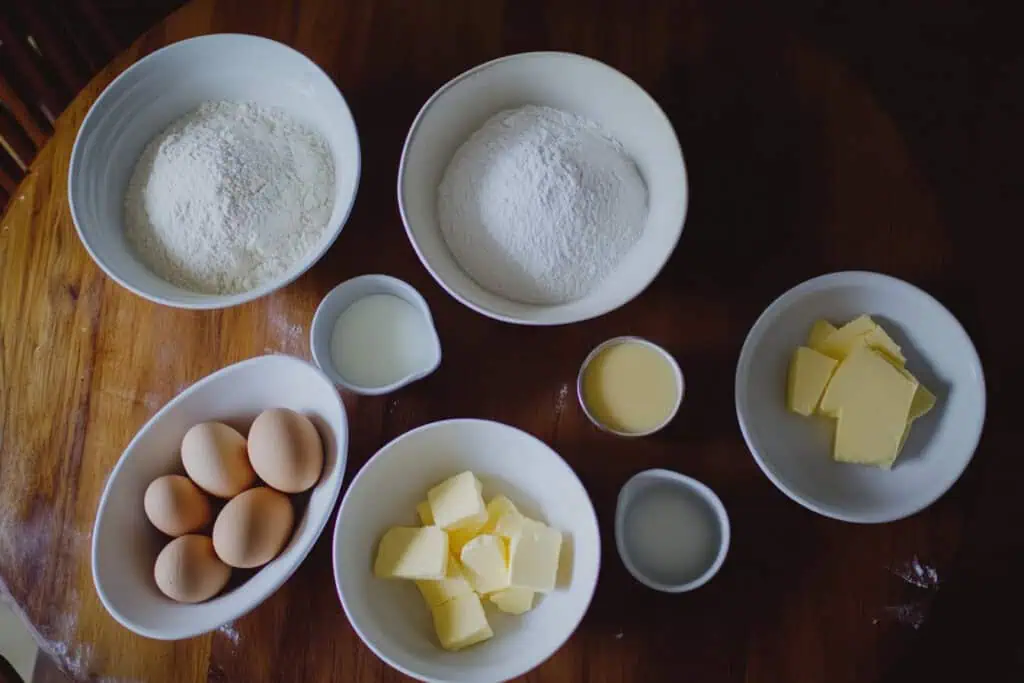
For the Crust:
- 2 cups all-purpose flour
- 3 tablespoons sugar
- ½ teaspoon salt
- ¾ cup unsalted butter, cut into cubes and softened
- ¼ cup cold water
For the Filling:
- 1 cup evaporated milk
- 4 large eggs + 1 large egg separated
- 1 teaspoon vanilla extract
- 1 teaspoon kalamansi or lemon juice
- 1 can (14oz) condensed milk
Equipment Needed
- 9-inch pie pan or round baking pan: The perfect size for this recipe, ensuring the filling cooks evenly.
- Electric mixer (hand or stand): Essential for achieving perfect dough texture and properly beating egg whites.
- Rolling pin: Helps flatten the pie crust evenly for a professional look.
- Kitchen shears: Perfect for trimming excess dough from the pie edges.
- Mixing bowls: At least 3 different sizes needed for separate mixing steps.
- Measuring cups and spoons: Ensures precise ingredient portions for consistent results.
- Whisk: For thoroughly combining the filling ingredients.
- Spatula: Used for folding in egg whites and scraping down bowl sides.
- Toothpicks: To test doneness of the custard filling.
- Cooling rack: Allows air to circulate under the pie for proper cooling.
How To Make
- Mix flour, sugar, and salt in a large bowl. Add softened butter cubes and combine with an electric mixer until the mixture looks like wet sand. Slowly pour in cold water while mixing until the dough comes together but isn't sticky. Shape into a ball, wrap in plastic, and chill in the refrigerator for 30 minutes.
- While the dough chills, warm the evaporated milk in the microwave for 1 minute until slightly warm (about 45°C/113°F). In a large bowl, whisk together 4 whole eggs and 1 egg yolk until well combined. Gradually pour in the condensed milk while whisking. Add vanilla extract and kalamansi juice, then mix in the warm evaporated milk until smooth. In a separate bowl, beat the remaining egg white until soft peaks form - when you lift the whisk, the peaks should gently fold over. Gently fold this beaten white into your main mixture using a sweeping motion, not stirring.
- Preheat your oven to 350°F (175°C). Take out your chilled dough and roll it on a floured surface until it's about ½ centimeter thick and large enough to cover your 9-inch pie pan. Lift the dough carefully and place it in the pan, pressing gently into the corners. Trim the edges leaving a ½ inch overhang, then pinch or press with a fork to create a decorative edge. Pour your filling mixture into the crust.
- Bake at 350°F (175°C) for 15 minutes, then lower the temperature to 325°F (163°C) and continue baking for 40-45 minutes. You'll know it's done when a toothpick inserted in the center comes out clean and the pie still has a slight jiggle. The top should be a beautiful golden brown. Let the pie cool completely at room temperature for at least an hour before slicing. During cooling, keep it away from drafts to prevent cracking.

Tips from Lola's Kitchen
- Room Temperature Ingredients: Always use room temperature eggs for better incorporation into the filling mixture.
- The Perfect Crust: Don't overmix the crust dough – it will become tough if overworked. Mix just until combined.
- Double Chill Method: For the flakiest crust, chill it twice: once after forming the dough, and again after shaping in the pan.
- Warm Milk Secret: Heating evaporated milk slightly creates a smoother, more velvety custard.
- Steam Trick: Create steam in the oven by placing a shallow pan of water on the bottom rack during baking for a more even bake.
- Protect the Edges: If the crust edges are browning too quickly, cover them with foil strips.
- Patient Cooling: Let the pie cool completely for the cleanest slices – rushing this step can cause the filling to collapse.
- Smooth Finish: For an ultra-smooth custard, strain the filling mixture through a fine sieve before pouring into the crust.
Substitutions
- Evaporated Milk: Can be replaced with a mixture of equal parts heavy cream and whole milk.
- Kalamansi: Substitute with lemon juice, lime juice, or calamondin if unavailable.
- All-purpose Flour: Pastry flour can be used for a softer, more tender crust texture.
- Butter: While butter provides the best flavor, margarine can work in a pinch.
- Vanilla Extract: Vanilla powder or scraped vanilla bean can be used for a more intense flavor.
- Condensed Milk: For less sweetness, use ¾ cup condensed milk and ¼ cup evaporated milk with 3 tablespoons sugar.
Troubleshooting
Crust Problems:
- Too Tough: You likely overworked the dough. Next time, mix just until combined and handle as little as possible.
- Shrinking Crust: The dough didn't rest enough. Ensure proper chilling time before baking.
- Soggy Bottom: For extra insurance against a soggy crust, blind bake for 10 minutes with pie weights before adding filling.
Filling Issues:
- Cracks on Top: Most often caused by overbaking or cooling too quickly. Reduce baking time slightly and cool in a draft-free area.
- Filling Not Setting: Your oven temperature may be too low or the pie is underbaked. Check your oven with a thermometer and extend baking time if needed.
- Weeping/Watery Filling: This happens from overbaking or incorporating too much air into the egg whites. Beat egg whites just to soft peaks.
- Not Browning: Make sure to fold in the beaten egg white properly, as this creates the signature brown top.
Storage & Reheating
- Room Temperature: Safe for up to 2 days in an airtight container.
- Refrigerator: Will keep up to 5 days covered with plastic wrap or in an airtight container.
- Freezer: Can be frozen for up to 2 months if well-wrapped in plastic and foil. Thaw overnight in the refrigerator.
Reheating Options:
- For best flavor, allow refrigerated pie to come to room temperature (about 30 minutes).
- To serve warm, heat in a 250°F (121°C) oven for 10 minutes.
- Individual slices can be warmed for 15-20 seconds in the microwave on 50% power.
FAQ
Why did my filling crack?
Cracks usually form from overbaking or cooling too quickly. Try reducing baking time slightly and cooling gradually away from drafts.
Can I make this ahead of time?
Yes! The pie can be made 1-2 days ahead and stored in the refrigerator. Let it come to room temperature before serving for the best texture and flavor.
Why isn't my top browning like in the photos?
The beaten egg white creates the signature brown top. Make sure to beat to soft peaks and gently fold into the filling. Also check that your oven is properly preheated.
Can I use a store-bought pie crust?
Yes, though homemade crust provides the best texture and flavor. If using store-bought, choose an unsweetened variety and follow the package instructions for blind baking.
How do I know when the pie is done?
Insert a toothpick in the center - it should come out clean. The pie should still have a slight jiggle but not be liquid. The top should be golden brown.
Can I reduce the sweetness?
Yes, you can use less condensed milk and substitute with more evaporated milk plus a little sugar to taste.
Why did my crust shrink during baking?
Crust shrinkage happens when the dough isn't properly rested. Make sure to chill the dough for at least 30 minutes before rolling and again after placing in the pan.
Can I use this recipe to make mini egg pies?
Absolutely! Divide the dough and filling among small tart pans or muffin tins. Reduce baking time to 20-25 minutes total.
Related
Looking for other recipes like this? Try these:


Classic Filipino Egg Pie
Equipment
- 9-inch pie pan or round baking pan Alternative: Disposable aluminum pie pan
- Electric mixer (hand or stand) For achieving perfect dough texture and beating egg whites
- Rolling Pin For flattening the pie crust evenly
- Kitchen shears (gunting pang kusina) For trimming excess dough
- Mixing bowls (mangkok) At least 3 different sizes for separate mixing steps
- Measuring cups and spoons (Panukat) For precise ingredients portions
- Whisk (wire whisk o panghalo)
- Spatula (pang-scrape)
- Toothpicks (for testing doneness)
- Cooling rack (optional)
Ingredients
For the Crust
- 2 cups all-purpose flour harina
- 3 tablespoons sugar asukal
- ½ teaspoon salt asin
- ¾ cup unsalted butter cut into cubes and softened (mantikilya)
- ¼ cup cold water malamig na tubig
For the Filling
- 1 cup evaporated milk evaporada
- 4 large eggs + 1 large egg separated (itlog)
- 1 teaspoon vanilla extract vanilla
- 1 teaspoon kalamansi or lemon juice
- 1 can 14oz condensed milk kondensada
Instructions
- Mix flour, sugar, and salt in a large bowl. Add softened butter cubes and combine with an electric mixer until the mixture looks like wet sand. Slowly pour in cold water while mixing until the dough comes together but isn't sticky. Shape into a ball, wrap in plastic, and chill in the refrigerator for 30 minutes.
- While the dough chills, warm the evaporated milk in the microwave for 1 minute until slightly warm (about 45°C/113°F). In a large bowl, whisk together 4 whole eggs and 1 egg yolk until well combined. Gradually pour in the condensed milk while whisking. Add vanilla extract and kalamansi juice, then mix in the warm evaporated milk until smooth. In a separate bowl, beat the remaining egg white until soft peaks form - when you lift the whisk, the peaks should gently fold over. Gently fold this beaten white into your main mixture using a sweeping motion, not stirring.
- Preheat your oven to 350°F (175°C). Take out your chilled dough and roll it on a floured surface until it's about ½ centimeter thick and large enough to cover your 9-inch pie pan. Lift the dough carefully and place it in the pan, pressing gently into the corners. Trim the edges leaving a ½ inch overhang, then pinch or press with a fork to create a decorative edge. Pour your filling mixture into the crust.
- Bake at 350°F (175°C) for 15 minutes, then lower the temperature to 325°F (163°C) and continue baking for 40-45 minutes. You'll know it's done when a toothpick inserted in the center comes out clean and the pie still has a slight jiggle. The top should be a beautiful golden brown. Let the pie cool completely at room temperature for at least an hour before slicing. During cooling, keep it away from drafts to prevent cracking.
- If your pie browns too quickly during baking, tent the edges with foil. For the cleanest slices, refrigerate the cooled pie for an hour before cutting. Serve at room temperature with hot coffee or fresh milk. The pie will keep at room temperature for 2 days or in the refrigerator for up to 5 days.
Tips from Lola's Kitchen
- Always use room temperature eggs for better incorporation
- Don't overmix the crust dough – it will become tough
- Chill the crust twice: once after forming the dough, and again after shaping in the pan
- Heat evaporated milk slightly for smoother incorporation
- Create steam in the oven by placing a shallow pan of water on the bottom rack
- Cover edges with foil if browning too quickly
- Let the pie cool completely for clean slices
Nutrition
The Story Behind Our Beloved Egg Pie
The Filipino egg pie holds a special place in our hearts, bringing back memories of busy panaderia mornings and warm afternoon merienda with family. While many think of it as purely Filipino, this beloved pastry actually tells a fascinating story of cultural mixing in our history.
During the American colonial period in the early 1900s, American home economics teachers introduced Western-style baking to Filipino households and schools. This is when our local panaderias began experimenting with custard pies, combining American pie-making techniques with Filipino flavors and ingredients that were easily available in local markets. The egg pie emerged as a unique creation - richer than American custard pies but less sweet than traditional Filipino desserts.
What made our Filipino egg pie special was how local bakers adapted it for Filipino tastes. They created that signature golden-brown top by incorporating meringue into the filling, something you won't find in other custard pies around the world. They also made it more affordable by using evaporated and condensed milk, which were becoming popular in Filipino households at the time.
By the 1950s and 1960s, egg pie had become a staple in neighborhood bakeries across the Philippines. From busy streets in Manila to small town panaderias in the provinces, the smell of freshly baked egg pie became part of our daily life. It was the perfect merienda - not too sweet, filling enough to satisfy hunger, and affordable enough for regular folks to enjoy.
Today, while modern bakeries offer all kinds of fancy pastries, the humble egg pie remains a bestseller. It's one of those treats that brings Filipinos together, whether shared during afternoon coffee with neighbors or brought home as pasalubong for family. Each region might have its own small twist to the recipe, but the basics stay the same - a buttery crust, silky-smooth custard filling, and that distinctive golden top that makes our Filipino egg pie uniquely ours.
Making egg pie at home connects us to this rich history. When you bake this recipe, you're not just making a dessert - you're continuing a tradition that has brought joy to Filipino families for generations. Whether you're craving a taste of childhood or want to share a piece of Filipino culture with others, this egg pie recipe carries the perfect blend of our past and present in every slice.


Comments
No Comments