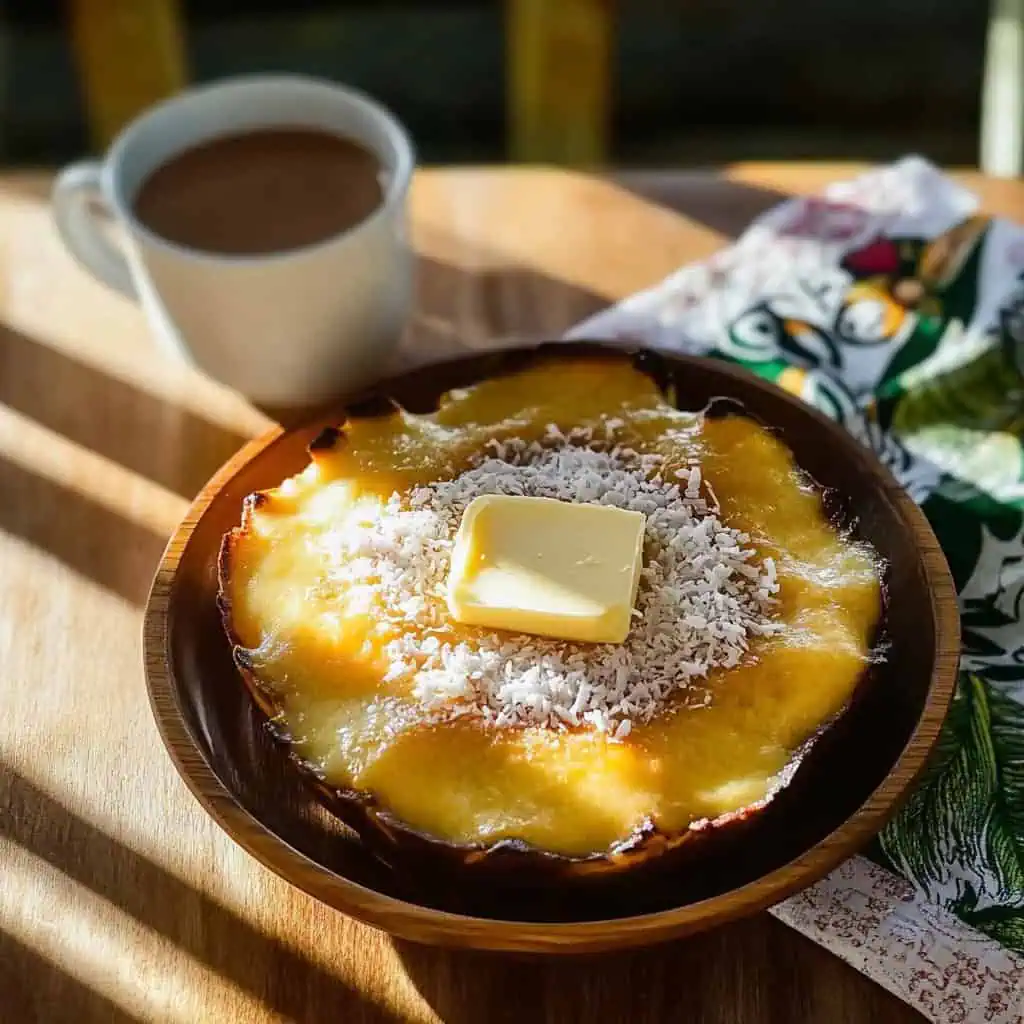
You know that moment when the smell of Bibingka hits you outside the church after Simbang Gabi? That's exactly what this homemade bibingka recipe recreates. Trust me, I've tested this recipe dozens of times to get it just right.
It takes me back to those Christmas seasons of my childhood, when my barkada and I would go caroling house-to-house, clutching our improvised tambol made from powdered milk cans, then excitedly pooling our "ambag" to buy still-steaming bibingka from Aling Ellen's stall. That first bite through the banana leaf, hitting the fluffy center with its perfect balance of salted egg and kesong puti – pure childhood bliss!
After years of trying different recipes, this version finally captures that exact taste of Christmas morning bibingka that we all grew up with. The secret? Letting the galapong rest overnight (like how traditional bibingka vendors do it) and getting that perfect char on top that makes everyone fight for the corner pieces.
Whether you're a Pinoy abroad missing the taste of home, or simply want to recreate those Simbang Gabi memories in your own kitchen, this recipe won't disappoint. It's actually easier than you think. Promise, as someone who burned her first three attempts, if I can make this, you definitely can, too!
Jump to:

Why You'll Love This Recipe
- Authentic Flavor: Traditional taste that rivals street-side bibingka
- Perfect Texture: Achieves that coveted soft, fluffy center with slightly charred top
- Make-Ahead Friendly: Batter can be prepared the night before
- Customizable: Easy to adjust toppings to your preference
- Special Occasion Ready: Impressive enough for Noche Buena or family gatherings
- Foolproof Method: Detailed steps ensure success even for beginners
Ingredients
This bibingka recipe uses traditional Filipino ingredients carefully selected for authentic flavor and texture. Rice flour and glutinous rice flour create the signature soft, slightly chewy consistency that defines bibingka.
Coconut milk adds richness and a subtle tropical flavor that plain milk can't replicate. The salted eggs provide the perfect savory balance to the sweetness, while kesong puti (or cream cheese substitute) adds creamy pockets throughout the cake. Banana leaves aren't just for presentation, they infuse the bibingka with a distinct aroma that's essential to the traditional experience.
Each ingredient works together to recreate the exact taste and texture of the street-side bibingka sold outside churches during Christmas season in the Philippines.
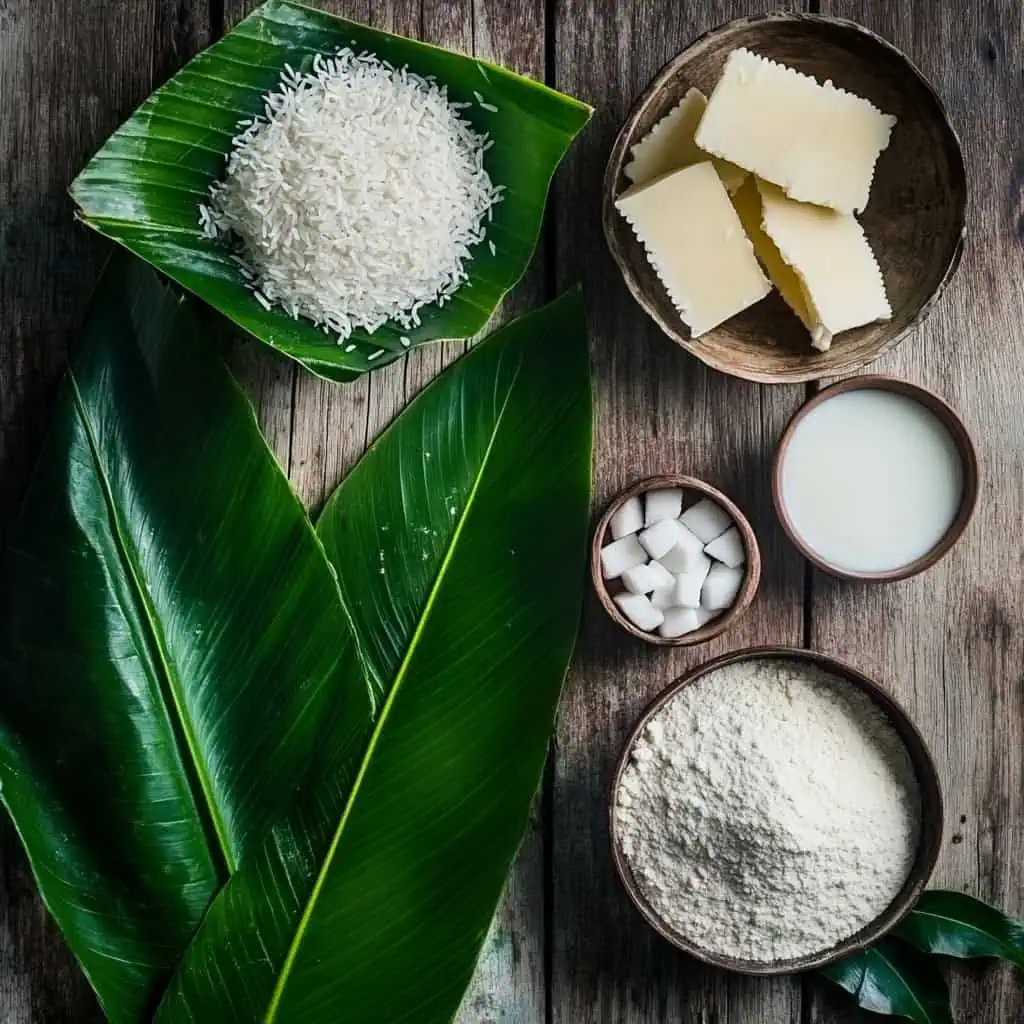
- 2 cups rice flour
- ½ cup glutinous rice flour
- 1 cup sugar
- 1 tablespoon baking powder
- 1 teaspoon salt
- 1½ cups coconut milk
- ½ cup water
- 3 eggs, beaten
- ¼ cup melted butter
- 2 salted eggs, sliced
- 2 ounces cream cheese or kesong puti
- Softened butter or margarine for brushing
- Sugar for sprinkling
- Fresh grated coconut
Equipment
- Mamon tins or 6-inch round cake pans - Traditional molds for authentic shape and size
- Banana leaves or parchment paper - Lines the pans and adds authentic aroma
- Large mixing bowls - For combining and resting the batter
- Whisk - Ensures a smooth, lump-free batter
- Measuring cups and spoons - For accurate ingredient measurements
- Oven - Primary cooking method for this recipe
- Baking sheet - Supports the cake pans during baking
- Kitchen scissors - For cutting banana leaves to size
- Tongs - Helps handle hot banana leaves during preparation
How To Make
- Prepare the batter (start the day before): Combine 2 cups rice flour, ½ cup glutinous rice flour, 1 cup sugar, 1 tablespoon baking powder, and 1 teaspoon salt in a large mixing bowl. Whisk until well combined.
- Add wet ingredients: Gradually pour in 1½ cups coconut milk and ½ cup water while continuously whisking. Add ¼ cup melted butter and 3 beaten eggs. Mix thoroughly until smooth and lump-free. Cover the bowl and refrigerate overnight or for at least 8-12 hours.
- Preheat and prepare: The next day, preheat your oven to 375°F (190°C). Clean banana leaves thoroughly with warm water and cut into circles slightly larger than your baking molds. Pass each leaf quickly over an open flame for 2-3 seconds per side to make them pliable.
- Line the pans: Line your mamon tins or round cake pans with the prepared banana leaves, ensuring the shiny side faces up. If using parchment paper instead, lightly grease with butter.
- Fill the molds: Remove the batter from the refrigerator and stir gently to recombine any separated ingredients. Pour into your lined molds, filling each about ¾ full. Top with slices of salted egg and pieces of kesong puti or cream cheese.
- First bake: Place filled molds on the lower rack of your preheated oven and bake for 20-25 minutes until edges begin to set and center starts to rise.
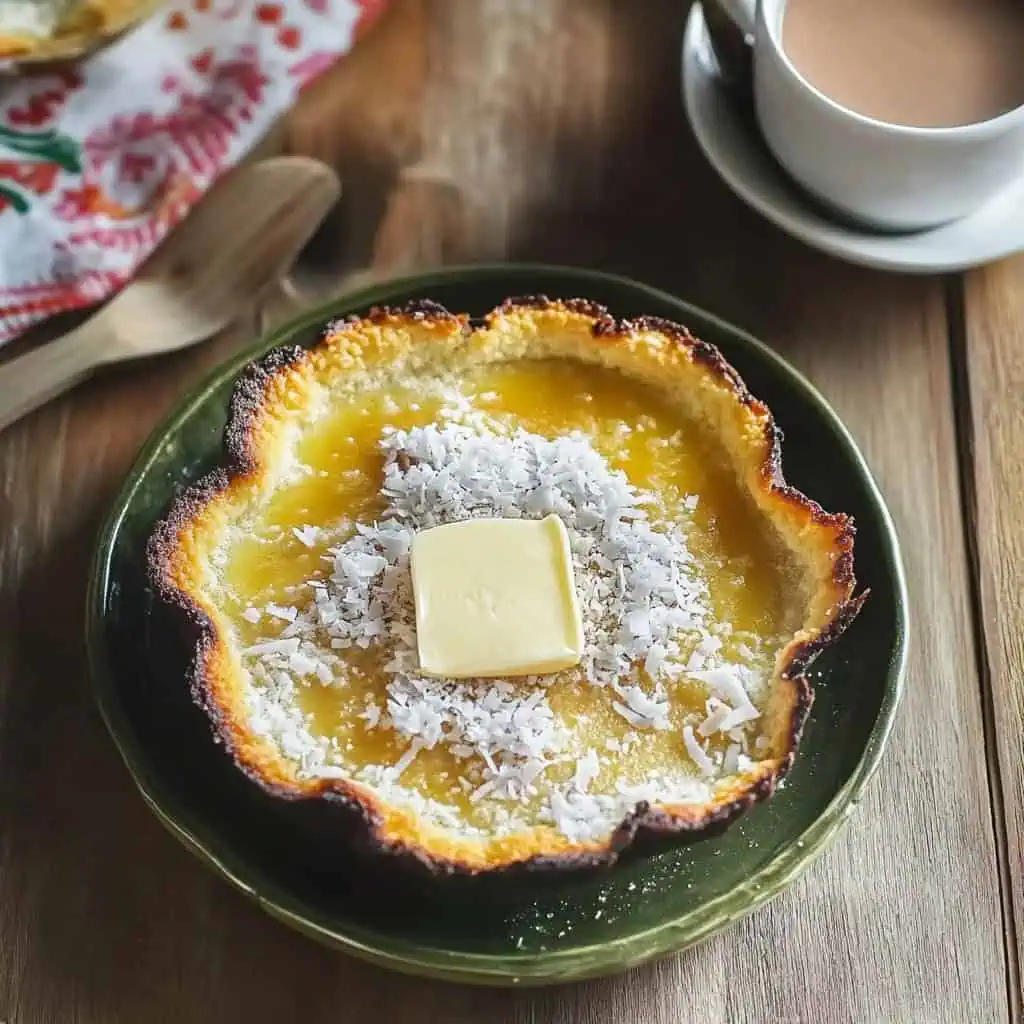
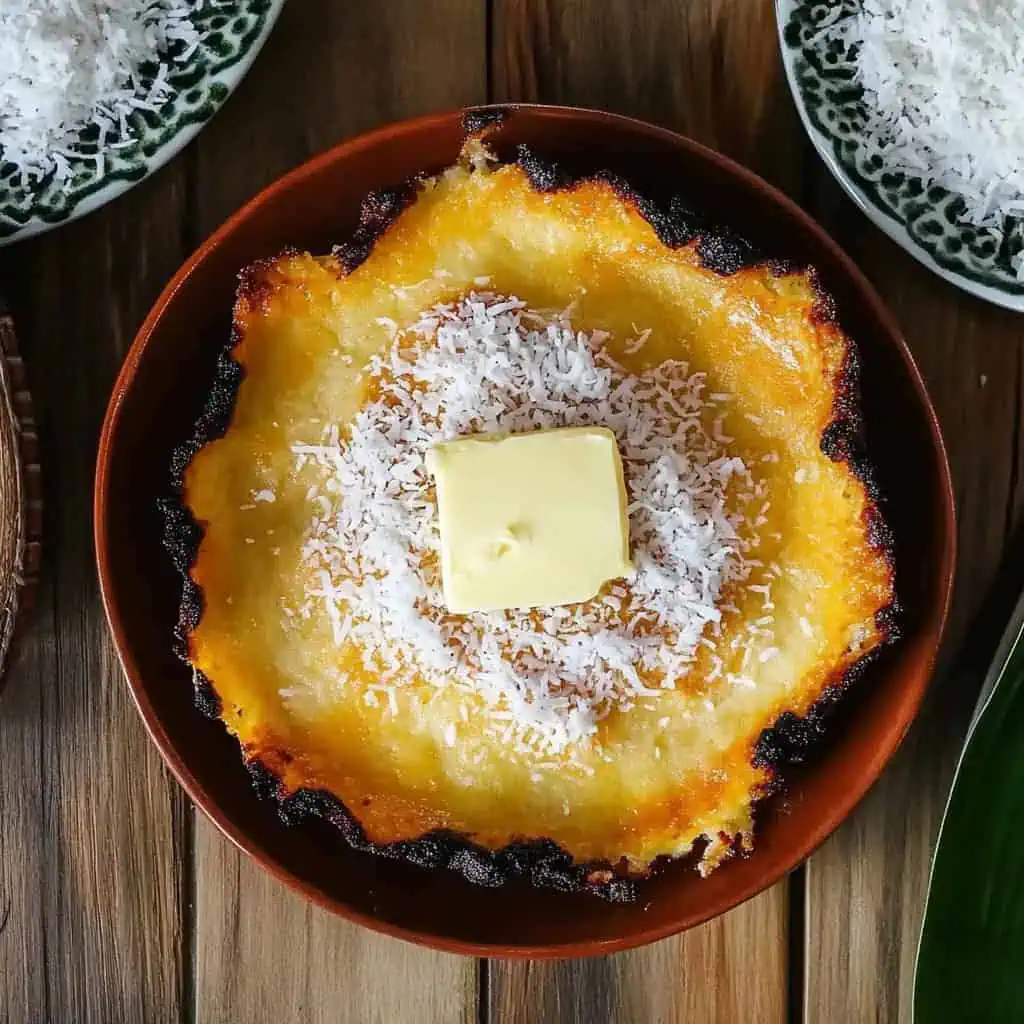
- Create the char: Move bibingka to the top rack and switch oven to broil at 450°F (230°C). Cook for an additional 1-2 minutes, watching carefully until the top develops beautiful golden-brown char marks.
- Finish and serve: Remove from oven and immediately brush the top with softened butter. Sprinkle generously with sugar and top with freshly grated coconut. Serve hot.

Tips from Lola's Kitchen
- Authentic galapong: For best texture, allow the rice flour mixture to hydrate overnight
- Banana leaf preparation: If leaves break or tear, double-layer them to prevent leakage
- Temperature matters: Use room temperature ingredients for even mixing
- Even baking: Rotate pans halfway through for consistent browning
- Fresh coconut: Grate coconut just before serving for best flavor and texture
- Test for doneness: Insert a toothpick in the center - it should come out with a few moist crumbs
- Perfect char: Don't walk away during the broiling step - the difference between perfect char and burnt is just seconds!
Substitutions
- Rice flour: In an emergency, substitute with 1½ cups all-purpose flour + ½ cup cornstarch (texture will differ)
- Coconut milk: Use either fresh or canned full-fat coconut milk
- Kesong puti: Substitute with queso de bola, mild cheddar, or cream cheese
- Banana leaves: Parchment paper will work functionally but won't provide the traditional aroma
- Salted eggs: If unavailable, use feta cheese with a pinch of extra salt
- Fresh coconut: Unsweetened dried coconut flakes can work in a pinch (rehydrate slightly first)
Troubleshooting
- Batter too thick: Add coconut milk 1 tablespoon at a time until proper consistency is reached
- Not browning properly: Increase top heat during final minutes or move rack closer to broiler
- Center collapse: Avoid opening the oven door while baking; check doneness through window
- Sticking to leaves: Brush leaves with a thin layer of oil before adding batter
- Uneven cooking: Ensure oven is properly preheated and pans are rotated during baking
- Too dry: Reduce baking time by 2-3 minutes in your next batch
Storage & Reheating
- Best consumed: Fresh and warm, within 2-3 hours of baking
- Room temperature: Store up to 24 hours in airtight container
- Refrigeration: Keeps up to 3 days in airtight container
- Oven reheating: Warm in 350°F oven for 5-7 minutes (preferred method)
- Microwave: Heat for 20-30 seconds (quicker but texture suffers)
- Freezing: Not recommended as texture significantly deteriorates
FAQ
Why rest the batter overnight?
Resting allows the rice flour to fully hydrate, resulting in a fluffier texture and more developed flavor. This step mimics traditional preparation methods and is worth the wait.
Can I make bibingka without banana leaves?
Yes, parchment paper works functionally, but you'll miss the distinctive aroma that banana leaves impart. Look for frozen banana leaves in Asian markets if fresh aren't available.
Why is my bibingka dense instead of fluffy?
Check your baking powder's freshness, ensure proper mixing without overmixing, and verify your oven temperature is accurate. The overnight rest is also crucial for proper texture.
How do I achieve the perfect charred top?
Use the broiler setting in your oven, position the rack approximately 6 inches from the heat source, and watch constantly for 1-2 minutes. The char develops quickly.
Can I make mini bibingka portions?
Absolutely! Use muffin tins lined with small pieces of banana leaf. Reduce cooking time to 15-18 minutes for the initial bake, then broil as directed.
Is bibingka gluten-free?
Yes, when made with traditional ingredients (rice flour and glutinous rice flour), bibingka is naturally gluten-free. Just ensure your baking powder is gluten-free certified.
What's the cultural significance of bibingka?
Bibingka is a cherished part of Filipino Christmas traditions, particularly during Simbang Gabi (Dawn Mass). Its aroma and taste symbolize community celebration and the warmth of the holiday season.
Related
Looking for other recipes like this? Try these:


Bibingka Recipe (Traditional Filipino Christmas Rice Cake)
Equipment
- Mamon tins or 6-inch round cake pans
- Banana leaves (dahon ng saging) or parchment paper
- Large mixing bowls
- Whisk
- Measuring cups and spoons
- Oven
- Baking sheet
- Kitchen scissors
- Tongs (for banana leaves)
Ingredients
For the Batter (Para sa Pinalamang)
- 2 cups rice flour
- ½ cup glutinous rice flour malagkit na bigas
- 1 cup sugar asukal
- 1 tablespoon baking powder
- 1 teaspoon salt asin
- 1½ cups coconut milk gata
- ½ cup water tubig
- 3 eggs beaten (itlog)
- ¼ cup melted butter tinunaw na mantikilya
For Toppings (Para sa Toppings)
- 2 salted eggs sliced (itlog na maalat)
- 2 ounces cream cheese or kesong puti
- Softened butter or margarine
- Sugar for sprinkling
- Fresh grated coconut niyog
Instructions
- Start this recipe the day before you plan to serve. Begin by gathering all your ingredients and ensuring they are at room temperature.
- The night before, combine 2 cups of rice flour (galapong), ½ cup glutinous rice flour (malagkit na bigas), 1 cup sugar (asukal), 1 tablespoon baking powder (pampalaki), and 1 teaspoon salt (asin) in a large mixing bowl. Whisk these dry ingredients together until well combined (haluing mabuti hanggang maghalo).
- Pour in 1½ cups coconut milk (gata) and ½ cup water (tubig) gradually while whisking continuously. Add ¼ cup melted butter (tinunaw na mantikilya) and 3 beaten eggs (binateng itlog). Mix thoroughly until you achieve a smooth, lump-free batter (hanggang maging makinis ang palaman). Cover the bowl with plastic wrap and refrigerate overnight or for at least 8-12 hours (ilagay sa refrigerator magdamag).
- The next day, start by preheating your oven to 375°F (190°C). While the oven heats, prepare your banana leaves (dahon ng saging). Clean them thoroughly with warm water and cut them into circles slightly larger than your baking molds. Pass each leaf quickly over an open flame for 2-3 seconds per side to make them pliable. This process releases the natural oils and aroma of the leaves.
- Line your mamon tins or 6-inch round cake pans with the prepared banana leaves, ensuring the shiny side faces up (ang makintab na parte ay nakaharap sa itaas). If using parchment paper instead, grease it lightly with butter.
- Remove the batter from the refrigerator and stir gently to recombine any separated ingredients (haluing muli ng marahan). Pour the batter into your lined molds, filling each about ¾ full. Place slices of salted egg (itlog na maalat) and pieces of kesong puti or cream cheese on top of each bibingka.
- Place the filled molds on the lower rack of your preheated oven and bake for 20-25 minutes. Watch as the edges begin to set and the center starts to rise. The batter should be mostly cooked through but still slightly wet on top.
- Move the bibingka to the top rack and switch your oven to broil at 450°F (230°C). Cook for an additional 1-2 minutes, watching carefully until the top develops beautiful char marks (hanggang magkaroon ng magandang tutong sa ibabaw). The top should have golden-brown spots but not be burnt.
- Remove from the oven and immediately brush the top with softened butter (pahiran ng malambot na mantikilya). Sprinkle generously with sugar (asukal) and top with freshly grated coconut (bagong kudkod na niyog).
- Serve your bibingka hot, straight from the oven (ihain habang mainit pa). The texture should be soft and fluffy in the center with a slightly crispy top and bottom. Traditional accompaniments include hot chocolate (tsokolate) or ginger tea (salabat).
- If you need to store leftover bibingka, let it cool completely then place in an airtight container. It will keep at room temperature for up to 24 hours or in the refrigerator for up to 3 days. To reheat, warm in a 350°F (175°C) oven for 5-7 minutes or microwave for 20-30 seconds, though oven reheating will better preserve the texture.
- Remember that bibingka is best enjoyed fresh and warm, when the contrast between the soft center and slightly crispy exterior is at its peak. The aroma of the banana leaves, coconut, and charred top creates that distinctive bibingka experience that makes it such a beloved Filipino Christmas tradition.
Tips from Lola's Kitchen
- Galapong substitute: For authentic texture, soak regular rice flour mixture overnight
- Banana leaf tip: If leaves break, double-layer them to prevent leaks
- Temperature matters: All ingredients should be at room temperature
- Even baking: Rotate pans halfway through baking
- Coconut freshness: Grate coconut just before serving
Nutrition
The Story Behind Bibingka
Deep in the heart of Philippine culture lies bibingka, a rice cake whose origins stretch back to pre-colonial times, when native Filipinos first discovered the art of cooking rice-based delicacies in clay pots. What began as a humble mixture of ground rice and water has evolved into the beloved Christmas treat we know today, showcasing the ingenious fusion of indigenous cooking methods with influences from Chinese, Spanish, and Malay traders who frequented our shores.
Unlike its Southeast Asian cousins like the Indonesian bingka or Malaysian apam, Filipino bibingka gained its distinct identity through a unique cooking method: the traditional bibingka is nestled between two heat sources. Traditionally, clay pots called "bibingkahan" are lined with banana leaves, with glowing charcoal placed both below and above the batter, creating that signature charred top that Filipino food lovers eagerly anticipate.
The introduction of Simbang Gabi (Dawn Mass) during the Spanish colonial period transformed bibingka from an everyday kakanin into a cherished Christmas tradition. As churchgoers emerged from the pre-dawn masses, the intoxicating aroma of bibingka baking in makeshift stands outside church doors became an integral part of the Filipino Christmas experience. The sight of vendors carefully tending to their bibingkahan while parishioners gathered around, waiting for their freshly-baked portions, has been painted into our collective memory.
Today's bibingka has evolved into a more luxurious version of its ancient self. What was once a simple galapong (rice dough) recipe now incorporates rich coconut milk, eggs, and butter, crowned with salted duck eggs and cheese. This transformation reflects the Filipino talent for adapting and elevating traditional recipes while maintaining their cultural essence. Modern iterations might feature various toppings and flavors, but the core preparation method – cooking between two heat sources with banana leaves – remains sacred to achieving that authentic bibingka taste and aroma.
Whether enjoyed in the busy streets of Metro Manila or lovingly prepared in Filipino-American kitchens across the globe, bibingka continues to serve as a delicious bridge between generations, connecting modern-day Filipinos to their rich culinary heritage. Its presence during the Christmas season has become so significant that for many Filipinos worldwide, it's not just a rice cake – it's a warm, familiar embrace that tastes like coming home.

Comments
No Comments