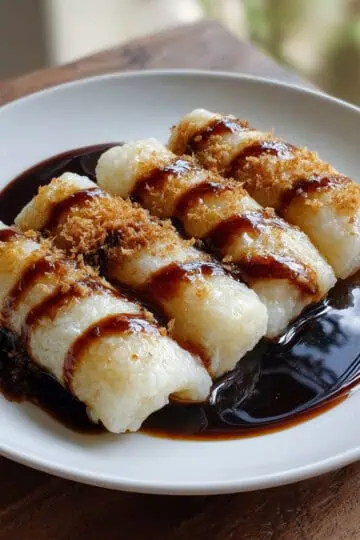
I've mastered countless Filipino recipes over the years, but these cheese sticks hold a special place in my heart. As someone who grew up loving traditional lumpiang shanghai, discovering this cheese-filled version was a delightful revelation that changed my approach to Filipino snack-making.
The genius lies in its simplicity: transforming basic lumpia wrappers and cheese into golden-brown rolls that achieve that perfect balance of crispiness and gooey center.
This recipe has become my go-to party preparation secret, consistently earning rave reviews at gatherings and potlucks. What makes it truly special is its versatility, equally at home at children's parties as it is alongside ice-cold drinks at evening gatherings.
This foolproof recipe delivers restaurant-quality cheese sticks that capture the authentic taste of Filipino street food in your own kitchen.
Jump to:

Why You'll Love This Recipe
- Authentically Filipino: A true taste of home using traditional techniques
- Perfectly Crispy: Guaranteed crunch with our tested temperature control method
- Fail-Proof Method: Step-by-step instructions ensure success every time
- Make-Ahead Friendly: Perfect for party prep and batch cooking
- Family-Approved: Time-tested recipe from Filipino households
- Budget-Friendly: Simple ingredients with maximum impact
Ingredients
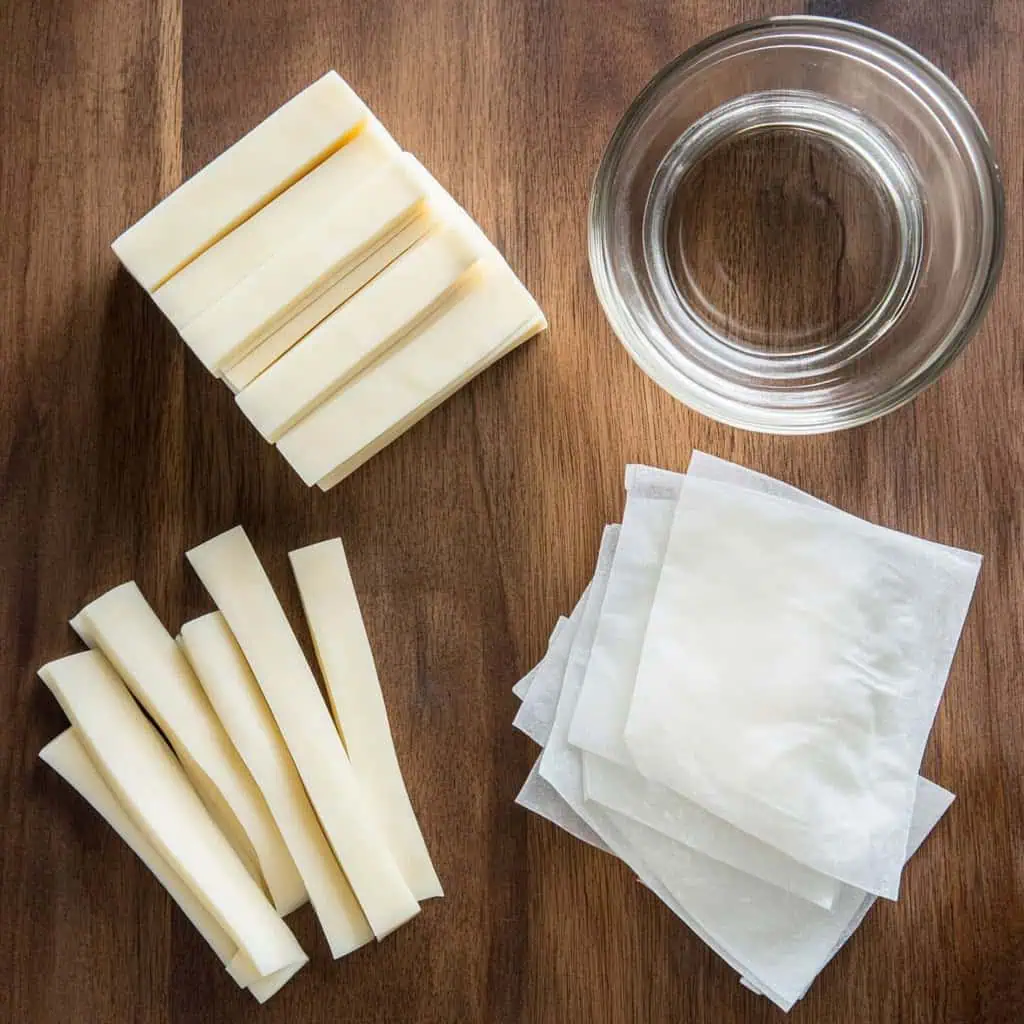
- 1 pound (450g) Eden Cheese or quick-melt cheese
- 24 pieces spring roll/lumpia wrappers
- Canola oil for frying (enough for 2 inches deep)
- Water for sealing
Equipment
- Large cutting board: Provides ample space for preparing and wrapping cheese sticks
- Sharp knife: Essential for clean cuts through cheese blocks
- Deep frying pan or kawali: Ensures proper oil depth for even cooking
- Kitchen tongs: Allows safe handling of hot cheese sticks during frying
- Wire cooling rack: Critical for maintaining crispiness as cheese sticks cool
- Paper towels: Helps absorb excess oil after frying
- Cooking thermometer: Ensures precise oil temperature for perfect results
How To Make
- Prepare the cheese: Cut cheese into uniform strips measuring ½ inch thick by 3 inches long (1.27cm x 7.62cm). For easier cutting, slightly freeze the cheese for 15 minutes first.
- Prepare wrappers: Keep your lumpia wrappers covered with a damp cloth to prevent them from drying out while you work.
- Assemble cheese sticks: Position a wrapper like a diamond on your work surface. Place a cheese strip in the center, then fold the bottom corner over the cheese. Fold both sides inward, then roll tightly upward. Seal the edges with water. The tight rolling is crucial to prevent cheese from leaking.
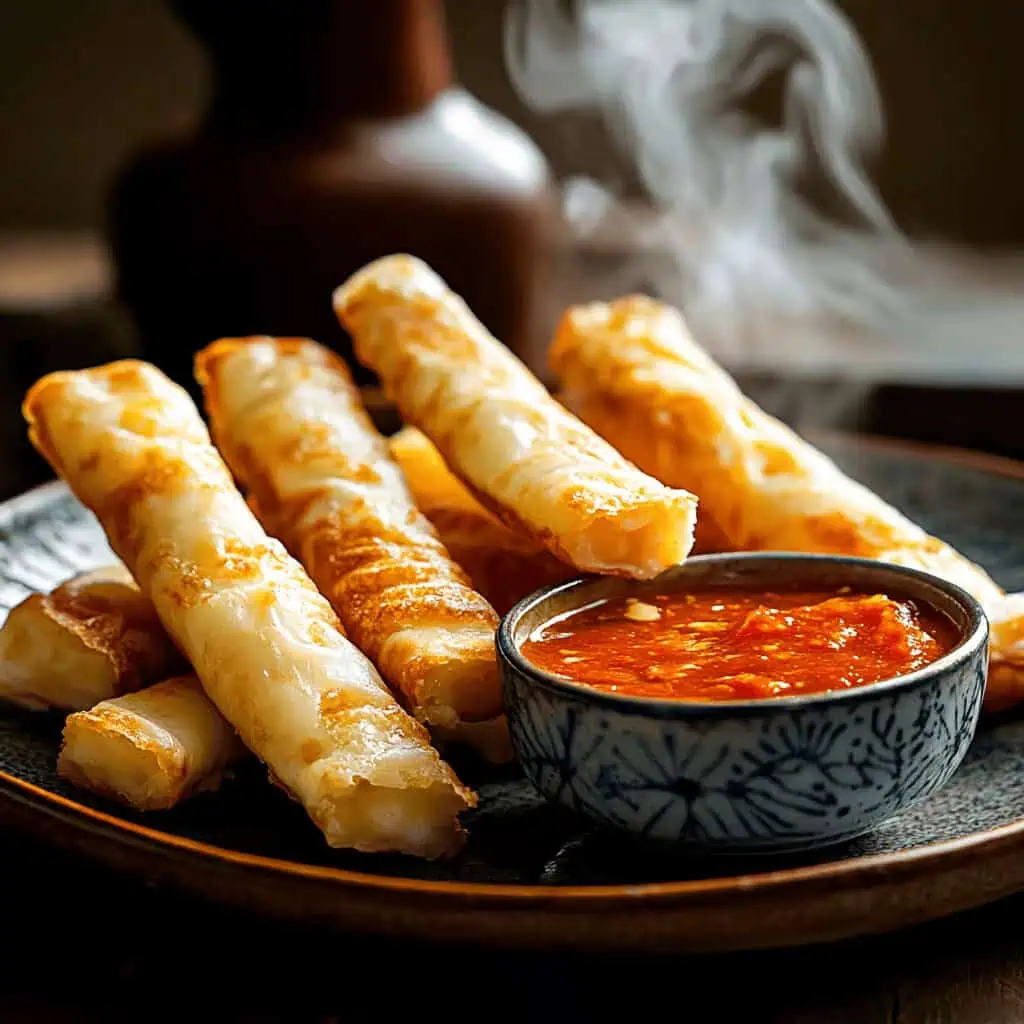
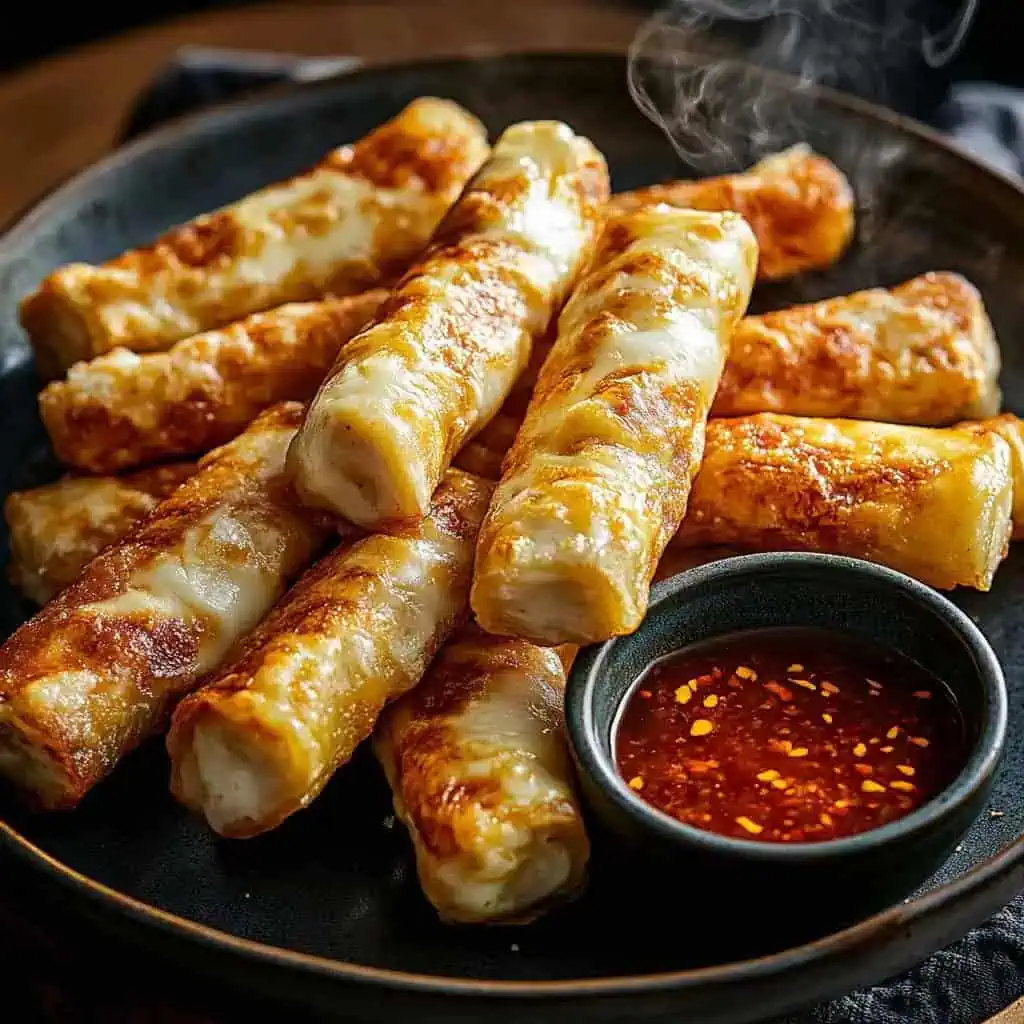
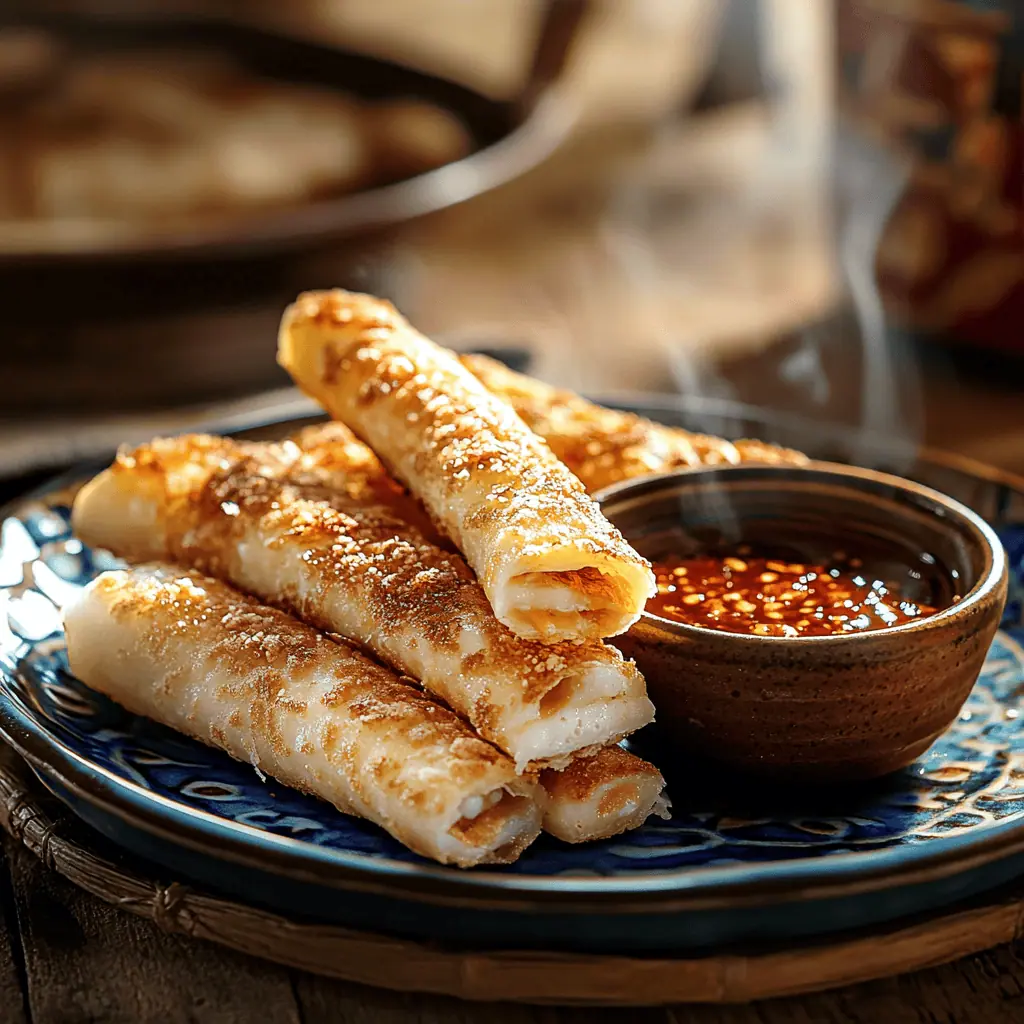
- Heat oil: Heat canola oil in a deep frying pan to 350°F (175°C), using enough oil for deep frying (about 2 inches deep). Maintain consistent oil temperature throughout cooking.
- Fry in batches: Fry the cheese sticks in small batches (3-4 pieces at a time) for 2-3 minutes or until golden brown. Don't overcrowd the pan as this will lower the oil temperature.
- Drain properly: Remove with tongs and drain on a wire rack, not paper towels, to maintain crispiness.
- Serve: Let cool slightly before serving with your choice of dipping sauce like sweet and sour sauce or banana ketchup.

Tips from Lola's Kitchen
- Wrapper management: Keep wrappers covered with damp cloth at all times when not actively using them
- Temperature control: Maintain consistent oil temperature (350°F/175°C) for even cooking and crispiness
- Cheese preparation: Semi-freezing cheese for 15 minutes makes it easier to cut and handle
- Tight wrapping: Roll wrappers tightly and seal edges thoroughly with water to prevent cheese leaks
- Batch frying: Never overcrowd the pan—this lowers oil temperature and results in soggy cheese sticks
- Proper draining: Use a wire rack instead of paper towels for cooling to maintain maximum crispiness
- Oil quality: Use fresh oil for best flavor and results—reused oil can impart off-flavors
Substitutions
Cheese Options:
- Eden Cheese: The traditional Filipino choice with perfect melting properties
- Quick-melt cheese: Excellent alternative with similar consistency
- Mozzarella: Creates a wonderful stretchy texture but may leak more during frying
- Cheddar: Offers stronger flavor but melts differently
- Velveeta: Melts consistently but has a different flavor profile
- String cheese: Convenient pre-portioned option that melts well
Wrapper Options:
- Spring roll wrappers: The traditional and preferred choice
- Lumpia wrappers: Works perfectly as they're essentially the same product
- Rice paper: Can be used for a baked version (not traditional but healthier)
Troubleshooting
Cheese Leaking During Frying:
- Ensure wrappers are tightly rolled with no air pockets
- Double-check that all edges are properly sealed with water
- Consider double-wrapping if using particularly thin wrappers
- Make sure oil is at the correct temperature (too hot causes rapid leaking)
Wrappers Breaking During Assembly:
- Handle wrappers gently to prevent tearing
- Keep wrappers covered with damp cloth when not in use
- Use only fresh wrappers as older ones dry out and crack easily
- Apply water sparingly when sealing to avoid over-softening
Cheese Sticks Not Crispy:
- Verify oil is hot enough (350°F/175°C) before frying
- Avoid overcrowding the pan which lowers oil temperature
- Drain on wire rack, not paper towels, to prevent steaming
- Ensure cheese sticks aren't touching while cooling
Storage & Reheating
Storage Options:
- Refrigerator: Store cooked cheese sticks in an airtight container for up to 3 days
- Freezer: Freeze uncooked assembled cheese sticks for up to 2 months (do not freeze cooked ones)
- Preparation: Place parchment paper between layers to prevent sticking
- Important: Ensure cooked cheese sticks are completely cooled before storage
Reheating Methods:
- Air fryer: Reheat at 350°F (175°C) for 3-4 minutes for optimal crispiness
- Conventional oven: Bake at 375°F (190°C) for 5-7 minutes until heated through
- Toaster oven: Heat at 350°F (175°C) for 4-5 minutes
- Avoid microwave: This makes the wrapper soggy and ruins the texture
FAQ
Can these cheese sticks be baked instead of fried?
Yes! While not traditional, you can bake them at 400°F (200°C) for 15-18 minutes. Brush with oil before baking for better browning. The texture will be different but still delicious.
Can I make cheese sticks ahead of time for a party?
Absolutely! Prepare and freeze the uncooked cheese sticks for up to 2 months. Fry them directly from frozen (no need to thaw), adding about 1-2 minutes to the cooking time.
Why did my cheese leak out during frying?
This typically happens due to loose wrapping, improperly sealed edges, or oil temperature being too high. Make sure to wrap tightly, seal all edges with water, and maintain oil at 350°F (175°C).
How do I keep my cheese sticks crispy for a party?
Cool them completely on a wire rack before placing in a serving dish. For parties, reheat in a 350°F (175°C) oven for 5 minutes just before serving. Keep them in a single layer rather than stacked.
Can I use different flavored cheeses?
Yes! While traditional Filipino cheese sticks use plain cheese, you can experiment with pepper jack, herb-infused cheese, or other flavored varieties for unique variations.
How can I tell when the oil is at the right temperature without a thermometer?
Drop a small piece of wrapper in the oil—it should bubble immediately and rise to the surface, but not burn quickly. Alternatively, dip the handle end of a wooden spoon in the oil; if bubbles form around it steadily, the oil is ready.
What dipping sauces work best with cheese sticks?
Traditional Filipino pairings include sweet chili sauce, banana ketchup, or a simple mixture of vinegar with diced chilies. They're also delicious with sweet and sour sauce or garlic aioli.
Related
Looking for other recipes like this? Try these:


Filipino Cheese Sticks (Cheese Springs Rolls)
Equipment
- Large cutting board (sangkalan)
- Sharp knife (kutsilyo)
- Deep frying pan or kawali
- Kitchen tongs (Sipit)
- Wire rack (cooling rack)
- Paper towels
- Thermometer (optional but recommended)
Ingredients
- 1 pound Eden Cheese or quick-melt cheese 450g
- 24 pieces spring roll wrappers lumpia wrapper
- Canola oil for frying
- Water for sealing
Instructions
- Begin by cutting the cheese into uniform strips measuring ½ inch thick by 3 inches length (1.27cm x 7.62cm). For easier cutting, slightly freeze the cheese for 15 minutes first. Keep your lumpia wrappers covered with a damp cloth (takpan ng basang tela ang mga balat ng lumpia) to prevent them from drying out.
- For assembly (pagbabalot), position a wrapper like a diamond on your work surface (ilagay ang balat na padiagonal). Place a cheese strip in the center, then fold the bottom corner over the cheese. Fold both sides inward, then roll tightly upward. Seal the edges with water. The tight rolling (mahigpit na pagbalot) is crucial to prevent cheese from leaking.
- Heat canola oil in a deep frying pan or kawali to 350°F (175°C), using enough oil for deep frying (about 2 inches deep). Maintain consistent oil temperature (initin ang langis sa tamang temperatura) throughout cooking.
- Fry the cheese sticks in small batches (3-4 pieces at a time) for 2-3 minutes or until golden brown (hanggang maging golden brown). Don't overcrowd the pan as this will lower the oil temperature. Remove with tongs (sipit) and drain on a wire rack, not paper towels, to maintain crispiness.
- Let cool slightly before serving with your choice of dipping sauce like sweet and sour sauce (suka at asukal) or banana ketchup. For storage, ensure cheese sticks are completely cooled before placing in an airtight container. They can be refrigerated for up to 3 days.
Tips from Lola's Kitchen
- Always use fresh lumpia wrappers
- Double-wrap if using thin wrappers
- Seal edges well with water
- Never overcrowd the pan
- Keep oil temperature consistent
- Pat dry excess oil with paper towels
Nutrition
The Story Behind Filipino Cheese Sticks
The beloved Filipino cheese sticks, known in every corner sari-sari store and present at countless Filipino celebrations, represent the incredible creativity of Filipino street food culture. While traditional lumpia has Chinese origins, these best homemade cheese sticks showcase how Filipinos brilliantly adapted the spring roll wrapper to create something uniquely Pinoy.
In the 1970s, as Eden cheese became a household name in the Philippines, innovative street vendors and creative home cooks began experimenting with this affordable dairy product. They discovered that wrapping cheese in lumpia wrappers and deep-frying them created an irresistible snack that would soon become a national favorite. This authentic Filipino recipe quickly spread from Manila's busy streets to become a staple at children's parties, family gatherings, and even upscale events.
What makes these easy Filipino cheese sticks truly special is their versatility. From humble carinderias to modern cafes, from simple merienda to elaborate party spreads, they've earned their place in Filipino food culture. The combination of crispy wrapper and melted cheese perfectly embodies the Filipino knack for creating delicious treats from simple ingredients – a hallmark of traditional Filipino cooking.
Today, while many variations exist, the classic homemade version remains unbeatable. Whether served in schools as baon, offered as pulutan during drinking sessions, or featured at family celebrations, these cheese sticks continue to bring Filipinos together. The sound of that first crispy bite, followed by the sight of stretchy melted cheese, has become synonymous with comfort food in Filipino households.
As more international food blogs and cooking shows discover Filipino cuisine, our traditional cheese sticks are gaining recognition worldwide. Yet, the best cheese sticks are still found in Filipino homes, where recipes are passed down through generations, each family adding their own special touch to this beloved classic. This recipe preserves those time-tested techniques while making it easy for modern home cooks to recreate the authentic taste they remember from their childhood.
From simple family merienda to go-to party finger food, these homemade cheese sticks represent the heart of Filipino snack culture – affordable, delicious, and always served with love. Whether you're craving a taste of home or discovering Filipino cuisine for the first time, this recipe captures the true essence of what makes Filipino food special: the perfect blend of simplicity, creativity, and heartwarming flavors.


Comments
No Comments