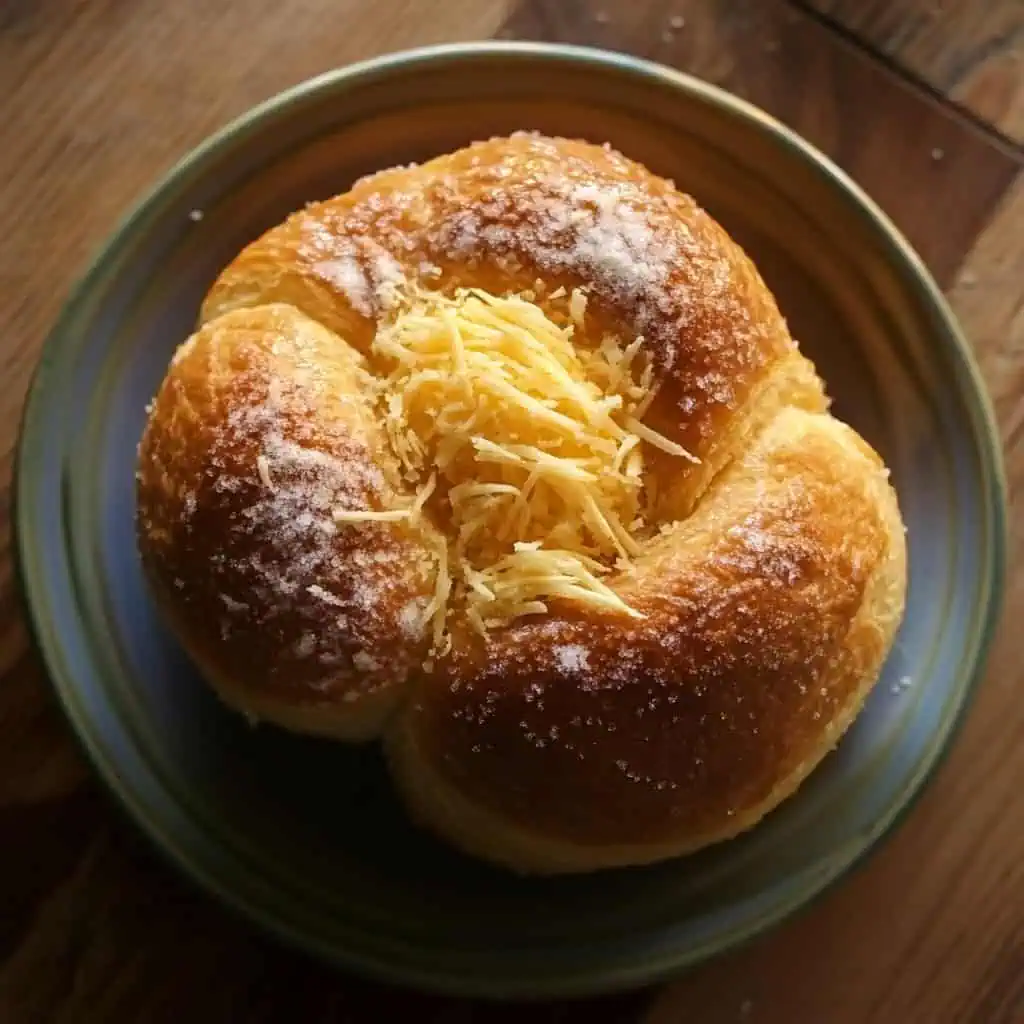
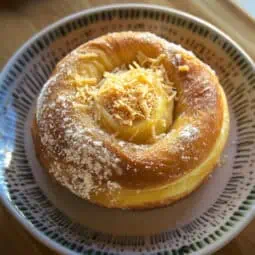
Let me share a secret that's been brightening my merienda moments since I was little: my Lola's authentic Filipino Ensaymada recipe. Nothing could beat the moment these butter-brushed, cheese-crowned brioche buns would emerge from her oven, filling our tiny kitchen with that unmistakable aroma that made even my balikbayan cousins forget about their fancy imported pastries.
Ensaymada isn't just any ordinary cheese bread, it's that special treat that made me run home from school fast. I've spent years perfecting this homemade ensaymada recipe, tweaking it countless times until it matched those precious afternoon memories at Lola's house. Now my own kids start circling the kitchen when they smell these baking, just like I used to!
Once you master this Filipino recipe, you'll never look at expensive bakery ensaymada the same way again. Sure, it takes a bit of patience. But the result? Pure Filipino comfort that makes your regular pandesal look like it needs to step up its game.
Get ready to become your family's favorite source of that butter-cheese happiness.
Jump to:
Why You'll Love This Recipe
- Authentically Filipino: Traditional recipe passed down through generations, adapted for modern home kitchens
- Cost-Effective: Make premium bakery-quality ensaymada at a fraction of the cost
- Detailed Instructions: Step-by-step guidance with Filipino translations for complex terms
- Foolproof Method: Tested techniques ensure success, even for beginners
- Versatile Base Recipe: Perfect foundation for creating various flavored versions
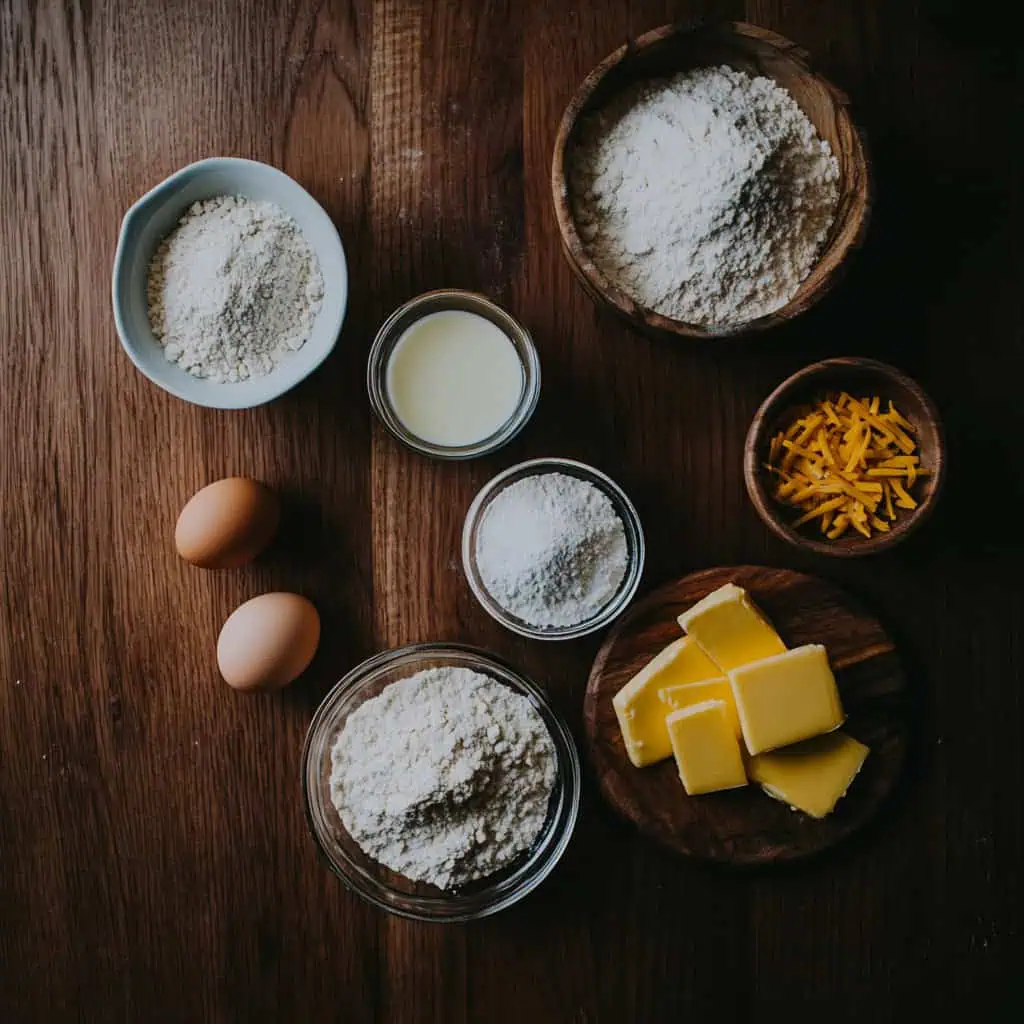
Ingredients
These ingredients create the perfect Filipino ensaymada by working together harmoniously. The all-purpose flour provides structure while the butter adds richness and that melt-in-your-mouth quality.
Egg yolks contribute to the bread's signature golden color and tender crumb. Fresh milk enriches the dough, making it soft and fluffy. The two-stage rising process with active dry yeast ensures those beautiful air pockets that make ensaymada so light.
Finally, the trio of melted butter, sugar, and cheese creates that irresistible sweet-savory contrast that defines authentic Filipino ensaymada. Each ingredient plays an essential role in transforming simple pantry staples into this beloved Filipino delicacy.
For the Sponge (Starter Dough):
- 1 cup all-purpose flour
- 1½ teaspoons sugar
- ¾ cup warm water (37°C/98°F)
- 4 teaspoons active dry yeast
For the Main Dough:
- ⅛ cup butter, softened
- ¾ cup sugar
- 1 tablespoon salt
- 5 egg yolks
- 1 cup fresh milk or evaporated milk
- 4 cups all-purpose flour
For Topping:
- ½ cup melted butter
- 1 cup grated cheese (preferably sharp cheddar)
- ¼ cup granulated sugar
Equipment Needed
- Stand mixer with dough hook - Creates proper gluten development with less manual effort; gives your dough the perfect texture
- Large mixing bowls - Provides enough space for dough to rise properly
- Pastry brush - Ensures even distribution of butter on dough and finished ensaymada
- Ensaymada molds or muffin tins - Helps maintain the traditional shape during baking
- Clean kitchen towels - Keeps dough covered and protected during rising
- Rolling pin - Essential for rolling dough into proper thickness before shaping
- Measuring cups and spoons - Guarantees accuracy in measurements for consistent results
- Pastry scraper - Makes handling and dividing dough easier and cleaner
- Baking sheets - Provides stable surface for baking if using individual molds
- Food thermometer - Ensures water is at the perfect temperature for activating yeast
How To Make
- Prepare the starter dough: Heat water to exactly 98°F/37°C. In a large mixing bowl, combine the warm water with 1½ teaspoons sugar. Sprinkle 4 teaspoons of active dry yeast over the mixture and allow it to stand for 10 minutes until bubbly and foamy. Stir in 1 cup of all-purpose flour until smooth. Cover with a damp cloth and let rise in a warm place (around 85°F/29°C) for 30 minutes.
- Make the main dough: While waiting for your starter dough, in a separate large bowl, cream together ⅛ cup softened butter and ¾ cup sugar until light and fluffy. Add 5 egg yolks one at a time, beating well after each addition. Mix in 1 cup of fresh milk gradually.
- Combine and knead: Begin adding the remaining 4 cups of flour to your butter mixture gradually, mixing well after each addition. Once all flour is incorporated, add your risen starter dough to this mixture. Using a stand mixer with dough hook attachment or your hands, knead the dough for 15 minutes until smooth and elastic.
- First rise: Place kneaded dough in a large greased bowl. Cover with a damp cloth and let rise in a warm place (85°F/29°C) for 2 hours or until doubled in size.
- Shape the ensaymada: After the first rise, punch down the dough and divide it into 24 equal portions. Take each portion and roll it out into a 12×6 inch rectangle. Brush each rectangle with melted butter. Starting from the long edge, roll each rectangle tightly like a jelly roll. Form each rolled piece into a spiral shape, tucking the end underneath. Place each spiral in a greased ensaymada mold or muffin tin.
- Second rise: Cover shaped ensaymadas with a damp cloth and let them rise again at 85°F/29°C for 2 hours or until doubled in size. Near the end of this rising time, preheat your oven to 375°F/190°C.
- Bake: Bake the ensaymadas for 12-15 minutes until golden brown. Watch carefully as they can brown quickly.
- Add toppings: Immediately after removing from the oven, brush the hot ensaymadas generously with melted butter. While still warm, top each with a generous amount of grated cheese and sprinkle with sugar. Let cool slightly before serving, about 5-10 minutes.

Tips from Lola's Kitchen
- Temperature matters: All ingredients should be at room temperature for better incorporation and smoother dough
- Sticky is good: The dough should be slightly sticky—resist the urge to add extra flour which can make the final product dense
- Create a proofing environment: If your kitchen is cool, create a warm environment by preheating your oven to its lowest setting, then turning it off before placing dough inside to rise
- Butter quality: Use high-quality butter for the best flavor—this is not the place to compromise
- Patient proofing: Don't rush the rising process—proper fermentation develops the signature ensaymada flavor and texture
- Yeast check: Always test your yeast's freshness before starting to ensure proper rising
- Gentle handling: After the first rise, handle the dough gently to avoid deflating it completely
Substitutions
- Fresh milk: Can be replaced with evaporated milk or full-fat coconut milk for a subtle tropical flavor
- Active dry yeast: Substitute with instant yeast by reducing the amount by 25% (3 teaspoons instead of 4) and skip the proofing step
- All-purpose flour: Bread flour creates a chewier texture, though the dough may require slightly more liquid
- Butter: Traditional recipes often used margarine, which can be substituted 1:1
- Cheddar cheese: Can be replaced with queso de bola (Edam cheese) for a more traditional flavor, or kesong puti (Filipino white cheese) for a milder taste
Troubleshooting
Dough not rising:
- Ensure your yeast is fresh and active
- Water temperature should be between 95-105°F—too hot will kill the yeast, too cold won't activate it
- Find a warmer location in your kitchen or create a proofing box as suggested in the tips
Tough texture:
- Avoid over-kneading, which develops too much gluten
- Double-check your flour measurement—too much flour creates dense bread
- Allow sufficient rising time for proper texture development
Uneven browning:
- Rotate baking pans halfway through baking
- Check if your oven has hot spots using an oven thermometer
- Ensure proper rack placement in the middle of the oven
Collapsed ensaymada:
- Handle the dough very gently after first rise
- Make sure the second rise isn't too long, which can weaken the structure
- Avoid opening the oven door during the first 10 minutes of baking
Storage & Reheating
- Room temperature: Store in an airtight container for up to 2 days
- Refrigeration: Keep fresh for up to a week in airtight packaging
- Freezing: Wrap individually in plastic wrap then place in freezer bags for up to 3 months
- Quick reheat: Microwave individual pieces for 15-20 seconds
- Best reheating method: Place in preheated 350°F oven for 5 minutes to restore the original texture
- Pre-topping storage: For best results when freezing, store without the butter, cheese and sugar toppings, adding them after reheating
FAQ
Why is my dough too sticky?
Ensaymada dough should be slightly sticky. Use oiled hands when handling and avoid adding too much flour, which can make the final product dense. The stickiness contributes to the soft, fluffy texture.
Can I make this without a stand mixer?
Yes, but be prepared to knead by hand for 20-25 minutes to develop proper gluten structure. The dough will become smoother and more elastic as you work it, though it will remain slightly tacky.
How do I know when the dough has risen enough?
The dough should double in size. When poked gently with a finger, the indentation should remain rather than spring back. If it springs back immediately, it needs more time.
Can I prepare this the night before?
Yes, after shaping the ensaymada, cover tightly and refrigerate overnight. The next morning, remove from refrigerator and let come to room temperature (about 1 hour) before the final rise and baking.
Why isn't my ensaymada as fluffy as bakery versions?
Commercial bakeries often use dough improvers and specialized equipment. For home versions, focus on proper kneading, adequate rising time, and gentle handling of the dough to achieve the best possible texture.
Can I reduce the sugar in this recipe?
You can reduce the sugar in the dough slightly, but it contributes to the texture as well as sweetness. Consider reducing the sugar sprinkled on top instead for a less sweet version.
How can I make my ensaymada more yellow like the ones in bakeries?
Some bakeries add a small amount of yellow food coloring or additional egg yolks for that golden hue. You can add 1-2 more egg yolks to the dough for a more golden color.
Why do I need to make a starter dough first?
The starter dough (sponge) develops flavor and improves the texture of the final product. This extra step is worth the time investment for authentic results.
Related
Looking for other recipes like this? Try these:


Filipino Ensaymada
Equipment
- Stand mixer with dough hook (recommended)
- Large mixing bowls
- Pastry brush
- Ensaymada molds or muffin tins
- Clean kitchen towels
- Rolling Pin
- Measuring cups and spoons
- Pastry scraper
- Baking sheets
Ingredients
For the Sponge (Para sa Paunang Masa):
- 1 cup all-purpose flour 1 tasa ng harina
- 1½ teaspoons sugar 1½ kutsarita ng asukal
- ¾ cup warm water ¾ tasa ng maligamgam na tubig (37°C/98°F)
- 4 teaspoons active dry yeast
For the Dough (Para sa Masa):
- ⅛ cup butter softened (⅛ tasa ng pinalambot na mantikilya)
- ¾ cup sugar ¾ tasa ng asukal
- 1 tablespoon salt 1 kutsara ng asin
- 5 egg yolks 5 dilaw ng itlog
- 1 cup fresh milk or evaporated milk 1 tasa ng gatas
- 4 cups all-purpose flour 4 na tasa ng harina
For Topping (Para sa Ibabaw):
- ½ cup melted butter ½ tasa ng tinunaw na mantikilya
- 1 cup grated cheese 1 tasa ng keso
- ¼ cup granulated sugar ¼ tasa ng asukal
Instructions
- Heat your water to exactly 98°F/37°C (maligamgam na tubig). In a large mixing bowl, combine the warm water with 1½ teaspoons sugar. Sprinkle 4 teaspoons of active dry yeast over the mixture and allow it to stand for 10 minutes until it becomes bubbly and foamy (maghintay hanggang lumitaw ang mga bula).
- Stir 1 cup of all-purpose flour into the yeast mixture until smooth (haluing mabuti hanggang maging makinis). Cover this starter dough with a damp cloth (basang tela) and let it rise in a warm place at 85°F/29°C for 30 minutes. This is your starter dough, also known as "paunang masa."
- While waiting for your starter dough, in a separate large bowl, cream together ⅛ cup softened butter and ¾ cup sugar until light and fluffy (paghaluin ang mantikilya at asukal hanggang lumambot at pumuti). Add 5 egg yolks one at a time, beating well after each addition (isang dilaw ng itlog kada paghuhulog). Mix in 1 cup of fresh milk gradually (unti-unting ilagay ang gatas).
- Begin adding the remaining 4 cups of flour to your butter mixture gradually, mixing well after each addition (unti-unting ilagay ang harina). Once all flour is incorporated, add your risen starter dough to this mixture. Using a stand mixer with a dough hook attachment or your hands, knead the dough for 15 minutes until it becomes smooth and elastic (masahin hanggang maging makinis at umaabot).
- Place your kneaded dough in a large greased bowl (minamantikilyang mangkok). Cover with a damp cloth and let it rise in a warm place at 85°F/29°C for 2 hours or until doubled in size (patababin sa loob ng dalawang oras).
- After the first rise, punch down the dough and divide it into 24 equal portions (hatiin sa 24 na pantay na piraso). Take each portion and roll it out into a 12×6 inch rectangle using a rolling pin (bilutan hanggang maging parihaba). Brush each rectangle with melted butter (pahiran ng tinunaw na mantikilya).
- Starting from the long edge, roll each rectangle tightly like a jelly roll (irolyo ng mahigpit tulad ng jelly roll). Form each rolled piece into a spiral shape, tucking the end underneath (irolyo sa hugis ng suso ng susong pilipit). Place each spiral in a greased ensaymada mold or muffin tin.
- Cover your shaped ensaymadas with a damp cloth and let them rise again at 85°F/29°C for 2 hours or until doubled in size. Near the end of this rising time, preheat your oven to 375°F/190°C.
- Bake the ensaymadas for 12-15 minutes until golden brown. Watch them carefully as they can brown quickly. Immediately after removing from the oven, brush the hot ensaymadas generously with melted butter (pahiran agad ng tinunaw na mantikilya).
- While still warm, top each ensaymada with a generous amount of grated cheese and sprinkle with sugar (lagyan ng maraming keso at asukal). Let them cool slightly before serving, about 5-10 minutes.
- For storage (paraan ng pagtatago), keep at room temperature in an airtight container for up to 2 days. They can be refrigerated for up to a week or frozen for up to 3 months. To reheat, warm in a preheated 350°F/175°C oven for 5 minutes or microwave individual pieces for 15-20 seconds.
- For best results, serve warm with hot chocolate or strong coffee. Ensaymada is traditionally enjoyed as a merienda (afternoon snack) between 3-4 PM, but it makes a wonderful breakfast or dessert any time of day.
Tips from Lola's Kitchen
- Use room temperature ingredients for better incorporation
- The dough should be sticky but manageable - avoid adding too much flour
- Create a warm environment for rising by preheating your oven to its lowest setting, then turning it off
- For extra richness, use butter instead of margarine
- Don't rush the rising process - proper fermentation develops flavor
- Test yeast freshness before starting to ensure proper rising
Nutrition
The Story Behind Filipino Ensaymada
The beloved Filipino ensaymada traces its roots to the Spanish ensaïmada from Mallorca, transformed by generations of Filipino bakers into something uniquely their own. Originally brought to the Philippines during the Spanish colonial period in the 16th century, this bread underwent a distinctly Filipino evolution, embracing local ingredients and taste preferences.
While the Mallorcan original relied heavily on pork lard (saïm in Catalan, hence the name), Filipino bakers adapted the recipe using butter and margarine, creating a lighter, sweeter version. They also introduced the now-signature topping of grated cheese, a addition that perfectly balances the bread's sweetness with a savory note—a combination that has become quintessentially Filipino.
In Philippine culture, ensaymada quickly emerged as more than just bread. It became a status symbol during the Spanish era, with wealthy families serving elaborate versions topped with queso de bola (Edam cheese) during fiestas and holidays. Today, this special treat remains a fixture in both humble neighborhood panaderias (bakeries) and high-end establishments, where bakers continue to innovate with modern variations like ube (purple yam) and dulce de leche flavors.
From morning coffee pairings to afternoon merienda (snack time), ensaymada has woven itself into the fabric of Filipino daily life. Its presence at celebrations, from Christmas gatherings to family reunions, makes it not just a pastry, but a cherished tradition that connects modern Filipinos to their cultural heritage. Whether enjoyed in its simplest form or elevated with premium ingredients, ensaymada stands as a testament to the Filipino talent for adapting foreign influences into something uniquely and deliciously their own.


Comments
No Comments