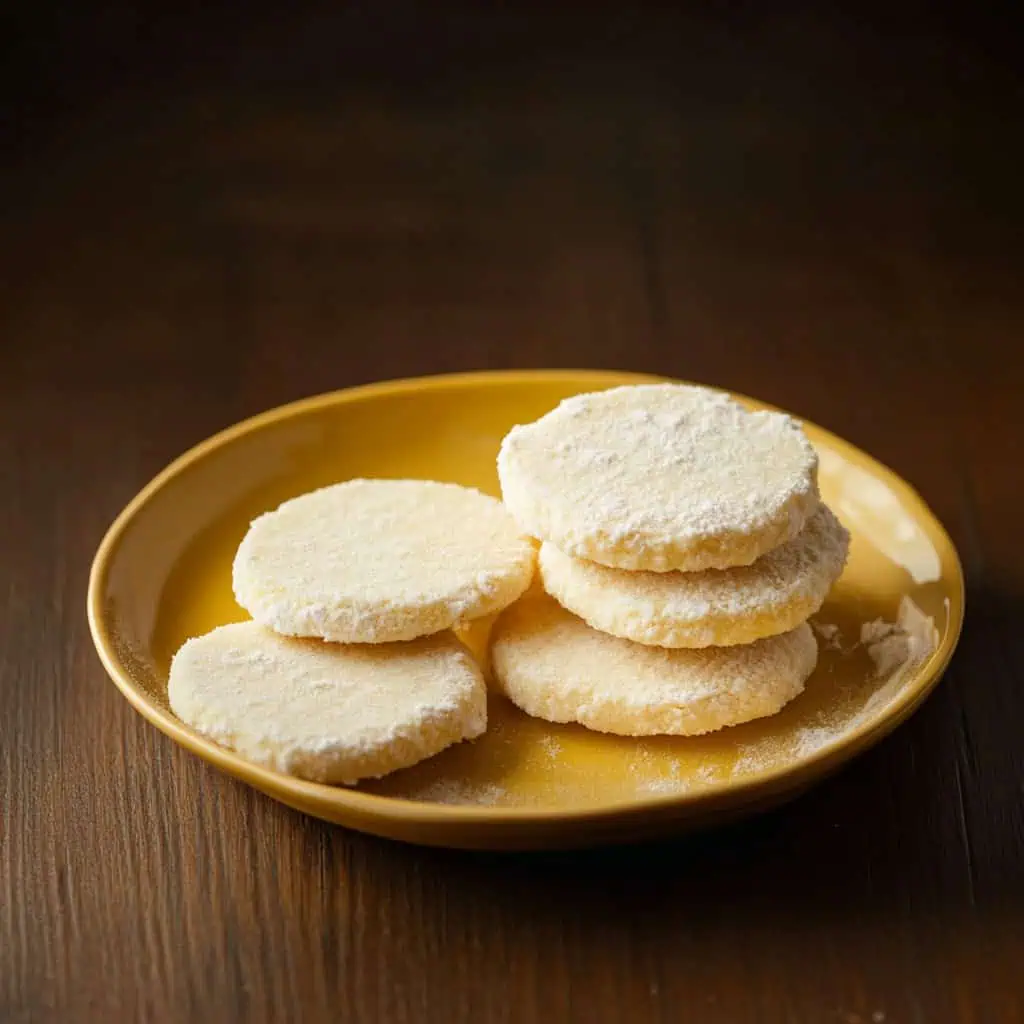
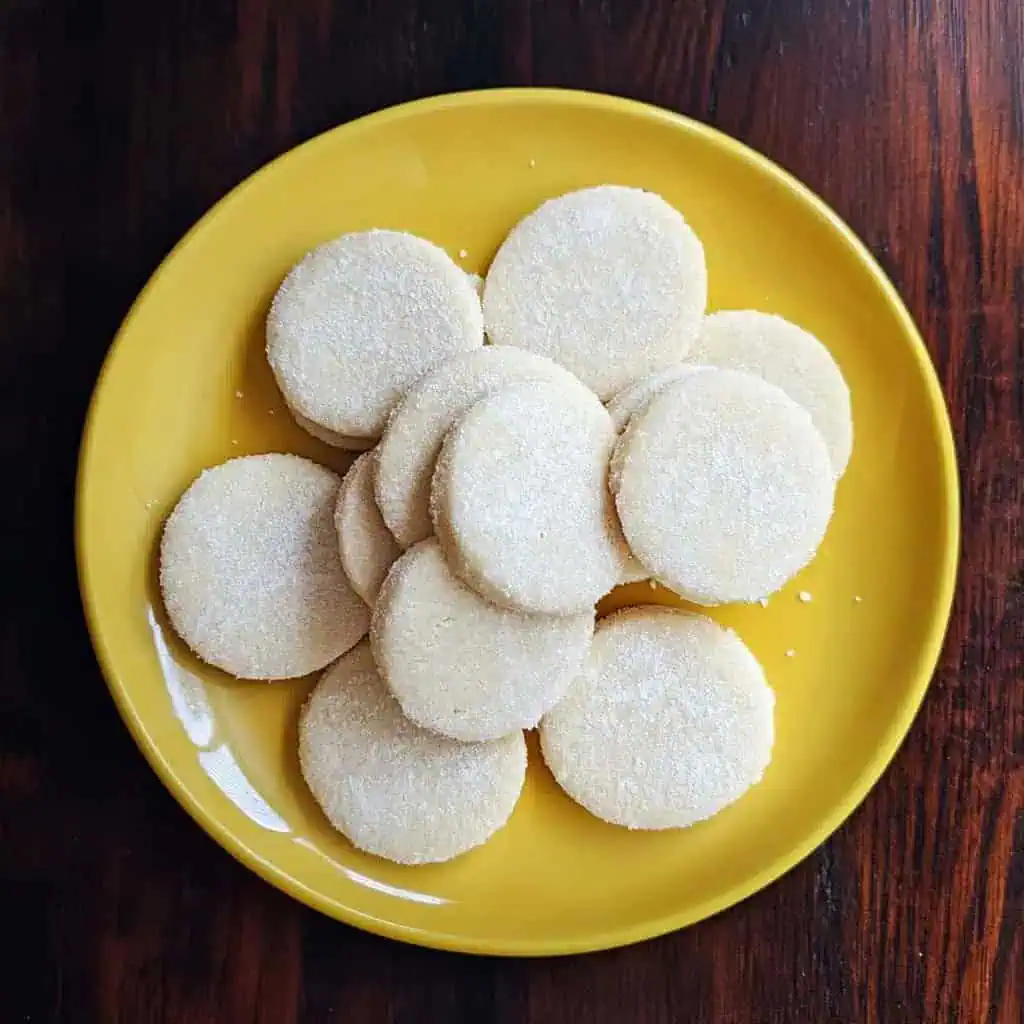
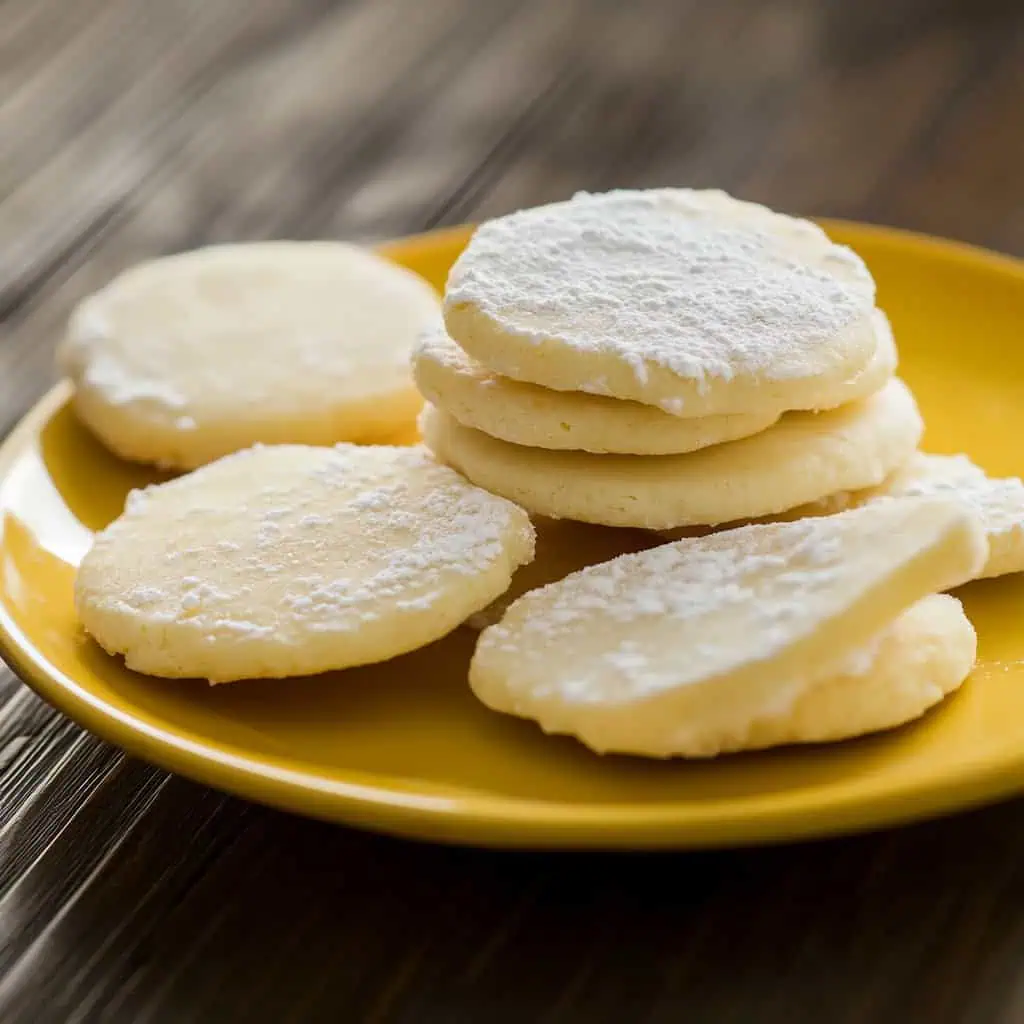
Let me share my favorite Puto Seko recipe that brings back warm memories of afternoons at my Lola's house. These Filipino cornstarch cookies might look fancy, but they're incredibly easy to make with just 3 ingredients from your kitchen. They're so simple that even my first batch turned out perfectly crisp and delicate just like the ones we used to buy from the local panaderia.
What makes this recipe special is how it transforms basic ingredients - just cornstarch, butter, and condensed milk - into something delicious. No complicated steps, no special tools needed (though a polvoron mold helps!), and they're ready in about an hour.
Whether you're craving something sweet for merienda or need a homemade pasalubong, these Puto Seko cookies are your answer. Follow along, and I'll show you exactly how to make these beloved Filipino cookies that taste just like childhood memories.
Jump to:
Why You'll Love This Recipe
- Uses just 3 simple ingredients you might already have
- Melt-in-your-mouth texture (Matutunaw sa bibig)
- Perfect for beginners in Filipino baking
- Gluten-free by nature
- Customizable with different flavors
- Makes an excellent food gift or pasalubong
- More affordable than store-bought versions
Ingredients
These three simple ingredients create magic when combined. Cornstarch forms the foundation, providing that signature light, crumbly texture that dissolves on your tongue. Butter adds necessary fat that creates richness while helping the cookies hold their shape.
Condensed milk brilliantly serves double duty - it sweetens the cookies while providing just enough moisture to form a dough without adding any liquid that would make the cookies tough.
This perfect balance of ingredients is why Puto Seko has remained a beloved Filipino treat for generations.
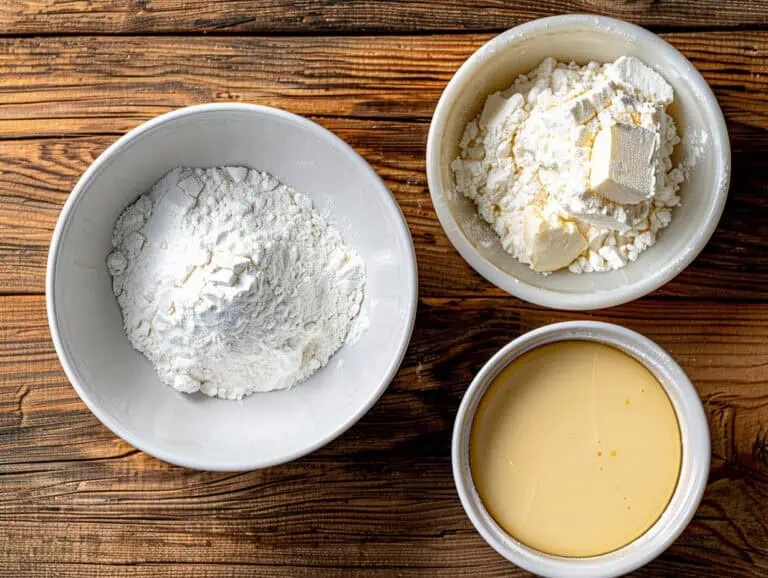
- 1 cup cornstarch - The main ingredient that gives these cookies their distinctive melt-in-your-mouth quality
- ¼ cup softened butter - Provides richness and helps bind the ingredients together
- ⅓ cup condensed milk - Adds sweetness and moisture without making the cookies too wet
Equipment Needed
- Food processor - For achieving the perfect dough consistency quickly and easily; creates a more uniform texture
- Baking sheet - Ensures even heat distribution for consistent baking
- Parchment paper - Prevents sticking and makes cleanup easier
- Cookie mold or polvoron mold - Creates the traditional shape and decorative patterns; helps compress the dough properly
- Measuring cups and spoons - For accurate measurements which are crucial in baking
- Wooden spoon - Used for propping the oven door open during the cooling process
- Wire cooling rack (Optional) - Allows for proper air circulation during the final cooling stage
How To Make
- Preheat your oven to 325°F (163°C). This moderate temperature helps dry the cookies without browning them.
- Prepare the dough by combining 1 cup cornstarch, ¼ cup softened butter, and ⅓ cup condensed milk in a food processor. Process for about 2 minutes until it forms a soft, pliable dough similar to play dough in consistency. If mixing by hand, this will take approximately 10 minutes of gentle kneading.
- Shape the cookies by lining your baking sheet with parchment paper. Scoop the dough into your cookie mold or polvoron mold, press firmly, scrape off any excess, then carefully press onto the lined baking sheet. Leave a small gap between each cookie.
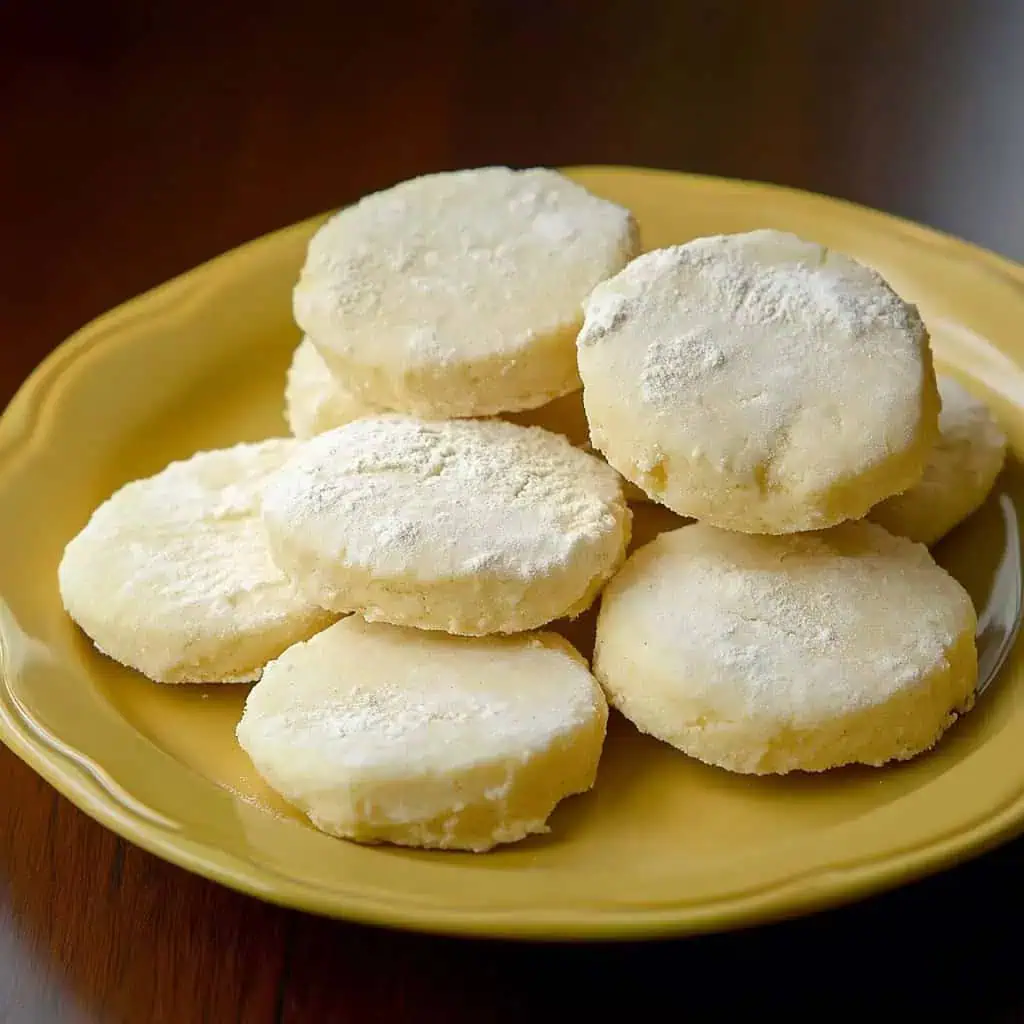
- Bake for 15 minutes at 325°F. The cookies should remain white - you're drying them out rather than browning them.
- Cool properly by turning off the oven after baking, then slightly opening the oven door (prop it open with a wooden spoon). Let the cookies cool inside the oven for about an hour. This gradual cooling process is crucial for developing the perfect crispy texture.
- Test for doneness by lightly tapping a cookie - it should sound hollow, indicating it's perfectly baked.
- Final cooling - Allow the cookies to cool completely on the counter for another 30 minutes before serving or storing. When done correctly, they should literally melt in your mouth.

Tips from Lola's Kitchen
- Room temperature ingredients work best - This ensures proper incorporation and dough consistency
- Don't overwork the dough - Gentle handling maintains the delicate texture
- Use the right pressure when molding - Press firmly enough to compact the dough but not so hard that it crumbles
- Listen for the hollow sound - This is the traditional way to check if they're perfectly done
- Patience during cooling - The gradual cooling process in the oven is what develops the signature crispy texture
- Store immediately - Once completely cooled, transfer to an airtight container to maintain freshness
Substitutions
- Butter: Can be replaced with margarine or coconut oil for a dairy-free version
- Condensed milk: Try flavored versions like pandan, ube, or coconut for interesting variations
- Cornstarch: For a more traditional texture, use 75% cornstarch and 25% rice flour
- Add-ins: Consider adding 1 teaspoon of vanilla extract or ½ teaspoon of cinnamon for subtle flavor variations
Troubleshooting
Dough is too sticky:
- Add cornstarch 1 tablespoon at a time until you achieve the proper consistency
- The dough should feel like play dough when ready - not sticky but still pliable
Dough is too crumbly:
- Add condensed milk ½ teaspoon at a time
- Mix gently until the dough holds together when pressed
Cookies are too soft after cooling:
- Extend the cooling time in the partially open oven
- Check your oven temperature with an oven thermometer for accuracy
- Ensure you're using the correct measurements for all ingredients
Cookies brown too quickly:
- Your oven might be running hot - reduce temperature by 25°F
- Position the baking rack in the middle of the oven
- Check cookies after 10 minutes instead of waiting the full 15
Storage & Reheating
- Room temperature: Store in an airtight container for 3-4 days
- Freezer: Place in a freezer-safe container with parchment paper between layers for up to 3 months
- To refresh: Heat in a 250°F oven for 5 minutes to restore crispness
- To crisp up soft cookies: Give them a very light toast in a toaster oven on the lowest setting
- Humidity control: In humid climates, add a small packet of food-grade silica gel to the storage container to absorb moisture
FAQ
Why is traditional Puto Seko white but some variations are colored?
The natural color is white when using regular condensed milk. Colored versions come from using flavored condensed milk or adding extracts like pandan (green) or ube (purple).
Can I use melted butter instead of softened?
No, melted butter will make the dough too soft and change the texture. Softened butter (just pliable, not runny) is essential for proper dough consistency.
Why do my cookies crack when I remove them from the mold?
The dough might be too dry. Add ½ teaspoon more condensed milk and ensure you're compressing the dough firmly in the mold before transferring to the baking sheet.
Can I make these without a food processor?
Yes! You can mix by hand, but be prepared to knead for about 10 minutes to achieve the right consistency. Use a fork to initially combine ingredients, then switch to hand kneading.
Are these suitable for people with gluten intolerance?
Yes, they're naturally gluten-free as they're made with cornstarch rather than wheat flour. Just ensure all your ingredients are certified gluten-free if making them for someone with celiac disease.
Related
Looking for other recipes like this? Try these:


Homemade Puto Seko Recipe (Filipino Cornstarch Cookies)
Equipment
- Food processor For achieving the perfect dough consistency
- Baking sheet For even baking
- Parchment Paper Prevents sticking
- Cookie Mold or Polvoron Mold For shaping the cookies
- Measuring cups and spoons (Panukat) For accurate measurements
- Wooden spoon For propping oven door during cooling
- Wire Cooling Rack (Optional) For proper cooling
Ingredients
- 1 cup Cornstarch Cornstarch/Corn flour
- ¼ cup Softened Butter Pinalambot na mantikilya
- ⅓ cup Condensed Milk Kondensadang gatas
Instructions
- First, turn on your oven and set it to 325°F. Let it heat up while you get your ingredients ready. Make sure your butter is soft but not melted.
- Put 1 cup cornstarch, ¼ cup soft butter, and ⅓ cup condensed milk in a food processor. Mix everything for about 2 minutes until it forms a soft dough. If you're mixing by hand instead, this will take about 10 minutes. The dough should feel like play dough when it's ready.
- Cover your baking pan with parchment paper. Take your cookie mold or polvoron mold and scoop some dough into it. Press down firmly, scrape off any extra dough, then press it onto your lined pan. Do this with all your dough, leaving a little space between each cookie.
- Put the pan in the oven and bake for 15 minutes. The cookies should stay white - we're drying them out, not browning them. After 15 minutes, turn off the oven but don't take the cookies out. Instead, open the oven door a little bit (you can use a wooden spoon to prop it open) and let the cookies cool inside. This makes them nice and crispy.
- Wait until the oven is completely cool before taking out your cookies - this takes about an hour. When you tap the cookies lightly, they should sound hollow. This means they're done perfectly.
- Let the cookies cool on the counter for another 30 minutes before eating or storing them. When they're done right, they should melt in your mouth. Store them in an airtight container and enjoy!
Tips from Lola's Kitchen
- Room temperature ingredients work best
- Don't overwork the dough to maintain tenderness
- If using manual mixing, knead gently like you're handling delicate bread
- The cookies will firm up as they cool, so don't overbake
- Listen for the hollow sound when tapping - it's the secret to knowing they're done
Nutrition
The Story Behind Puto Seko
Every bite of Puto Seko tells a fascinating story of cultural fusion in Filipino cuisine. These beloved cornstarch cookies, found in practically every Filipino bakery and many home kitchens, actually trace their roots to both Indian and Spanish influences - a perfect example of how Filipino food has evolved through centuries of cultural exchange.
The name itself reveals this rich history. "Puto" comes from the Tamil word "puttu," which means "portioned" - referring to traditional Indian steamed rice portions. When you look at other Filipino puto varieties like puto bumbong or traditional white puto, you can see this connection to Indian steamed rice treats. The "seko" part comes from the Spanish word "seco," meaning dry - a perfect description of these crumbly, melt-in-your-mouth cookies.
Originally, Filipino bakers made Puto Seko with a combination of rice flour and cornstarch, creating treats that connected the islands' native rice-based snacks with European cookie-making techniques. Over time, home bakers discovered that using mainly cornstarch created an even more delicate texture that literally dissolves on your tongue. This modern version became so popular that it's now considered the standard recipe in many Filipino households.
Today's Puto Seko has evolved into something uniquely Filipino, despite its international roots. You'll find these cookies served during merienda (afternoon snack time) alongside hot coffee or tea, packed as pasalubong (food gifts) for loved ones, or displayed proudly during special occasions and holidays. They've become such a staple that many Filipinos have childhood memories of sneaking these treats from their grandmother's cookie jars or buying them fresh from their local panaderia (bakery).
What makes Puto Seko truly special is how it transformed from a traditional rice-based snack into a beloved cookie that perfectly balances Filipino, Indian, and Spanish culinary traditions. The fact that modern versions can be made with just three ingredients shows how Filipino cooks have mastered the art of simplifying recipes while keeping their essential character intact. Whether enjoyed during everyday merienda or special celebrations, Puto Seko remains a testament to the adaptability and creativity of Filipino cooking.
This simple cookie carries centuries of history in every bite, yet remains as relevant today as when it first appeared in Filipino kitchens. It's a delicious reminder of how Filipino cuisine continues to evolve while staying true to its roots - making something uniquely delicious from a world of influences.

Comments
No Comments