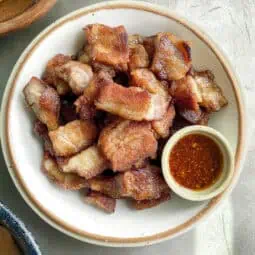
Lechon was always the star of our celebrations. But let's be honest, who has the time or energy to make a whole roasted pig on a regular Tuesday? That's why I fell in love with Pinakupsan, my family's go-to recipe when those crispy lechon cravings hit.
After countless attempts at perfecting this Visayan dish in my own kitchen, I've discovered that this two-ingredient wonder delivers that same addictive crunch and juicy meat we all love about lechon, but with barely any effort.
Just imagine: crispy, golden-brown pork pieces that practically cook themselves in their own fat, ready to be dunked in spicy vinegar or paired with hot rice. I'll become your favorite way to satisfy those lechon cravings without the fuss of deep-frying or the expense of buying from the neighborhood lechon manok stand.
Jump to:
Why You'll Love This Recipe
- Only 2 basic ingredients needed
- No deep frying required - the pork cooks in its own rendered fat
- Achieves that sought-after lechon-like crispiness
- Minimal active cooking time - perfect for busy days
- Versatile - can be used in multiple dishes
- Budget-friendly way to satisfy lechon cravings
Ingredients
This recipe relies on just two simple ingredients for a reason. Pork belly is the star because its perfect balance of meat and fat layers allows it to self-cook and crisp up without added oil.
The fat renders slowly, essentially frying the meat in its own juices while creating that sought-after crackling texture. Salt is the only seasoning needed because it draws out moisture, intensifies the pork's natural flavor, and helps achieve that golden-brown crispiness.
This minimalist approach allows the true essence of the pork to shine through, creating an authentic Visayan dish that captures the beloved flavors of lechon without the complexity.
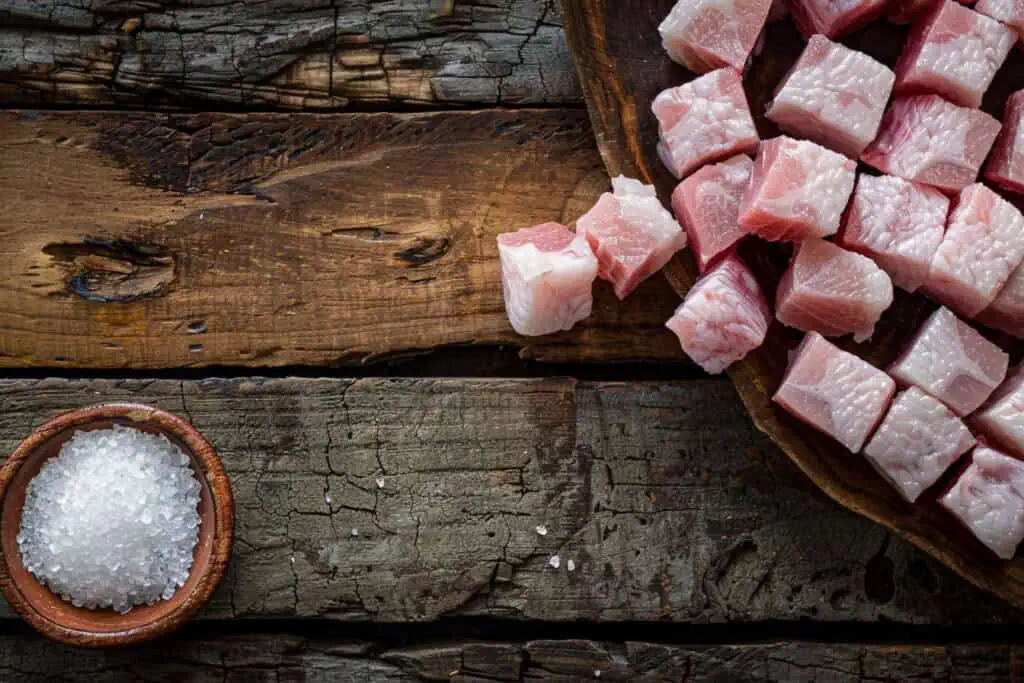
- 2 pounds pork belly (liempo), cut into 2-inch pieces
- 2 teaspoons salt
Equipment
- Thick-bottomed pan (kaserola) – Ensures even heat distribution and prevents burning. A cast iron or heavy stainless steel pan works perfectly.
- Wide spatula (sandok) – Helps turn the meat without breaking the pieces, preserving their integrity.
- Slotted spoon – Essential for removing the cooked pork while leaving the valuable rendered fat in the pan.
- Wire rack – Placing the cooked pork on a rack allows excess oil to drain and helps the pork become even crispier.
- Sharp knife – Necessary for cutting pork belly into uniform pieces, ensuring even cooking.
How To Make
- Cut the pork belly into 2-inch pieces, ensuring each piece has both meat and fat. Season the pork pieces evenly with salt, rubbing the salt all over.
- Heat a thick-bottomed pan over high heat. When hot, place the pork pieces in the pan in a single layer, being careful not to overcrowd them.
- Cook for about 7-10 minutes, turning the pieces occasionally, until you see fat starting to render from the pork. You'll notice clear oil beginning to collect in the pan.
- Once enough oil has collected in the pan, reduce the heat to its lowest setting. Cover the pan and let the pork cook slowly for about 45-50 minutes. Every 10-15 minutes, lift the lid and turn the pieces so they brown evenly.
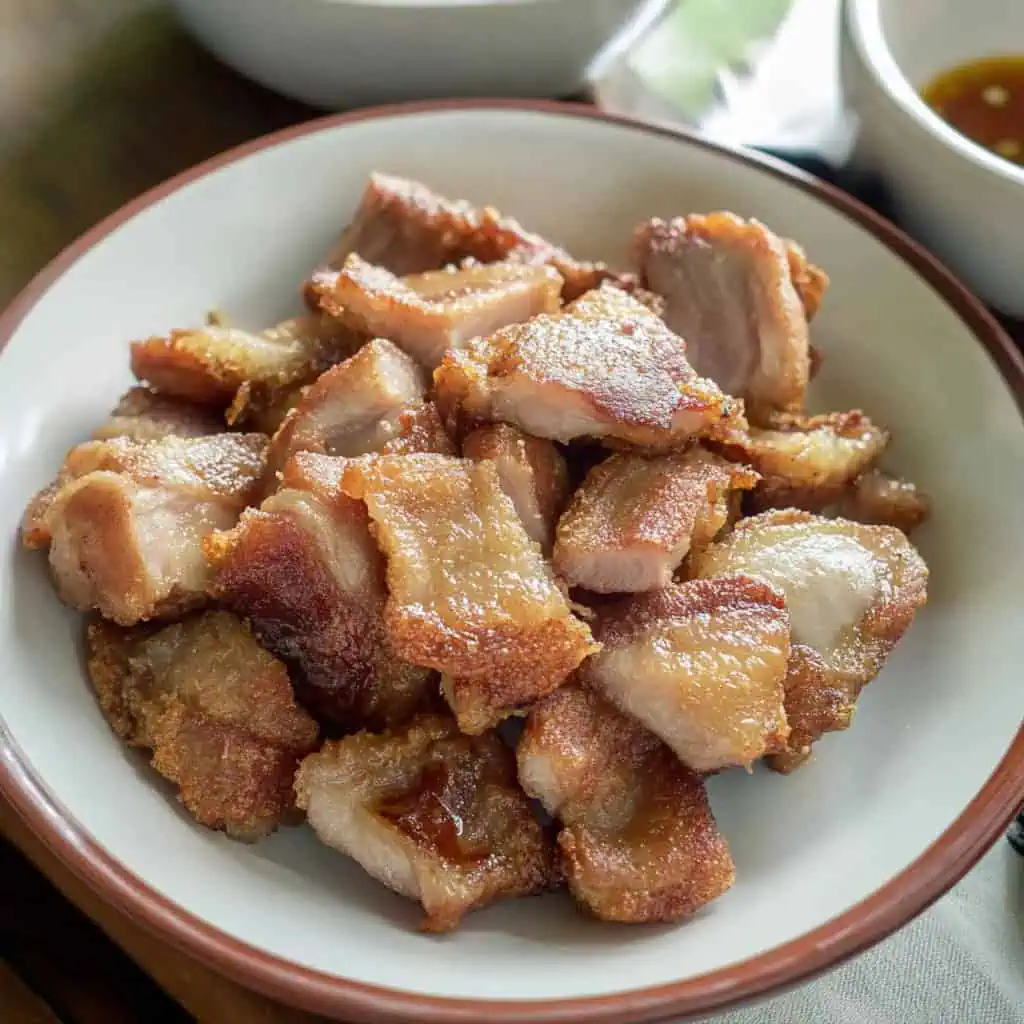
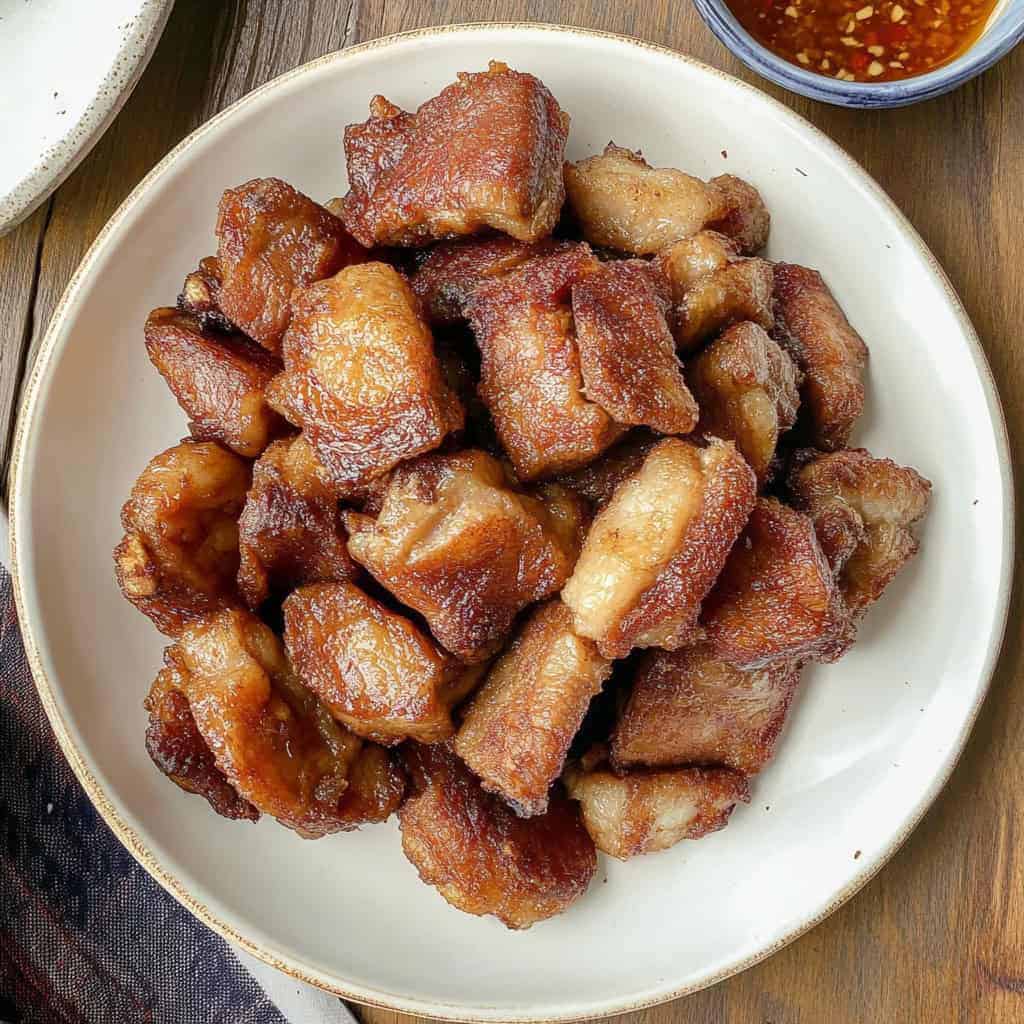
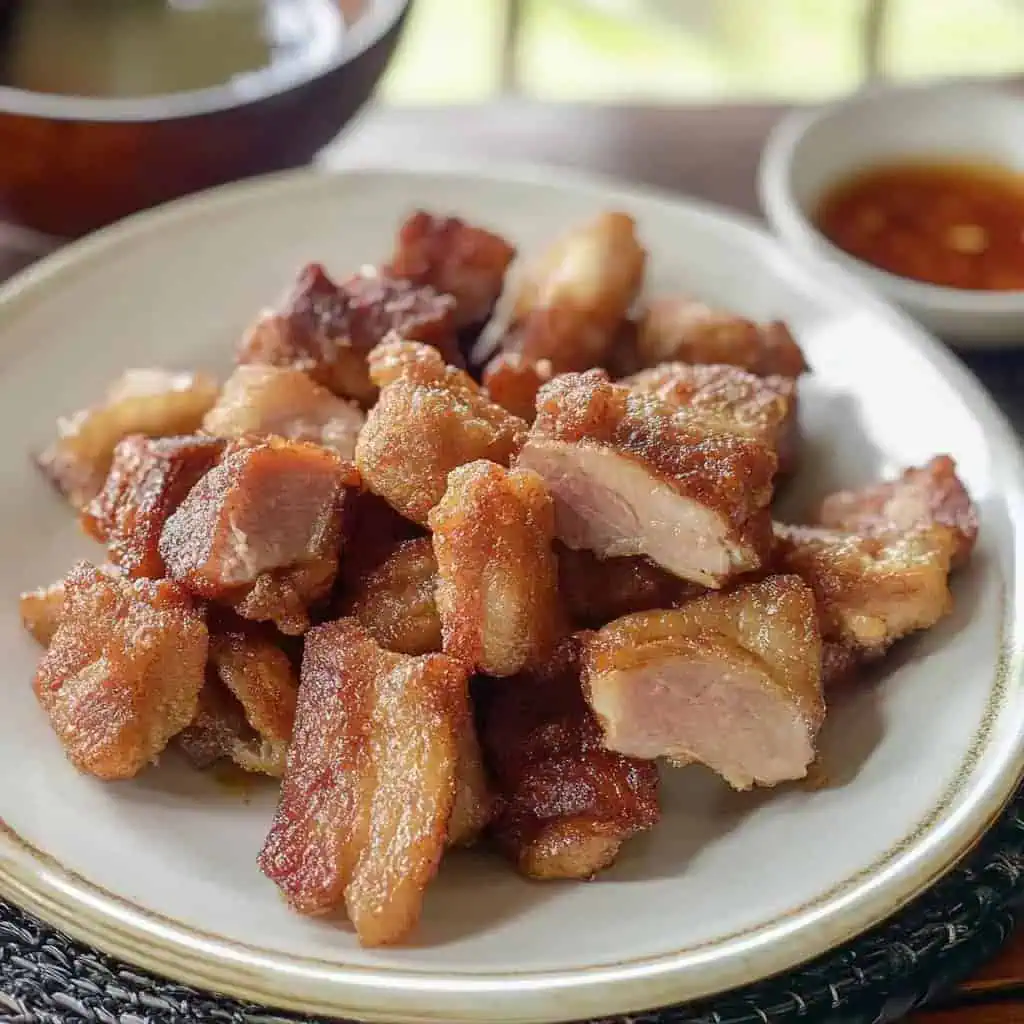
- Continue cooking until the pork turns deep golden brown and the pieces have become smaller and crispier. You can test a piece – it should be crunchy outside but still juicy inside.
- Using a slotted spoon, transfer the crispy pork to a wire rack placed over a tray. Let it rest for 5 minutes – this helps make it even crispier.
- Serve hot with spicy vinegar for dipping.
- Save the pork fat left in the pan – it's perfect for cooking other dishes!
Spicy Vinegar Dip Recipe
- ½ cup white vinegar (suka)
- 2-3 Thai chilies (siling labuyo), chopped
- 2 cloves garlic, minced
- Salt and pepper to taste
Simply mix all ingredients together and serve alongside your crispy Pinakupsan.

Tips from Lola's Kitchen
Choose the right cut – Look for pork belly with beautiful layers of fat and meat for the best results.
Don't crowd the pan – Cook in batches if necessary to ensure proper browning and crisping.
Low and slow – The slower you cook, the crispier the result. Patience yields the best texture.
Save that liquid gold – The rendered fat (mantika) is precious for future cooking and adds incredible flavor to other dishes.
Add aromatics – Whole garlic cloves added during cooking infuse the pork with extra flavor.
Listen to your food – The sizzling sound should lessen before covering the pan—this indicates the fat has rendered properly.
Rest before serving – Allowing the pork to rest on a wire rack helps excess fat drain and increases crispiness.
Substitutions
Pork cut alternatives – Pork shoulder can work, though it's less fatty and won't be quite as crispy.
Salt options – Rock salt (tultul) provides a more rustic flavor profile.
Healthier version – While not traditional, leaner pork cuts can be used, but note that results will be less crispy.
Flavor additions – Ground black pepper or garlic powder can be added to the salt rub for more complexity.
Troubleshooting
Not Crispy Enough?
- Cook longer on low heat – patience is key
- Ensure pork pieces aren't too large – smaller pieces crisp better
- Check if pan temperature is too high – high heat can sear the outside without rendering the fat properly
Too Salty?
- Serve with vinegar dip – the acidity balances the saltiness
- Pair with unseasoned sides like plain rice or vegetables
- Use less salt next time – you can always add more at the table
Meat Still Tough?
- Continue cooking on low heat – tough meat needs more time
- Check pork quality – older animals have tougher meat
- Cut against the grain when serving for more tenderness
Storage & Reheating
Refrigeration – Store in an airtight container in the refrigerator for up to 3 days.
Freezing – Can be frozen for up to 1 month. Wrap tightly to prevent freezer burn.
Reheating – For best results, reheat in a pan over medium heat until crispy again. Avoid microwave reheating as it makes the meat chewy and soft.
Make-ahead tip – You can pre-cook the pork until almost done, then finish the crisping process just before serving.
FAQ
Can I use other cuts of pork?
While you can use other cuts, pork belly gives the best results due to its fat content. The fat is essential for self-basting and creating that signature crispy texture.
How do I know when it's done?
The pork should be golden brown, reduced in size, and crispy on the outside while remaining juicy inside. If you're uncertain, take a piece out and test it.
Can I make this in advance?
Yes, but it's best served fresh. If making ahead, slightly undercook it, then reheat in a pan to restore crispiness just before serving.
Why isn't my pork getting crispy?
The most common reasons are cooking at too high a temperature, not cooking long enough, or using meat with insufficient fat content. Remember that crispiness comes from the slow rendering of fat.
Can I add other seasonings?
Yes, but traditionally, only salt is used to let the pork's natural flavor shine. If you're new to the dish, try the authentic version first before experimenting with additions.
What's the difference between Pinakupsan and Lechon Kawali?
Pinakupsan is slow-cooked in its own fat without pre-boiling, while Lechon Kawali is typically boiled first, then deep-fried. Pinakupsan has a more concentrated flavor and a different texture.
Is this dish healthy?
Pinakupsan is a traditional indulgence rather than a health food. Enjoy it in moderation as part of a balanced diet.
Can I use an air fryer instead?
While not traditional, an air fryer can work for the final crisping stage after the fat has rendered in a pan. The results will be different but still delicious.
Related
Looking for other recipes like this? Try these:


Pinakupsan (Visayan-Style Crispy Pork Belly)
Equipment
- Thick-bottomed pan (kaserola) ensures even heat distribution and prevents burning
- Wide spatula (sandok) for turning the meat without breaking
- Slotted spoon (sandok na butas) for removing the cooked pork while leaving the rendered fat
- Wire rack (cooling rack) for draining excess oil
- Sharp knife (mataling kutsilyo) for cutting pork belly into uniform pieces
Ingredients
- 2 pounds pork belly liempo, cut into 2-inch pieces
- 2 teaspoons salt asin
Instructions
- Cut the pork belly into 2-inch pieces, making sure each piece has both meat and fat. Season the pork pieces evenly with salt, rubbing the salt all over.
- Heat a thick-bottomed pan over high heat. When hot, place the pork pieces in the pan in a single layer, making sure not to overcrowd them.
- Cook for about 7-10 minutes, turning the pieces occasionally, until you see fat starting to come out from the pork. You'll notice clear oil beginning to collect in the pan.
- Once you see enough oil in the pan, turn the heat down to its lowest setting. Cover the pan and let the pork cook slowly for about 45-50 minutes. Every 10-15 minutes, lift the lid and turn the pieces so they brown evenly.
- Keep cooking until the pork turns deep golden brown and the pieces have become smaller and crispier. You can test a piece - it should be crunchy outside but still juicy inside.
- Using a slotted spoon, transfer the crispy pork to a wire rack placed over a tray. Let it rest for 5 minutes - this helps make it even crispier.
- Serve hot with spicy vinegar for dipping. For the vinegar dip, simply mix vinegar with chopped chilies, minced garlic, and a pinch of salt and pepper.
- Keep the pork fat that's left in the pan - it's perfect for cooking other dishes!
Tips from Lola's Kitchen
- Choose pork belly with layers of fat and meat for the best results
- Don't crowd the pan - cook in batches if necessary
- The slower you cook, the crispier the result
- Save the rendered fat (mantika) for future cooking
- Add whole garlic cloves during cooking for extra flavor
- Listen for the sizzling sound to lessen before covering the pan
Nutrition
The Story Behind Pinakupsan
Born in the heart of the Visayas, Pinakupsan stands as a testament to Filipino culinary ingenuity, where necessity birthed a brilliant cooking technique that transforms humble pork belly into crispy, golden morsels rivaling the famous lechon. This traditional method of slow-cooking pork in its own fat emerged as a practical alternative to the more elaborate process of preparing lechon, especially for families who craved that signature crispy-skinned pork without the time and resource demands of roasting an entire pig.
The name itself, "Pinakupsan," comes from the Visayan word "kupsan," which refers to the process of rendering fat from meat. This cooking technique has been passed down through generations of Visayan households, where home cooks discovered that patiently allowing pork to cook in its own rendered fat not only preserved the meat but also created an irresistibly crispy texture that's become the hallmark of this dish. Unlike its cousins lechon kawali or bagnet, which require deep frying, Pinakupsan achieves its crackling exterior through a gentler, more natural process.
In today's fast-paced world, where traditional recipes often get simplified or forgotten, Pinakupsan has not only survived but thrived, particularly in home kitchens across the Philippines. Its popularity has grown beyond the Visayas, reaching Manila and other regions, where busy families appreciate its simple preparation method and incredible results. The dish embodies the Filipino value of "diskarte" - finding clever solutions to everyday challenges - by creating something extraordinary from just pork belly and salt. Whether served as pulutan during gatherings, paired with hot rice for a satisfying meal, or added to other dishes like monggo or pinakbet, Pinakupsan continues to prove that sometimes the simplest recipes yield the most memorable flavors.
Modern Filipino food enthusiasts have embraced this traditional cooking method not just for its delicious results, but also because it aligns with contemporary cooking trends that favor minimal waste and maximum flavor. The rendered pork fat, a precious by-product of the cooking process, becomes a valuable kitchen ingredient itself, used to enhance the flavor of other Filipino dishes. This zero-waste approach to cooking, inherent in the Pinakupsan method, shows how our ancestors' wisdom continues to resonate with today's sustainable cooking practices.


Comments
No Comments