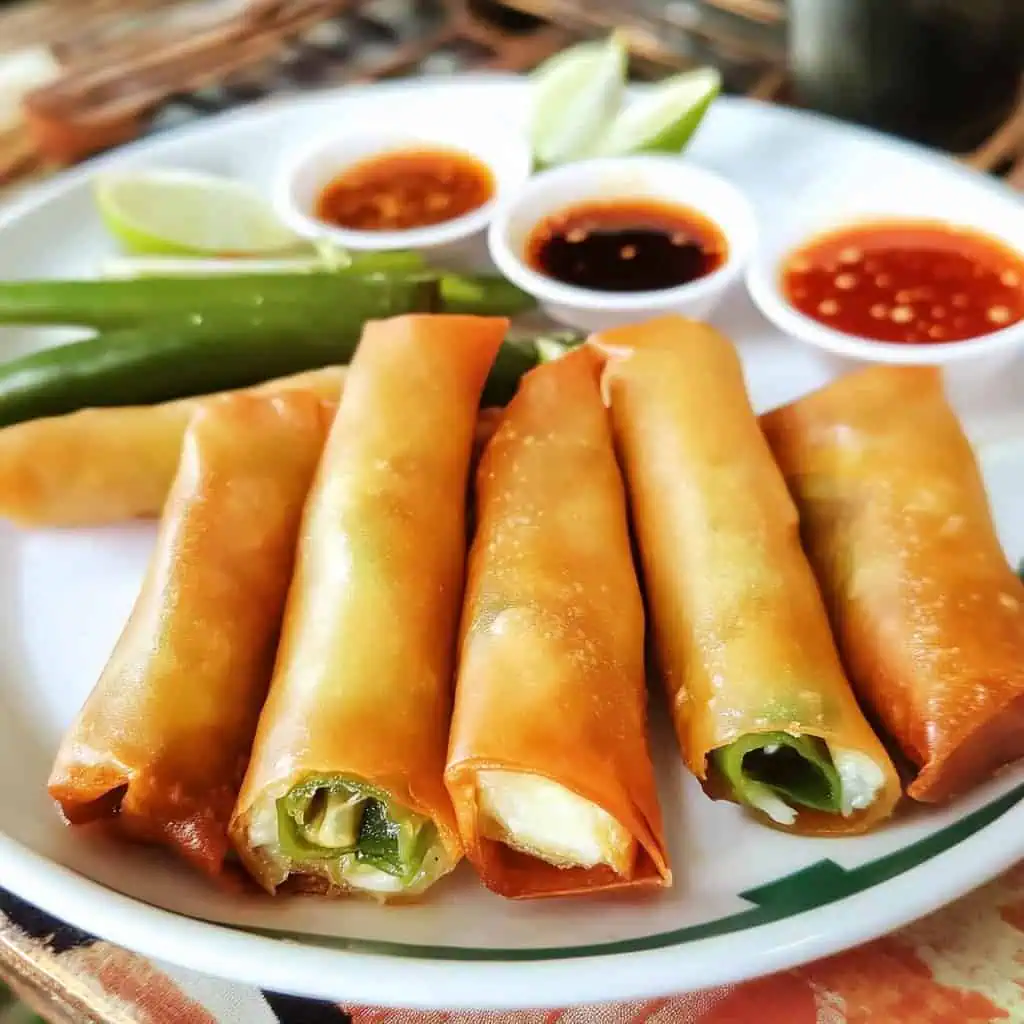
Let me tell you about my absolute favorite party trick: this Homemade Dynamite Lumpia recipe that never fails to turn our simple family gatherings into memorable taste-testing challenges. As someone who grew up watching my titas compete over who makes the best lumpia, I decided to spice things up (literally) by mastering this modern Filipino appetizer.
The first time I served these crispy, cheese-stuffed chili rolls, my cousins went from confidently saying "Kaya ko yan!" to frantically reaching for water while insisting "Masarap naman" between laughs.
What makes this recipe extra special isn't just the perfectly balanced heat of the siling haba or the stretchy cheese pull that's totally Instagram-worthy, it's how it brings everyone together, turning ordinary pulutan sessions into hilarious spice-tolerance challenges.
Once you master this Dynamite Lumpia recipe, you'll become the designated pulutan provider at every inuman, the MVP of family potlucks, and that friend who always gets tagged in spicy food challenges.
I'm sharing all my tried-and-tested tips to help you nail this recipe. And yes, I'll teach you how to control the heat level so you can still impress your friends without sending them running for the nearest water station.
Jump to:
Why You'll Love This Recipe
- Perfect Party Food: Creates an exciting conversation starter that combines familiar lumpia with a spicy twist
- Customizable Heat: Easy to adjust spiciness levels by controlling chili seed removal
- Make-Ahead Friendly: Can be prepared in advance and frozen for up to 3 months
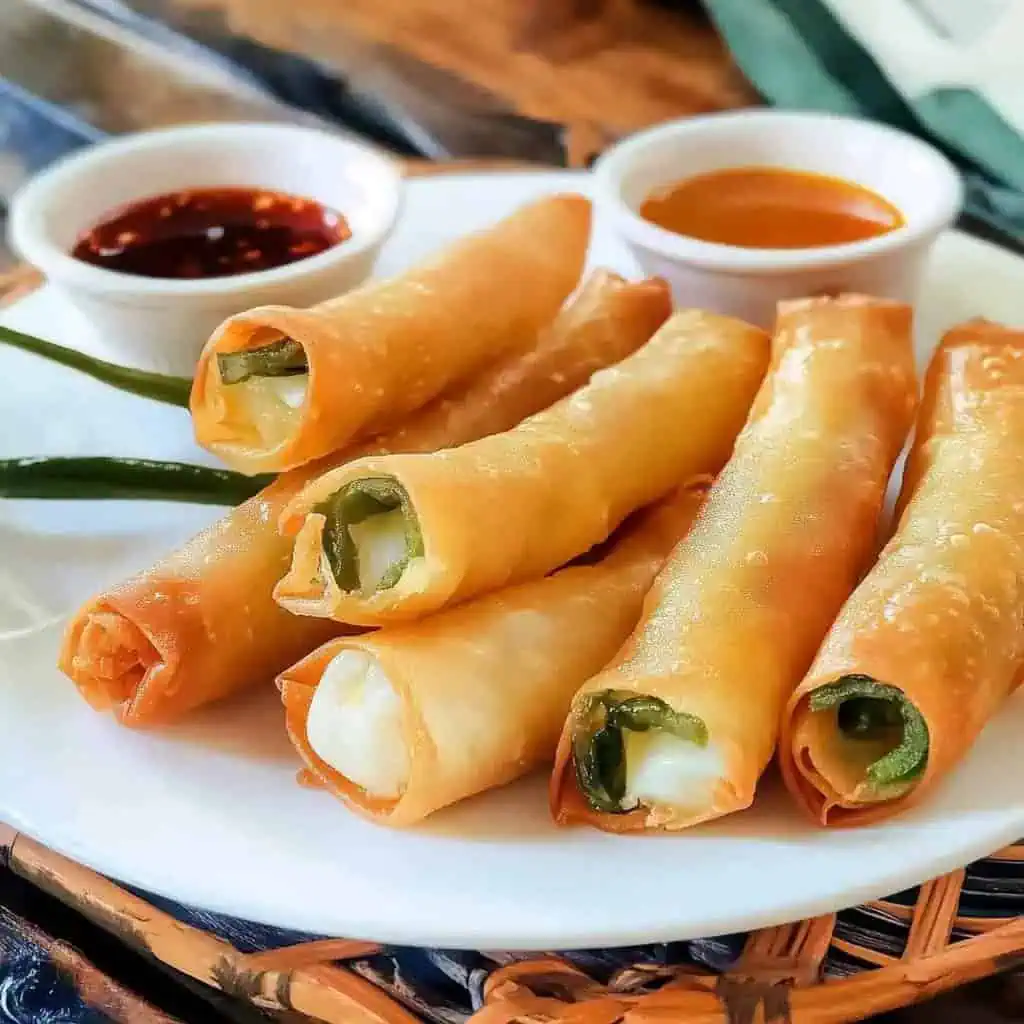
- Impressive Presentation: The exposed green chili stems create an eye-catching display
- Stretchy Cheese Pull: The optional cheese filling creates Instagram-worthy moments
- Crowd Pleaser: Balances crispy texture, savory meat, and controllable heat
Ingredients
These ingredients create the perfect balance of flavors and textures in Dynamite Lumpia. Finger chilies provide the signature heat while their hollow shape makes them ideal for stuffing.
Ground pork delivers rich savory flavor and juicy texture, while garlic and green onions add aromatic depth. The optional cheese mellows the heat and creates that irresistible stretchy pull when bitten. Spring roll wrappers seal everything together and fry to a golden crisp, creating a contrast between the crunchy exterior and tender filling.
This combination delivers a perfect bite with multiple layers of flavor - spicy, savory, crispy, and creamy all at once.

For the Filling:
- 30 pieces finger chilies (siling haba)
- 1 pound (450g) ground pork
- 2 cloves garlic, minced
- ½ cup green onions, finely chopped
- 1 teaspoon salt
- ¼ teaspoon ground black pepper
- Optional: 30 thin strips quick-melt cheese
For Assembly:
- 30 pieces spring roll wrappers
- Canola oil for deep frying
- Water for sealing
Equipment Needed
- Deep frying pan or kawali: Essential for achieving that perfect golden-brown exterior. The traditional Filipino wok (kawali) distributes heat evenly for consistent cooking.
- Kitchen thermometer: Helps maintain the ideal oil temperature of 350°F (175°C) for crispy results without oil absorption.
- Paper towels: For drying chilies thoroughly and absorbing excess oil after frying.
- Wire cooling rack: Allows air circulation under the fried lumpia, preventing sogginess.
- Small knife: For precise slitting and deseeding of chilies.
- Teaspoon: Perfect size for stuffing chilies with filling.
- Wooden chopstick: Used to test oil temperature - small bubbles should form around it when ready.
How To Make
- Begin by preparing the finger chilies. Make a careful lengthwise slit on one side of each chili, keeping the stem intact. Using a teaspoon, gently remove all seeds and white membrane. Rinse the chilies under cold water to remove any remaining seeds, then pat them completely dry with paper towels to prevent oil splatter during frying.
- In a large bowl, prepare the filling by thoroughly combining ground pork, minced garlic, finely chopped green onions, salt, and ground black pepper until well mixed.
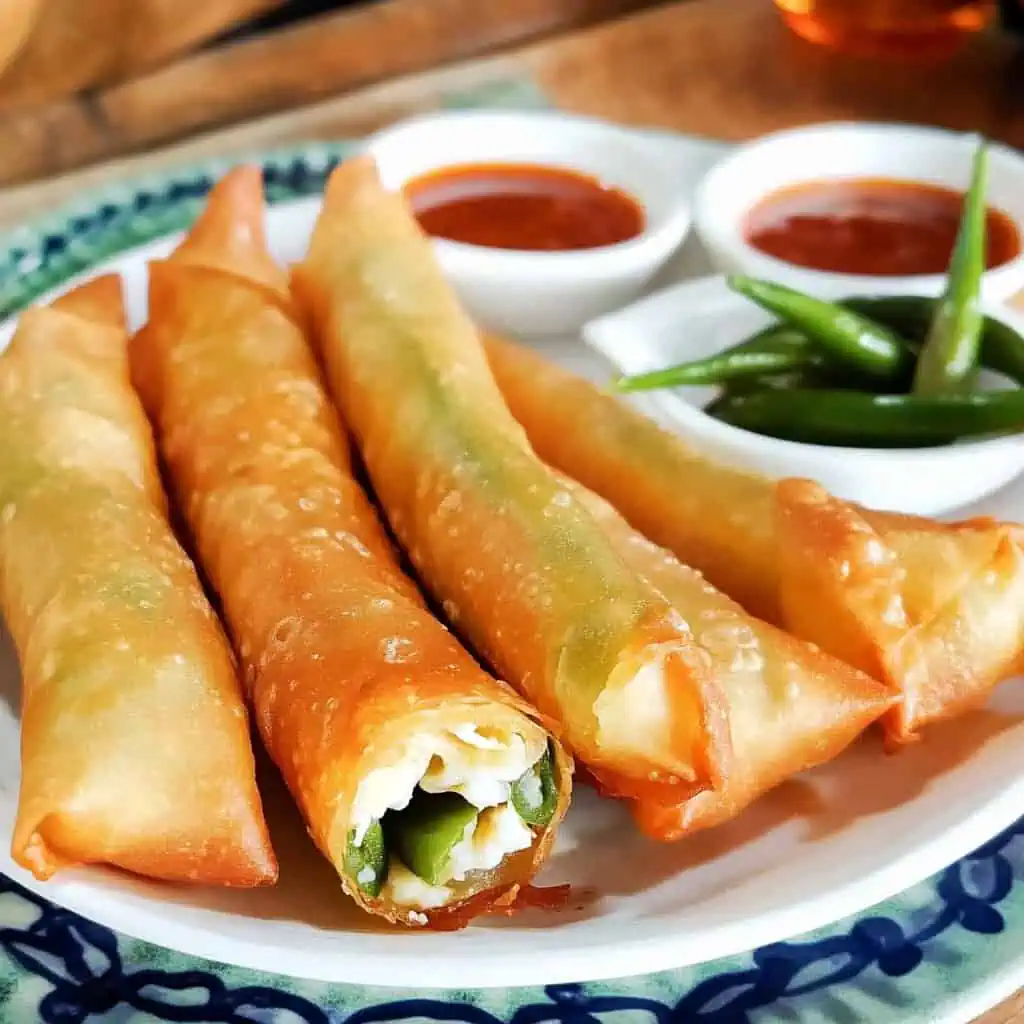
- For assembly, position a lumpia wrapper in a diamond shape on your work surface. Carefully stuff a prepared chili with the pork mixture using a teaspoon. If desired, place a thin strip of cheese inside the chili for extra flavor. Place the stuffed chili horizontally near the bottom corner of the wrapper.
- Fold the bottom corner over the filling, then fold both side corners inward. Roll the lumpia tightly upward, leaving the chili stem exposed. Seal the edges with water. Continue this process with remaining ingredients.
- Heat canola oil in a deep frying pan or kawali to 350°F (175°C). You can test the oil temperature by inserting a wooden chopstick - small bubbles should form around it. Fry the lumpia in batches for 7-10 minutes, turning occasionally until they achieve a golden brown color. Avoid overcrowding the pan to maintain oil temperature.
- Remove the cooked lumpia using a slotted spoon and place them on a wire rack to drain excess oil. Serve hot with sweet chili sauce or your preferred dipping sauce.

Tips from Lola's Kitchen
- Select uniform chilies: Choose chilies of similar size for even cooking and consistent heat levels.
- Thorough deseeding is key: Remove ALL seeds and membrane to control the heat - this makes a huge difference!
- Double-wrap when needed: If a wrapper tears, don't panic - simply use a second wrapper to secure everything.
- Test oil properly: The wooden chopstick method is more reliable than guessing - look for those small, steady bubbles.
- Patience pays off: Maintain proper oil temperature by frying in small batches rather than rushing and overcrowding.
- Dry chilies completely: Even small amounts of moisture can cause dangerous oil splatter - take your time to pat them dry.
- Pre-chill before wrapping: Refrigerating the stuffed chilies for 15 minutes before wrapping makes them easier to handle.
- Watch the wrapper edges: Keep edges clean from filling to ensure proper sealing.
Substitutions
- Meat options: Ground chicken or turkey work well as lighter alternatives to pork.
- Non-spicy version: Bell peppers can replace chilies for a completely mild version.
- Vegetarian filling: Finely chopped mushrooms, tofu, and carrots create a delicious meat-free alternative.
- Wrapper alternatives: Rice paper wrappers can be used for a lighter, non-fried version.
- Cheese varieties: While quick-melt cheese is traditional, pepper jack adds extra flavor, or cream cheese provides a cooling effect.
- Oil choices: While canola oil is ideal, vegetable or peanut oil also work well for frying.
- Gluten-free option: Rice paper or gluten-free spring roll wrappers can accommodate dietary restrictions.
Troubleshooting
Problem: Wrapper breaking during rolling
- Solution: Ensure chilies are completely dry before wrapping
- Check that wrappers are fresh and not dried out
- Don't overstuff the chilies
- Try double-wrapping particularly fragile areas
Problem: Filling not cooking thoroughly
- Solution: Maintain proper oil temperature at 350°F
- Make smaller, thinner rolls for more even cooking
- Pre-cook the pork filling slightly before stuffing if concerned
- Ensure you're not overcrowding the pan, which drops temperature
Problem: Lumpia is too spicy
- Solution: Remove ALL seeds and white membrane meticulously
- Serve with cooling dips like sour cream or yogurt
- Add more cheese to the filling to balance heat
- Soak deseeded chilies in cold water for 30 minutes before using
Problem: Lumpia becoming soggy quickly
- Solution: Ensure oil is hot enough when frying
- Drain thoroughly on a wire rack, not paper towels
- Keep warm in a 200°F oven until serving
- Avoid covering hot lumpia, which traps steam
Storage & Reheating
Storage:
- Uncooked: Freeze in a single layer on a baking sheet, then transfer to airtight containers or freezer bags with parchment between layers. Keep frozen for up to 3 months.
- Cooked: Refrigerate in an airtight container for up to 2 days.
- To prevent sticking, place parchment paper between layers.
Reheating:
- Oven: Preheat to 350°F, place on wire rack over baking sheet, heat for 5-7 minutes until crispy and heated through.
- Air fryer: 350°F for 3-4 minutes for perfect crispiness restoration.
- Avoid microwave: This will make the wrapper soggy and rubbery.
- From frozen (uncooked): Fry directly from frozen, adding 1-2 minutes to cooking time.
FAQ
Can I make these ahead for a party?
Absolutely! You can prepare them completely, freeze uncooked, and fry directly from frozen when needed. Add 1-2 minutes to frying time.
How do I reduce the spiciness for guests who can't handle heat?
Remove ALL seeds and white membrane, soak chilies in cold water for 30 minutes, add extra cheese inside, and serve with cooling dips like sour cream.
Can I air fry these instead of deep frying?
Yes! Preheat your air fryer to 375°F, spray the lumpia with oil, and cook for 8-10 minutes, turning halfway through for even browning.
How do I keep them crispy for a buffet-style party?
Place them on a wire rack in a warm oven (200°F) until serving. Avoid covering them while hot, as trapped steam causes sogginess.
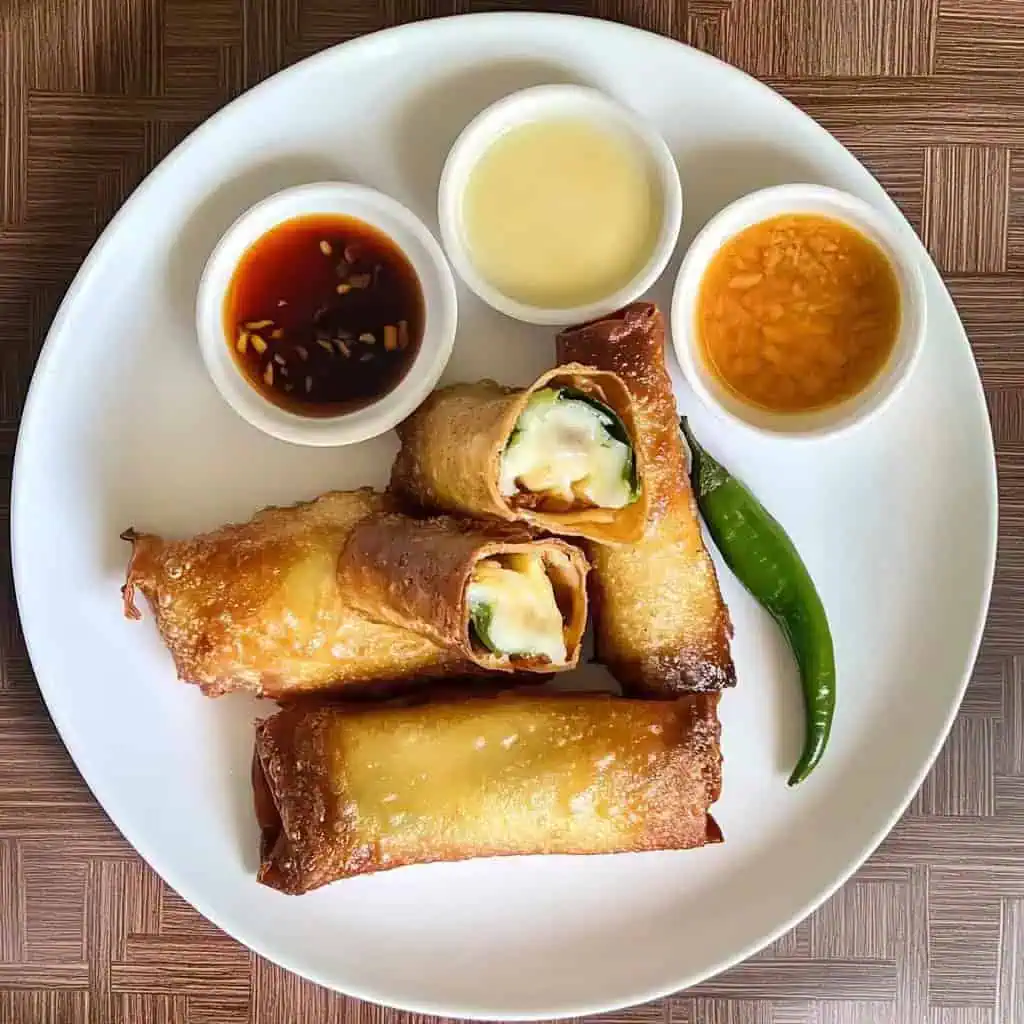
What's the best dipping sauce to serve with Dynamite Lumpia?
Sweet chili sauce is traditional, but garlic mayo, spiced vinegar, and sweet and sour sauce are also excellent options. Offer a variety for guests to choose their preference.
Can I prepare the filling a day ahead?
Yes, the meat filling can be prepared up to 24 hours ahead and stored in the refrigerator. This actually allows flavors to develop better.
Are there any shortcuts for faster preparation?
Pre-deseed all chilies the day before and refrigerate. You can also use pre-minced garlic and pre-chopped green onions to save time.
How can I tell when they're perfectly cooked?
They should be golden brown, and if you cut one open, the meat filling should be fully cooked with no pink remaining.
Related
Looking for other recipes like this? Try these:


Dynamite Lumpia
Equipment
- Deep frying pan or kawali
- Kitchen thermometer (recommended)
- Paper towels
- Wire cooling rack
- Small knife for deseeding
- Teaspoon for stuffing
Ingredients
For the Filling:
- 30 pieces finger chilies siling haba
- 1 pound 450g ground pork
- 2 cloves garlic minced (bawang, trinurang)
- ½ cup green onions finely chopped (dahon ng sibuyas)
- 1 teaspoon salt asin
- ¼ teaspoon ground black pepper paminta
- Optional: 30 thin strips quick-melt cheese
For Assembly:
- 30 pieces spring roll wrappers lumpia wrapper
- Canola oil for deep frying
- Water for sealing
Instructions
- Begin by preparing the finger chilies (siling haba). Make a careful lengthwise slit on one side of each chili, keeping the stem intact. Using a teaspoon, gently remove all seeds and white membrane. Rinse the chilies under cold water to remove any remaining seeds, then pat them completely dry with paper towels to prevent oil splatter during frying.
- In a large bowl, prepare the filling by thoroughly combining ground pork, minced garlic, finely chopped green onions, salt (asin), and ground black pepper (paminta) until well mixed.
- For assembly (pagbabalot), position a lumpia wrapper in a diamond shape on your work surface. Carefully stuff a prepared chili with the pork mixture using a teaspoon. If desired, place a thin strip of cheese inside the chili for extra flavor. Place the stuffed chili horizontally near the bottom corner of the wrapper.
- Fold the bottom corner over the filling, then fold both side corners inward. Roll the lumpia tightly upward, leaving the chili stem exposed. Seal the edges with water. Continue this process with remaining ingredients.
- Heat canola oil in a deep frying pan or kawali to 350°F (175°C). You can test the oil temperature by inserting a wooden chopstick - small bubbles should form around it. Fry the lumpia in batches for 7-10 minutes, turning occasionally until they achieve a golden brown color (hanggang maging gintong-brown). Avoid overcrowding the pan to maintain oil temperature.
- Remove the cooked lumpia using a slotted spoon and place them on a wire rack to drain excess oil. Serve hot with sweet chili sauce (suka't sili) or your preferred dipping sauce. For storage, uncooked lumpia can be frozen for up to 3 months, while cooked ones should be consumed within 2 days when refrigerated.
Tips from Lola's Kitchen
- Choose chilies of similar size for even cooking
- Remove ALL seeds to reduce heat level
- If wrapper tears, double-wrap it
- Test oil temperature with a wooden chopstick - small bubbles should form around it
- Never leave hot oil unattended
- Pat chilies completely dry to prevent oil splatter
Nutrition
The Story Behind Dynamite Lumpia
The creation of Dynamite Lumpia represents the innovative spirit of modern Filipino cuisine, where traditional lumpia-making techniques meet contemporary flavors. This fusion appetizer, which emerged in the bustling streets of Metro Manila during the early 2000s, quickly became a standout variation of the classic Filipino spring roll that we all know and love.
Unlike traditional lumpiang shanghai, which solely relies on meat filling, Dynamite Lumpia introduces whole finger chilies (siling haba) as its star ingredient. This brilliant adaptation was reportedly inspired by Japanese tempura-style stuffed peppers, but Filipino cooks made it their own by wrapping the stuffed chilies in lumpia wrappers and deep-frying them to golden perfection. The name "Dynamite" comes from its explosive combination of flavors and the surprise heat that comes with each bite.
What started as a creative bar food or "pulutan" in local Filipino restaurants soon found its way into family celebrations, birthday parties, and holiday gatherings. Its popularity soared particularly during major boxing match viewings, where Filipino families and friends would gather around television sets with plates full of these spicy treats. The dish perfectly embodies the Filipino love for combining different textures and flavors – crispy exterior, tender meat filling, and the gentle heat of chilies all in one bite.
Today, Dynamite Lumpia has evolved beyond its original recipe, with creative cooks adding cheese, seafood, and even vegetarian variations to the classic pork filling. You'll find these crispy rolls being served everywhere from high-end Filipino restaurants to humble carinderia stalls, proving that great food innovation knows no bounds. Whether you're hosting a party, attending a potluck, or simply craving a spicy snack, this modern Filipino appetizer delivers an unforgettable flavor experience that keeps people coming back for more.
What makes this recipe particularly special is its versatility and crowd-pleasing nature. While traditional lumpia is always a hit, Dynamite Lumpia adds that extra element of excitement and surprise that makes it a conversation starter at any gathering. The combination of familiar lumpia elements with the unexpected heat of whole chilies creates a unique Filipino food experience that perfectly represents our evolving culinary landscape.
Comments
No Comments